
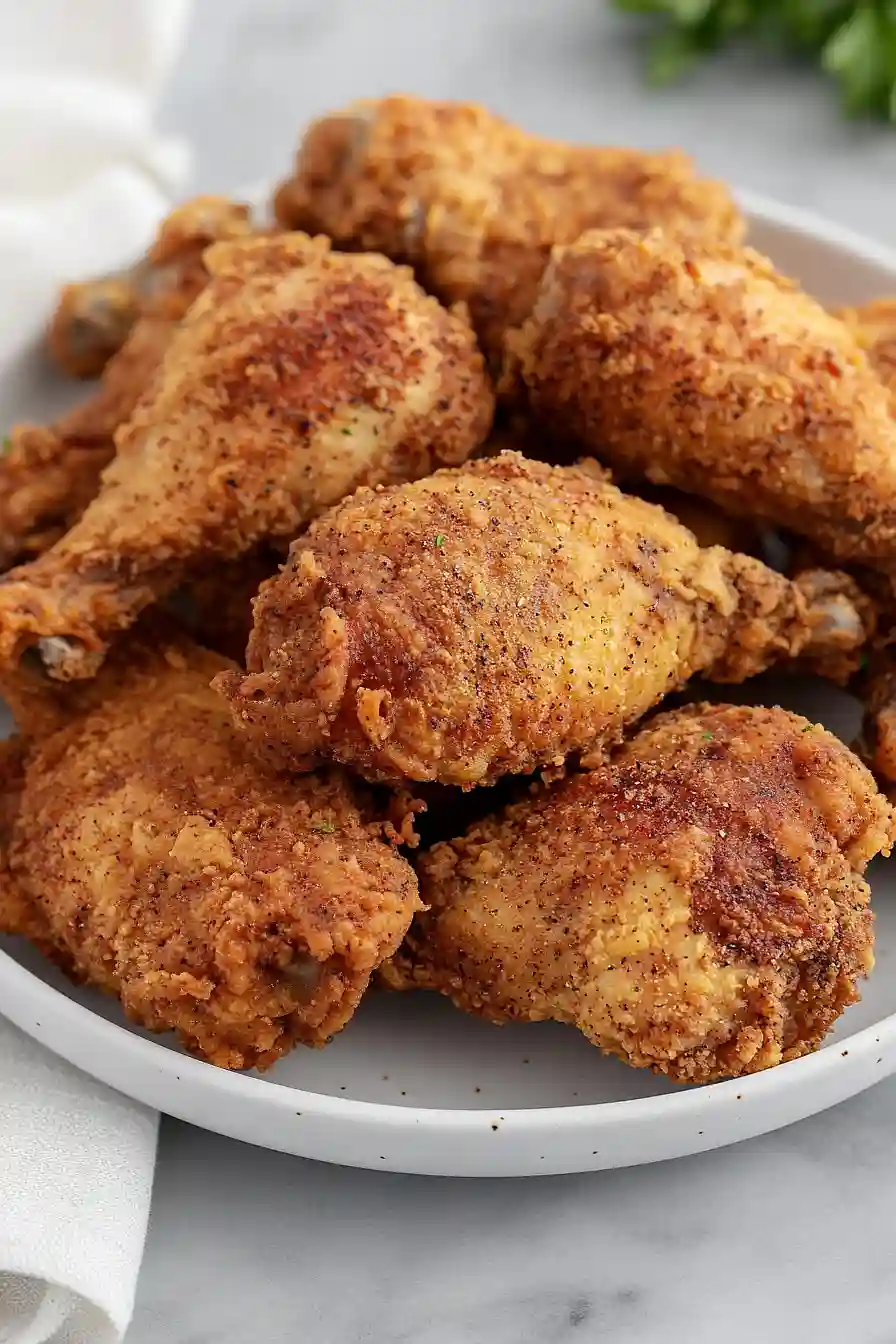
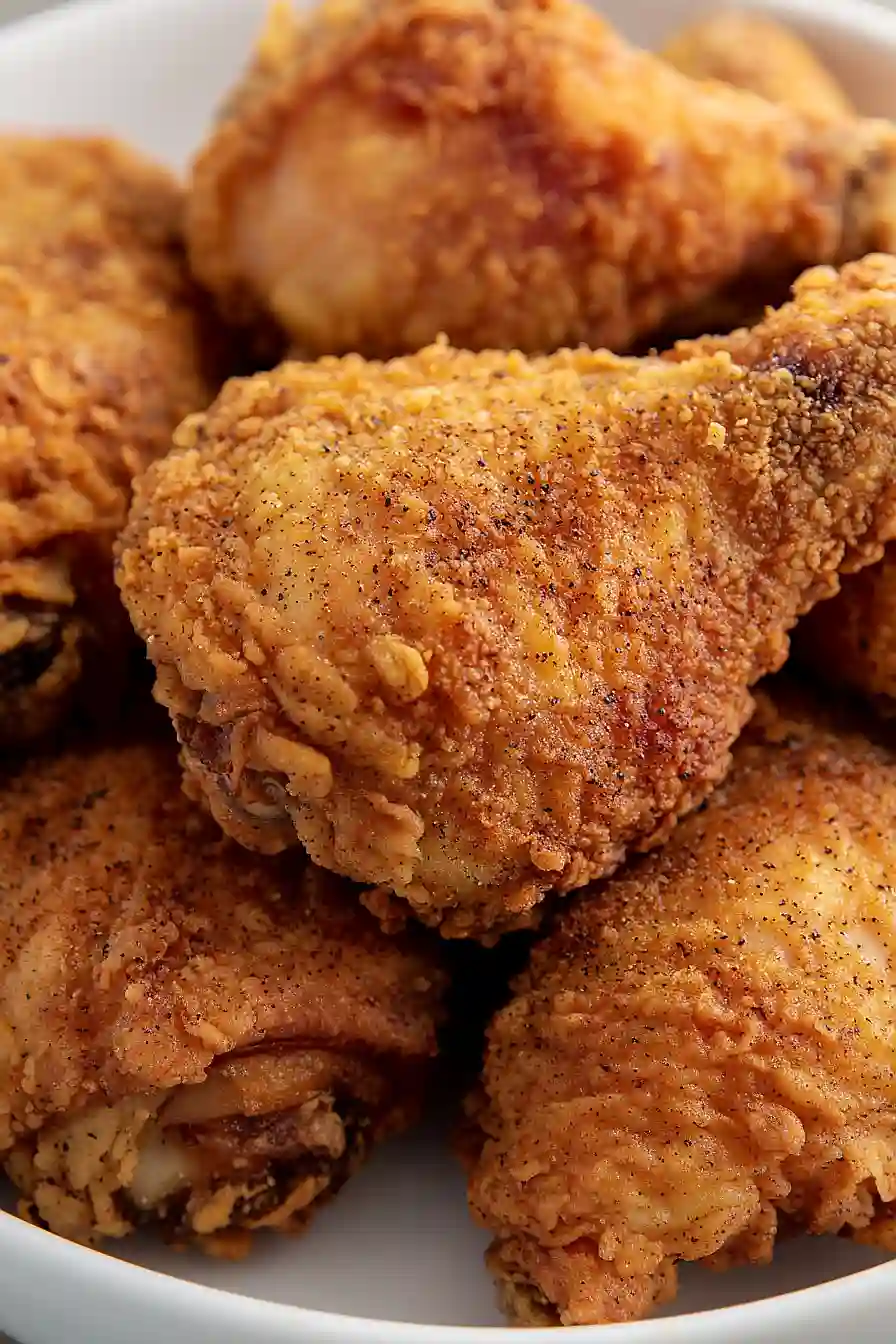
There’s nothing quite like biting into perfectly crispy fried chicken. The crunch, the juicy meat inside, the way it makes everyone at the dinner table happy. But when gluten became an issue in our house, I thought those days were over. I was wrong, and I’m so glad about that.
It took me a while to figure out the right combination of flours and seasonings. I tried rice flour, almond flour, and even potato starch. Some attempts were too gritty, others fell right off the chicken. But once I cracked the code, this gluten-free version became even more popular than my old recipe.
The secret isn’t just in the flour blend. It’s in the technique too. Double-dredging, the right oil temperature, and letting the coating rest for a few minutes before frying. These little steps make all the difference between soggy disappointment and crispy perfection.

Why You’ll Love This Gluten-Free Fried Chicken
- Gluten-free without sacrificing flavor – You won’t even miss the regular flour – this coating gets just as crispy and golden as traditional fried chicken, making it perfect for anyone avoiding gluten.
- Crispy, seasoned coating – The blend of herbs and spices creates a flavorful crust that’s packed with garlic, onion, and aromatic herbs that make every bite delicious.
- Dairy-free friendly – You can easily swap the milk for almond, cashew, or coconut milk, making this recipe work for multiple dietary needs without changing the taste.
- Classic comfort food – This recipe delivers all the satisfaction of traditional fried chicken – juicy meat with a perfectly crunchy exterior that the whole family will love.
What Kind of Chicken Should I Use?
For the best gluten-free fried chicken, I recommend using a mix of thighs and drumsticks like this recipe calls for, since dark meat stays juicier and more flavorful than white meat during frying. You can definitely use all thighs or all drumsticks if you prefer one over the other, or even substitute with chicken wings for a party-friendly option. If you want to use chicken breasts, just keep in mind they cook faster and can dry out more easily, so you’ll need to watch your cooking time closely. Fresh chicken works best, but if you’re using frozen, make sure it’s completely thawed and patted dry before starting your buttermilk soak.
Options for Substitutions
This gluten-free fried chicken recipe has some room for swaps, but a few ingredients are pretty important to keep:
- Gluten-free flour: This is the star of the show for keeping things gluten-free, so don’t substitute this one! Different brands work differently, so stick with a good all-purpose blend like Bob’s Red Mill or King Arthur.
- Cornstarch: You can swap this with potato starch or arrowroot powder in equal amounts. Both will give you that crispy coating you’re after.
- Milk: Any milk works here – whole milk, buttermilk, or the dairy-free options mentioned. If using buttermilk, skip the vinegar since it’s already acidic.
- Chicken pieces: Feel free to use all thighs, all drumsticks, or even chicken breasts cut into strips. Just adjust cooking time – breasts cook faster than dark meat.
- Dried herbs: Mix and match these based on what you have. Italian seasoning can replace the thyme, oregano, and basil combo, or try poultry seasoning for a different flavor.
- Frying oil: Peanut oil is great, but vegetable oil, canola oil, or even avocado oil work well too. Just make sure whatever you use can handle high heat.
Watch Out for These Mistakes While Cooking
The biggest mistake when making gluten-free fried chicken is not letting the chicken marinate in the buttermilk mixture for at least 2 hours – this step is crucial since gluten-free flour doesn’t stick as well as regular flour, and the longer marinating time helps create that crispy coating we all love.
Another common error is frying at the wrong temperature; keep your oil between 325-350°F because gluten-free flour browns faster than regular flour, so you’ll end up with burnt coating and raw chicken if the heat is too high.
Don’t skip the resting period after coating – let your chicken sit for 10-15 minutes before frying so the coating can set properly, and always use a meat thermometer to ensure the internal temperature reaches 165°F since dark meat takes longer to cook through.
Finally, avoid overcrowding the pan, which drops the oil temperature and results in greasy, soggy chicken instead of that perfect golden crust.
What to Serve With Gluten-Free Fried Chicken?
This crispy gluten-free fried chicken pairs perfectly with classic Southern sides like creamy mashed potatoes, coleslaw, and buttery corn on the cob. I love serving it with mac and cheese (use gluten-free pasta, of course!) and some fluffy biscuits made with gluten-free flour for the full comfort food experience. For something a bit lighter, try it alongside a fresh garden salad or some roasted vegetables like green beans or Brussels sprouts. Don’t forget the honey or hot sauce for drizzling – it takes this crispy chicken to the next level!
Storage Instructions
Refrigerate: Leftover fried chicken keeps well in the fridge for up to 4 days when stored in an airtight container or wrapped tightly in foil. I like to place a paper towel in the container to absorb any extra moisture and keep the coating from getting too soggy.
Freeze: You can freeze cooked fried chicken for up to 3 months in freezer-safe bags or containers. Let it cool completely first, then wrap each piece individually in plastic wrap before placing in the freezer bag. This prevents the pieces from sticking together and makes it easy to grab just what you need.
Crisp Up: To bring back that crispy texture, pop the chicken in a 375°F oven for about 10-15 minutes until heated through and the coating gets crispy again. You can also use an air fryer at 350°F for 5-8 minutes. Skip the microwave if you want to keep that crunch!
| Preparation Time | 120-150 minutes |
| Cooking Time | 45-60 minutes |
| Total Time | 165-210 minutes |
| Level of Difficulty | Medium |
Estimated Nutrition
Estimated nutrition for the whole recipe (without optional ingredients):
- Calories: 3400-3700
- Protein: 170-200 g
- Fat: 170-200 g
- Carbohydrates: 180-210 g
Ingredients
For the marinade:
- 3 cups milk (or unsweetened almond, cashew, or coconut milk)
- 3 tbsp white vinegar
- 2 tsp salt
- 1 tsp ground black pepper
- 6 chicken thighs
- 6 chicken drumsticks
For the coating:
- 2 cups gluten-free all-purpose flour
- 1 cup cornstarch
- 1 tbsp onion powder
- 1 tbsp garlic powder
- 2 tsp salt
- 1 tbsp paprika
- 1 tbsp dried thyme
- 1 tbsp dried oregano
- 1 tbsp dried basil
For frying:
- 4 cups vegetable oil (such as peanut oil)
Step 1: Marinate the Chicken
- 3 cups milk (or unsweetened almond, cashew, or coconut milk)
- 3 tbsp white vinegar
- 2 tsp salt
- 1 tsp ground black pepper
- 6 chicken thighs
- 6 chicken drumsticks
In a large mixing bowl, whisk together the milk, white vinegar, salt, and ground black pepper.
Add the chicken thighs and drumsticks to the bowl, ensuring that the pieces are fully submerged in the marinade.
Cover the bowl with plastic wrap and refrigerate for at least 2 hours, or preferably overnight, to allow the chicken to absorb the flavors and become tender.
Step 2: Prepare the Breaded Coating
- 2 cups gluten-free all-purpose flour
- 1 cup cornstarch
- 1 tbsp onion powder
- 1 tbsp garlic powder
- 2 tsp salt
- 1 tbsp paprika
- 1 tbsp dried thyme
- 1 tbsp dried oregano
- 1 tbsp dried basil
While the chicken is marinating, prepare the breading mixture.
In a large gallon-sized resealable plastic bag or a shallow dish, combine the gluten-free all-purpose flour, cornstarch, onion powder, garlic powder, salt, paprika, dried thyme, dried oregano, and dried basil.
Close the bag and shake well, or use a whisk to mix if using a dish, until all the dry ingredients are thoroughly combined.
Step 3: Coat the Chicken Pieces
- marinated chicken from Step 1
- breading mixture from Step 2
One at a time, remove each piece of chicken from the marinade (from Step 1), allowing any excess buttermilk mixture to drip off.
Transfer the chicken to the breading bag or dish (from Step 2).
Seal the bag tightly and shake to ensure the chicken is evenly coated with the flour mixture, or turn to coat thoroughly if using a dish.
Place each breaded chicken piece on a baking sheet.
Repeat this process until all chicken pieces are coated in the seasoned flour mixture.
I find it’s helpful to use one hand for wet ingredients and the other for dry to keep the mess to a minimum.
Step 4: Fry the Chicken
- coated chicken pieces from Step 3
- 4 cups vegetable oil (such as peanut oil)
Heat the vegetable oil in a large (preferably cast iron) skillet over medium heat until it reaches 350°F.
Test the oil’s temperature by dropping in a little flour mixture; it should sizzle but not smoke.
Fry 3 or 4 pieces at a time, placing the chicken skin side down first.
Maintain the oil temperature by adjusting the heat as needed.
Fry each piece for 15-18 minutes, turning every 2 minutes with tongs, until the chicken is golden brown, crispy, and reaches an internal temperature of 165°F.
Step 5: Rest and Serve the Fried Chicken
Once cooked, remove the fried chicken from the oil and place it on a cooling rack or paper towel-lined baking sheet to drain any excess oil.
Let the chicken rest for at least 10 minutes before serving to allow the juices to redistribute and keep the meat tender.
The fried chicken can be served warm or cold according to your preference.
I like to let the chicken rest so the crust stays extra crispy.

Juicy Gluten-Free Fried Chicken
Ingredients
For the marinade:
- 3 cups milk (or unsweetened almond, cashew, or coconut milk)
- 3 tbsp white vinegar
- 2 tsp salt
- 1 tsp ground black pepper
- 6 chicken thighs
- 6 chicken drumsticks
For the coating:
- 2 cups gluten-free all-purpose flour
- 1 cup cornstarch
- 1 tbsp onion powder
- 1 tbsp garlic powder
- 2 tsp salt
- 1 tbsp paprika
- 1 tbsp dried thyme
- 1 tbsp dried oregano
- 1 tbsp dried basil
For frying:
- 4 cups vegetable oil (such as peanut oil)
Instructions
- In a large mixing bowl, whisk together the milk, white vinegar, salt, and ground black pepper. Add the chicken thighs and drumsticks to the bowl, ensuring that the pieces are fully submerged in the marinade. Cover the bowl with plastic wrap and refrigerate for at least 2 hours, or preferably overnight, to allow the chicken to absorb the flavors and become tender.
- While the chicken is marinating, prepare the breading mixture. In a large gallon-sized resealable plastic bag or a shallow dish, combine the gluten-free all-purpose flour, cornstarch, onion powder, garlic powder, salt, paprika, dried thyme, dried oregano, and dried basil. Close the bag and shake well, or use a whisk to mix if using a dish, until all the dry ingredients are thoroughly combined.
- One at a time, remove each piece of chicken from the marinade (from Step 1), allowing any excess buttermilk mixture to drip off. Transfer the chicken to the breading bag or dish (from Step 2). Seal the bag tightly and shake to ensure the chicken is evenly coated with the flour mixture, or turn to coat thoroughly if using a dish. Place each breaded chicken piece on a baking sheet. Repeat this process until all chicken pieces are coated in the seasoned flour mixture. I find it's helpful to use one hand for wet ingredients and the other for dry to keep the mess to a minimum.
- Heat the vegetable oil in a large (preferably cast iron) skillet over medium heat until it reaches 350°F. Test the oil's temperature by dropping in a little flour mixture; it should sizzle but not smoke. Fry 3 or 4 pieces at a time, placing the chicken skin side down first. Maintain the oil temperature by adjusting the heat as needed. Fry each piece for 15-18 minutes, turning every 2 minutes with tongs, until the chicken is golden brown, crispy, and reaches an internal temperature of 165°F.
- Once cooked, remove the fried chicken from the oil and place it on a cooling rack or paper towel-lined baking sheet to drain any excess oil. Let the chicken rest for at least 10 minutes before serving to allow the juices to redistribute and keep the meat tender. The fried chicken can be served warm or cold according to your preference. I like to let the chicken rest so the crust stays extra crispy.


")
")
