Best Canning White Chicken Chili
Delicious Best Canning White Chicken Chili recipe with step-by-step instructions.
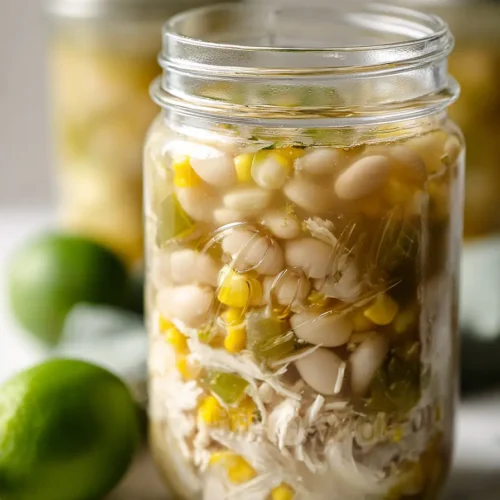
Ingredients
- 1 tsp black pepper (freshly ground for better flavor)
- 1 tbsp Mexican oregano (dried)
- 12 cups chicken broth
- 1 tbsp ground cumin
- 1 tsp cayenne powder
- 4 cups onions (diced into 1/2-inch pieces)
- 1 lb great northern beans (dried, soaked overnight)
- 2 lb chicken breast (cut into 1-inch chunks)
- 2 tsp canning salt (pickling salt preferred)
- 4 cups corn kernels (fresh or frozen)
- 1.5 cups bell peppers (diced, about 1/4-inch pieces)
- 4 garlic cloves (minced)
Instructions
- Set up your canning equipment by placing clean jars, lids, and bands within reach. Fill your pressure canner with water and heat to 180°F—this gentle heat prevents jars from cracking when you add the hot chili later. While the water heats, prepare all your ingredients: dice the onions into 1/2-inch pieces, mince the garlic cloves, dice the bell peppers into 1/4-inch pieces, and cut the chicken breasts into 1-inch chunks. Combine all your dry spices (black pepper, Mexican oregano, cumin, and cayenne powder) in a small bowl so they're ready to add to the pot in one go.
- Drain the soaked great northern beans and place them in a large pot, then cover with fresh water. Bring to a boil and let them boil for 2-3 minutes, then drain completely. This pre-boiling step removes any remaining surface impurities and begins to soften the beans, which is important for achieving the right texture in the final canned product without overcooking them during the canning process.
- In a large, heavy-bottomed pot, combine the precooked beans from Step 2, chicken chunks, and chicken broth. Bring to a rolling boil, then add the diced onions, minced garlic, diced bell peppers, corn kernels, and the spice mixture from Step 1. Stir well to distribute the spices evenly. I like to add the spices all at once rather than gradually because it creates a more cohesive flavor profile. Return the mixture to a gentle boil and maintain it for exactly 5 minutes—this cooks the vegetables slightly while keeping them from becoming mushy, and ensures the chicken is cooked through. Don't skip this boiling time, as it's crucial for food safety in pressure canning.
- Working quickly while the chili is still hot, ladle it into the preheated jars from Step 1, leaving exactly 1 inch of headspace at the top—this space is essential for proper seal formation. If you run short on chili before filling all jars, top them off with additional hot chicken broth to maintain the 1-inch headspace. Using a clean, damp cloth, wipe the rims of each jar thoroughly to remove any food particles or spills, which would prevent a proper seal. Place the lids on the jars and screw the bands down firmly by hand until they're snug but not over-tightened—I find it helpful to tighten until I feel slight resistance, then stop.
- Carefully place the filled and sealed jars into the preheated canner from Step 1, ensuring they're covered with about 2 inches of water. Set your pressure canner to process at 10 psi, then start timing: process pint jars for 75 minutes or quart jars for 90 minutes, adjusting pressure as needed based on your altitude and canner type. Maintain steady pressure throughout processing—fluctuating pressure compromises the seal. This high-heat, high-pressure environment eliminates harmful bacteria that could cause botulism.
- Once processing time is complete, turn off the heat and let the pressure canner cool naturally until the pressure gauge reads zero—do not force cool it by running cold water over it, as rapid temperature changes can crack the jars. Carefully remove the jars from the canner using a jar lifter and place them on a clean towel or wooden surface, spacing them at least 1 inch apart. Listen for the distinctive 'ping' sound as each jar cools and seals—this is the satisfying confirmation that the lids have sealed properly. Let the jars sit undisturbed for at least 12 hours before checking seals or moving them.
- After 12 hours of cooling, check each jar by pressing down on the center of the lid—it should be slightly concave and not flex or pop. If a lid flexes, that jar did not seal properly and should be refrigerated for immediate use or reprocessed with a new lid. Remove the metal bands and store sealed jars in a cool, dark place. Your white chicken chili will keep for up to 1 year when properly canned.