Halloween treats have always been my favorite part of the season. I look forward to making spooky snacks as much as I do carving pumpkins with the kids. But that doesn’t mean I want to spend hours in the kitchen when I could be helping with costumes. I prefer treats that look scary but are easy to make.
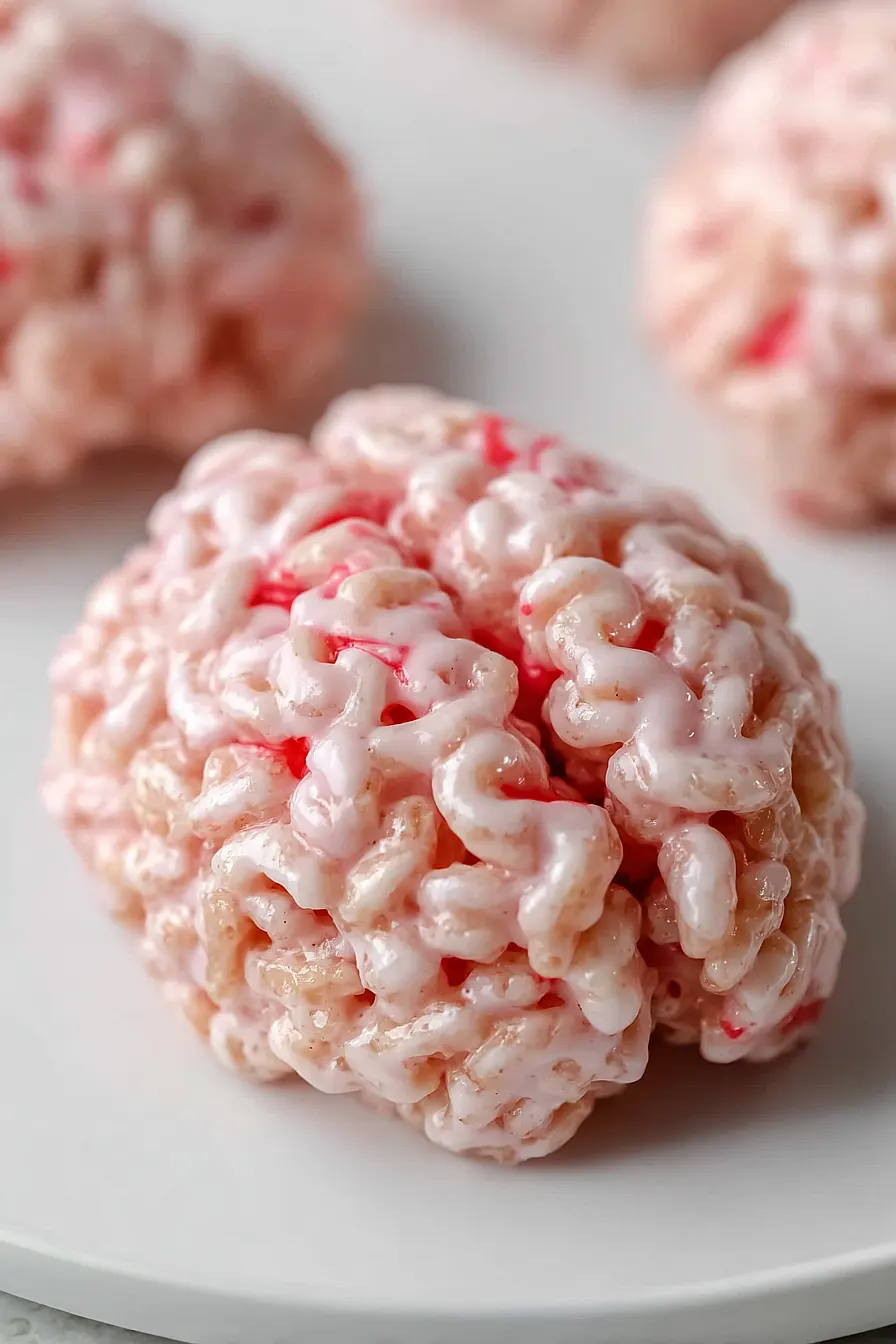
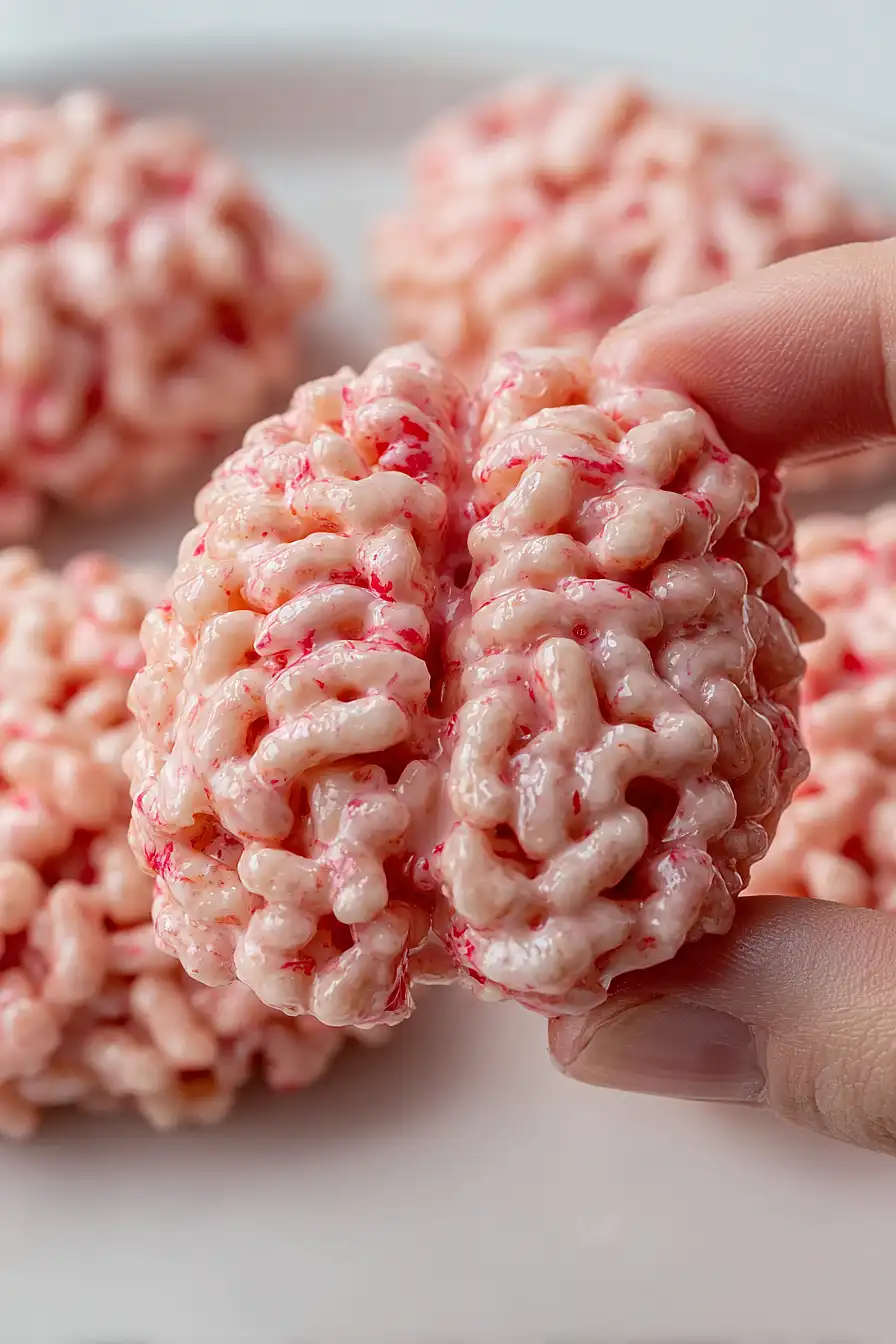
That’s why these marshmallow Rice Krispies brains are my Halloween hero. They only take about 20 minutes to put together, and the kids think they’re gross enough to be perfect. I use a simple brain mold and pink food coloring to get that creepy look. No fancy decorating skills needed.
Want something that’ll make your guests do a double-take? These are it. They look realistic enough to gross people out, but taste like the Rice Krispies treats everyone loves. Honestly, I make a double batch because they disappear fast once people get brave enough to try one.

Why You’ll Love These Marshmallow Rice Krispies Halloween Brains
- Super quick and easy – With just 15-25 minutes from start to finish, you can whip up these spooky treats without spending hours in the kitchen.
- Kid-friendly fun – Children will love helping you make these creepy-looking brains, and they’re perfect for Halloween parties or trick-or-treat bags.
- Simple ingredients – You probably already have most of these basic pantry staples at home, making this an easy last-minute Halloween treat.
- No baking required – Just melt, mix, and shape – no need to turn on the oven or worry about timing anything perfectly.
- Spooky presentation – The red food coloring transforms ordinary rice crispy treats into gross-looking brains that are sure to get squeals of delight at any Halloween gathering.
What Kind of Marshmallows Should I Use?
Regular-sized marshmallows work best for this recipe since they melt down smoothly and evenly when heated with the butter. You can use any brand of white marshmallows you have on hand – they all melt pretty much the same way. Mini marshmallows will also work if that’s what you’ve got, but you might need to adjust the melting time slightly since they’ll melt faster than the regular ones. Just avoid using flavored or colored marshmallows since you’ll be adding your own red food coloring to create that spooky brain effect.
Options for Substitutions
This spooky treat is pretty forgiving when it comes to swaps, so here are some options if you’re missing ingredients:
- Regular marshmallows: You can use mini marshmallows instead – just use about 5 cups since they pack more densely. Mini marshmallows actually melt a bit more evenly, which can make mixing easier.
- Rice Bubbles (Krispies): Any puffed rice cereal will work here. Corn flakes or other crispy cereals can work too, but Rice Krispies really are best for that classic texture and crunch.
- Unsalted butter: Salted butter works fine – just skip the added salt in the recipe. You can also use margarine, but butter gives the best flavor.
- Red food coloring: Gel food coloring works better than liquid for getting that deep, bloody red color without making the mixture too wet. You can also mix red with a tiny drop of brown for a more realistic brain color.
- Salt: The salt really helps balance the sweetness, but if you’re using salted butter, you can skip it entirely.
Watch Out for These Mistakes While Cooking
The biggest mistake when making Rice Krispies treats is overheating the marshmallows, which can make them tough and chewy instead of gooey – keep the heat on low and stir constantly once they start melting.
Another common error is waiting too long to shape your “brains” after mixing in the cereal, since the mixture hardens quickly and becomes difficult to mold – work fast and have your brain mold or your hands ready to go.
Don’t go overboard with the red food coloring either, as too much can make the mixture bitter and overly sticky, so add just a few drops at a time until you get that perfect bloody brain look.
Finally, make sure to butter your hands or use cooking spray when shaping to prevent the sticky mixture from turning into a frustrating mess that sticks to everything.
What to Serve With Marshmallow Rice Krispies Halloween Brains?
These spooky treats are perfect on their own as a Halloween party centerpiece, but they’re even more fun when you create a whole creepy dessert spread! I love setting them out alongside other Halloween goodies like chocolate “dirt” pudding cups with gummy worms, orange-frosted cupcakes, or candy corn mixed with roasted peanuts. For drinks, try serving them with cold milk (maybe tinted green for extra spookiness) or hot chocolate with mini marshmallows floating on top. You can also crumble some of the brains over vanilla ice cream for a crunchy, sweet topping that kids absolutely love.
Storage Instructions
Keep Fresh: These spooky brain treats will stay soft and chewy when stored in an airtight container at room temperature for up to a week. I like to layer them between sheets of parchment paper so they don’t stick together, especially since they can get a bit tacky from the marshmallows.
Make Ahead: Perfect for Halloween party prep! You can make these creepy brains up to 3 days before your party and they’ll still taste fresh. Just keep them covered so they don’t dry out, and the red food coloring will stay nice and bright for that gross-out factor kids love.
Wrap Individual: If you’re giving these out as Halloween treats, wrap each brain individually in plastic wrap or small treat bags. They’ll stay fresh this way and are perfect for trick-or-treaters or school parties without getting sticky fingers everywhere!
| Preparation Time | 10-15 minutes |
| Cooking Time | 5-10 minutes |
| Total Time | 15-25 minutes |
| Level of Difficulty | Easy |
Estimated Nutrition
Estimated nutrition for the whole recipe (without optional ingredients):
- Calories: 1450-1600
- Protein: 7-10 g
- Fat: 40-48 g
- Carbohydrates: 290-320 g
Ingredients
- red food coloring (gel preferred for vibrant color without thinning mixture)
- 4 cups puffed rice cereal (Rice Krispies work best for this texture)
- 6 tbsp unsalted butter (softened to room temperature)
- 1/2 tsp salt
- 6 cups plain marshmallows (I use Jet-Puffed for consistent melting)
Step 1: Prepare Your Workspace and Melt the Marshmallow Base
- 6 tbsp unsalted butter
- 6 cups plain marshmallows
Set up a double boiler by bringing a pot of water to a gentle simmer, then placing a heatproof bowl on top (the bowl should not touch the water).
Add the softened butter and marshmallows to the bowl, stirring constantly for 2-4 minutes until the mixture is completely smooth and melted.
The gentle heat of the double boiler ensures even melting without scorching, which would create lumps or an uneven texture.
Step 2: Season and Color the Marshmallow Mixture
- 1/2 tsp salt
- red food coloring
- melted marshmallow mixture from Step 1
Remove the bowl from heat and immediately stir in the salt and red food coloring until fully combined.
I prefer gel food coloring here because it won’t thin out the mixture like liquid coloring would, giving you that vibrant color without affecting the texture.
Mix thoroughly so the color distributes evenly throughout—this takes about 30 seconds of vigorous stirring.
Step 3: Combine Cereal and Form Brain Shapes
- 4 cups puffed rice cereal
- colored marshmallow mixture from Step 2
Add the puffed rice cereal to the colored marshmallow mixture and fold everything together gently but thoroughly until every piece of cereal is coated.
Work quickly while the mixture is still warm and pliable.
Oil your hands lightly with cooking oil or butter, then scoop portions of the mixture and shape them into oval forms roughly the size of a tennis ball.
Press your thumb down the center of each oval to create the characteristic brain ridge, or use a chopstick or wooden spoon handle to make a deeper central indent.
Step 4: Add Finishing Details with Veins
- shaped brains from Step 3
- red food coloring
Once all your brain shapes have set and firmed up slightly (about 5-10 minutes), use a toothpick dipped in red food coloring to draw veins across the surface of each brain.
I like to create an organic, slightly asymmetrical vein pattern—start from the center ridge and branch outward like real brain convolutions.
This final detail transforms the treats from simple shapes into convincingly creepy Halloween props.


