Linzer cookies have been on my holiday baking list for years, but this time I wanted to try something different. Don’t get me wrong—I love the classic raspberry jam filling. But when I spotted a jar of maple frosting in my pantry last week, I thought, why not give these cookies a twist?
The combination works better than I expected. The maple adds a cozy, almost caramel-like sweetness that pairs really well with the almond and orange flavors in the cookie. Plus, that little dusting of confectioners sugar on top makes them look fancy without any extra work on your part.
These cookies do take a bit of time since you’re cutting out shapes and sandwiching them together. But I promise they’re worth it. Make a batch on the weekend, and you’ll have a cookie jar full of something special all week long.
Why You’ll Love These Maple Linzer Cookies
- Quick and easy – These cookies come together in under an hour, making them perfect for last-minute holiday baking or when you need a homemade treat without spending all day in the kitchen.
- Unique maple twist – The maple frosting filling gives these traditional cookies a fun, unexpected flavor that sets them apart from the usual raspberry jam version.
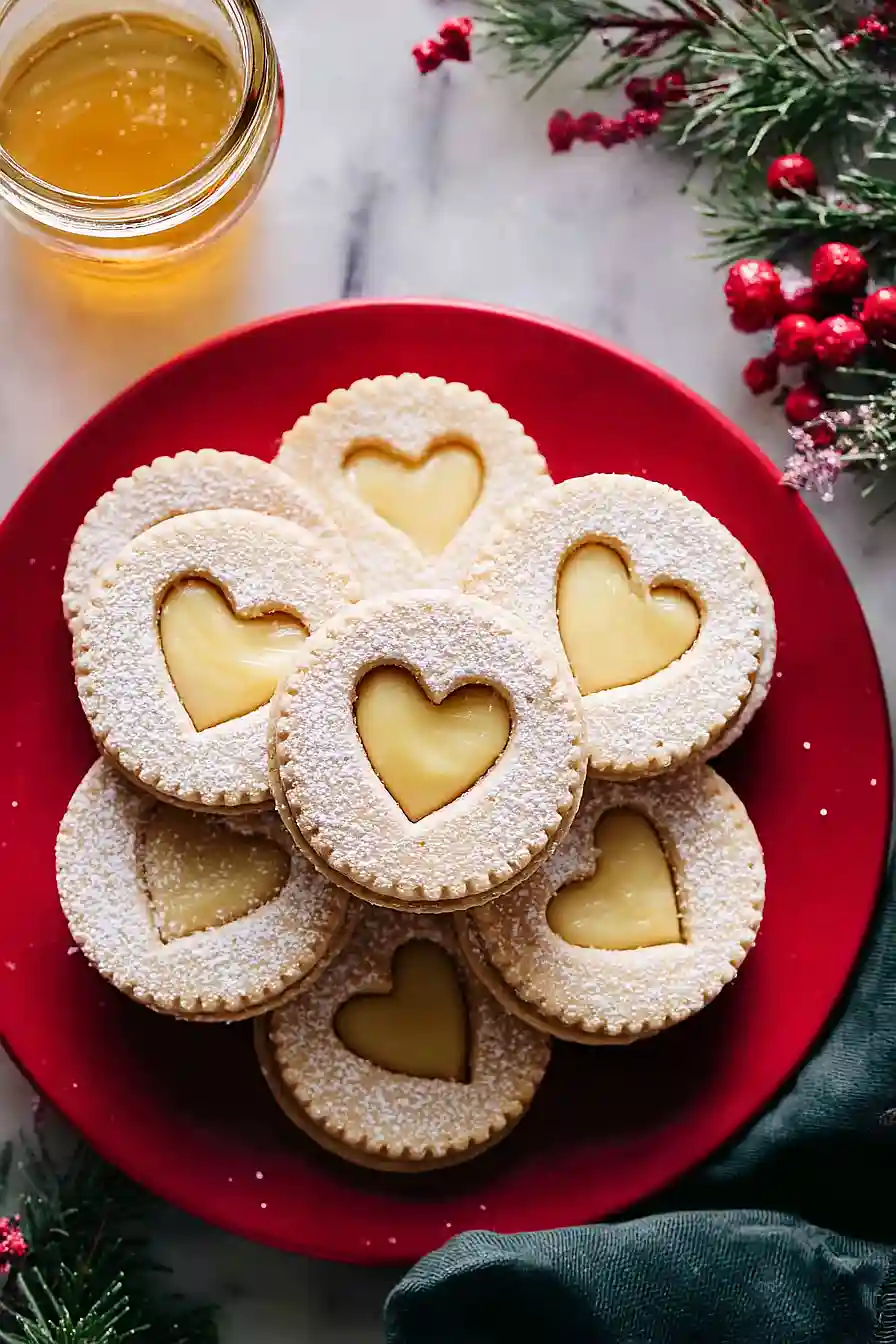
- Beautiful presentation – With their classic cut-out windows showing the maple filling underneath, these cookies look bakery-quality and are sure to impress guests at any gathering.
- Simple ingredients – You probably have most of these pantry staples on hand already, with the ground almonds and maple frosting being the only special items you might need to pick up.
- Perfect for gifting – These cookies hold up well and look so pretty, making them ideal for cookie exchanges, holiday gift boxes, or bringing to parties.
What Kind of Almonds Should I Use?
For these cookies, you’ll want to use whole raw almonds that you grind yourself rather than pre-packaged almond flour. The texture you’re going for is finely ground but still has a bit more body than the super-fine almond flour you’d buy at the store. You can grind them in a food processor, but be careful not to over-process them or you’ll end up with almond butter instead of ground almonds. A good tip is to pulse the almonds in short bursts and stop when they look like coarse sand – they should still have a little bit of texture to them, which gives these cookies their traditional linzer cookie feel.

Options for Substitutions
These cookies are pretty forgiving, so here are some swaps you can make if needed:
- Ground almonds: If you don’t have ground almonds, you can pulse whole almonds in a food processor until finely ground – just stop before it turns into almond butter. Almond flour can work in a pinch, but the texture will be slightly different since it’s more finely ground.
- Orange zest and juice: No orange on hand? Lemon zest and juice make a great substitute and give the cookies a bright, citrusy flavor. You could also use 1 teaspoon of vanilla extract in place of the juice if you want to skip the citrus altogether.
- Maple frosting: While the maple frosting gives these cookies their signature flavor, you can use raspberry or apricot jam for a more traditional linzer cookie. Just warm the jam slightly to make it easier to spread.
- Unsalted butter: If you only have salted butter, that’s fine – just skip the pinch of salt in the recipe to keep the flavor balanced.
- All-purpose flour: This is one ingredient you’ll want to stick with for these cookies. All-purpose flour gives them the right structure and texture that’s essential for linzer cookies.
Watch Out for These Mistakes While Baking
The biggest issue with linzer cookies is dough that’s too soft to work with, which happens when the butter gets too warm – if your dough feels sticky or starts to spread while you’re cutting shapes, pop it back in the fridge for 15-20 minutes to firm up.
Another common mistake is rolling the dough too thin, which makes the cookies fragile and prone to breaking when you try to sandwich them together, so aim for about 1/4 inch thickness for sturdy cookies that hold their shape.
When cutting out the center windows on your top cookies, make sure your cutters are small enough to leave a decent border around the edges, otherwise the cookies might crack when you lift them.
Finally, let the bottom cookies cool completely before spreading on the maple frosting – warm cookies will cause the frosting to melt and slide right off, leaving you with a messy (though still tasty) result.

What to Serve With Maple Linzer Cookies?
These cookies are perfect alongside a hot cup of coffee or tea for an afternoon pick-me-up or after-dinner treat. I love serving them on a platter with other holiday cookies during Christmas time, or bringing them to cookie exchanges since they look so pretty with the maple frosting peeking through. They’re also great with a glass of cold milk if you’re keeping things simple, or pair them with hot apple cider in the fall when you want something cozy. For a fancier dessert spread, set them out with some fresh berries and whipped cream on the side.
Storage Instructions
Store: These cookies keep really well in an airtight container at room temperature for about a week. Just make sure they’re completely cool before stacking them, and you can put a piece of parchment paper between layers if you want to be extra careful with the frosting.
Freeze: You can freeze the unfilled cookies for up to 3 months, which is great if you want to bake ahead for the holidays. Once they’re baked and cooled, layer them with parchment paper in a freezer container. When you’re ready to serve, thaw them at room temperature and add the maple frosting right before enjoying.
Make Ahead: The dough is actually easier to work with after it’s been chilled, so I usually make it a day ahead and keep it wrapped in plastic wrap in the fridge. You can also bake the cookies a few days early and just wait to fill them with the maple frosting until the day you plan to serve them.
| Preparation Time | 30-45 minutes |
| Cooking Time | 11-13 minutes |
| Total Time | 41-58 minutes |
| Level of Difficulty | Medium |
Estimated Nutrition
Estimated nutrition for the whole recipe (without optional ingredients):
- Calories: 3100-3400
- Protein: 40-46 g
- Fat: 170-190 g
- Carbohydrates: 360-400 g
Ingredients
For the cookies:
- 1 orange zest (finely grated for bright citrus flavor)
- 1/2 cup sugar
- 1.25 cup ground almonds (or almond flour for finer texture)
- pinch of salt
- 1 egg (room temperature)
- 2 cups all-purpose flour (I use King Arthur)
- 2 tsp orange juice (freshly squeezed preferred)
- 8 tbsp unsalted butter (I use Kerrygold for rich flavor)
- 1.5 tsp vanilla extract
For assembly:
- 1/2 cup maple frosting
- confectioners sugar (for dusting)
Step 1: Cream Butter and Sugar, Then Build the Wet Base
- 8 tbsp unsalted butter
- 1/2 cup sugar
- 1 orange zest
- 2 tsp orange juice
- 1.5 tsp vanilla extract
- 1 egg
Cut the butter into cubes and let it sit at room temperature for 15 minutes until slightly softened.
In a large bowl, beat the softened butter with the sugar for about 3 minutes until light and fluffy—this incorporates air into the dough and creates a tender cookie.
Add the finely grated orange zest, fresh orange juice, vanilla extract, and room-temperature egg, then beat for another minute until fully combined.
The mixture should look smooth and well-incorporated, with no streaks of egg or zest remaining visible.
Step 2: Mix Dry Ingredients and Combine into Dough
- 2 cups all-purpose flour
- 1.25 cup ground almonds
- pinch of salt
- wet ingredient mixture from Step 1
In a separate bowl, whisk together the all-purpose flour, ground almonds, and salt.
This ensures the leavening and salt are evenly distributed throughout the dry ingredients.
Add the dry mixture to the wet ingredient mixture from Step 1 and fold together gently with a spatula or wooden spoon until just combined—don’t overmix, as this can make the cookies tough.
The dough should come together without any visible dry streaks and have a slightly crumbly, cohesive texture.
Step 3: Chill the Dough
- dough from Step 2
Divide the dough in half and wrap each portion tightly in plastic wrap.
Refrigerate for 30 to 60 minutes until firm and easy to handle.
I like to chill mine for the full hour when I have time, as it gives the flavors time to meld and makes the dough less likely to spread in the oven.
You can prepare your baking sheets and oven while waiting.
Step 4: Preheat Oven and Roll Out Dough
- dough from Step 3
Preheat your oven to 375°F.
Remove one portion of chilled dough from the refrigerator and place it between two sheets of parchment paper.
Using a rolling pin, roll the dough to a 1/4-inch thickness, working gently and evenly.
The parchment paper prevents sticking and makes transferring the cookies to the baking sheet much easier.
Repeat with the second portion of dough.
If the dough becomes too soft while rolling, refrigerate it for a few minutes to firm up again.
Step 5: Cut Cookies and Prepare for Baking
- rolled dough from Step 4
Using a 2-inch round cutter, cut circles from both portions of rolled dough.
From one portion, cut small circles from the center of half the cookies—these will be your ‘window’ cookies with cutouts.
Leave the other portion whole; these will be your base cookies for sandwiching.
Transfer all cut cookies to parchment-lined baking sheets, keeping the whole cookies and cutout cookies on separate sheets so they bake together without confusion.
Step 6: Bake and Cool the Cookies
- baked cookies from Step 5
- confectioners sugar
Bake both sheets at 375°F for 11 to 13 minutes, until the edges are golden brown but the centers still have a slight pale color—this keeps them tender.
Remove from the oven and let the cookies cool on the baking sheet for 2 minutes, then transfer to a wire rack to cool completely.
Once cooled, dust the cutout cookies generously with confectioners sugar, which gives them a beautiful snowy appearance and adds subtle sweetness.
Step 7: Assemble the Sandwich Cookies
- whole cookies from Step 6
- cutout cookies from Step 6
- 1/2 cup maple frosting
Spread about 1 teaspoon of maple frosting onto the flat side of each whole cookie.
Place a cutout cookie on top, flat side down, so the frosting creates a seal between them and the pretty sugared window shows off the maple filling beneath.
For a neater appearance, I like to apply the frosting in small dots around the edge rather than a thick layer in the middle—it gives you better control and prevents squishing.

Traditional Maple Linzer Cookies
Ingredients
For the cookies:
- 1 orange zest (finely grated for bright citrus flavor)
- 1/2 cup sugar
- 1.25 cup ground almonds (or almond flour for finer texture)
- pinch of salt
- 1 egg (room temperature)
- 2 cups all-purpose flour (I use King Arthur)
- 2 tsp orange juice (freshly squeezed preferred)
- 8 tbsp unsalted butter (I use Kerrygold for rich flavor)
- 1.5 tsp vanilla extract
For assembly:
- 1/2 cup maple frosting
- confectioners sugar (for dusting)
Instructions
- Cut the butter into cubes and let it sit at room temperature for 15 minutes until slightly softened. In a large bowl, beat the softened butter with the sugar for about 3 minutes until light and fluffy—this incorporates air into the dough and creates a tender cookie. Add the finely grated orange zest, fresh orange juice, vanilla extract, and room-temperature egg, then beat for another minute until fully combined. The mixture should look smooth and well-incorporated, with no streaks of egg or zest remaining visible.
- In a separate bowl, whisk together the all-purpose flour, ground almonds, and salt. This ensures the leavening and salt are evenly distributed throughout the dry ingredients. Add the dry mixture to the wet ingredient mixture from Step 1 and fold together gently with a spatula or wooden spoon until just combined—don't overmix, as this can make the cookies tough. The dough should come together without any visible dry streaks and have a slightly crumbly, cohesive texture.
- Divide the dough in half and wrap each portion tightly in plastic wrap. Refrigerate for 30 to 60 minutes until firm and easy to handle. I like to chill mine for the full hour when I have time, as it gives the flavors time to meld and makes the dough less likely to spread in the oven. You can prepare your baking sheets and oven while waiting.
- Preheat your oven to 375°F. Remove one portion of chilled dough from the refrigerator and place it between two sheets of parchment paper. Using a rolling pin, roll the dough to a 1/4-inch thickness, working gently and evenly. The parchment paper prevents sticking and makes transferring the cookies to the baking sheet much easier. Repeat with the second portion of dough. If the dough becomes too soft while rolling, refrigerate it for a few minutes to firm up again.
- Using a 2-inch round cutter, cut circles from both portions of rolled dough. From one portion, cut small circles from the center of half the cookies—these will be your 'window' cookies with cutouts. Leave the other portion whole; these will be your base cookies for sandwiching. Transfer all cut cookies to parchment-lined baking sheets, keeping the whole cookies and cutout cookies on separate sheets so they bake together without confusion.
- Bake both sheets at 375°F for 11 to 13 minutes, until the edges are golden brown but the centers still have a slight pale color—this keeps them tender. Remove from the oven and let the cookies cool on the baking sheet for 2 minutes, then transfer to a wire rack to cool completely. Once cooled, dust the cutout cookies generously with confectioners sugar, which gives them a beautiful snowy appearance and adds subtle sweetness.
- Spread about 1 teaspoon of maple frosting onto the flat side of each whole cookie. Place a cutout cookie on top, flat side down, so the frosting creates a seal between them and the pretty sugared window shows off the maple filling beneath. For a neater appearance, I like to apply the frosting in small dots around the edge rather than a thick layer in the middle—it gives you better control and prevents squishing.


