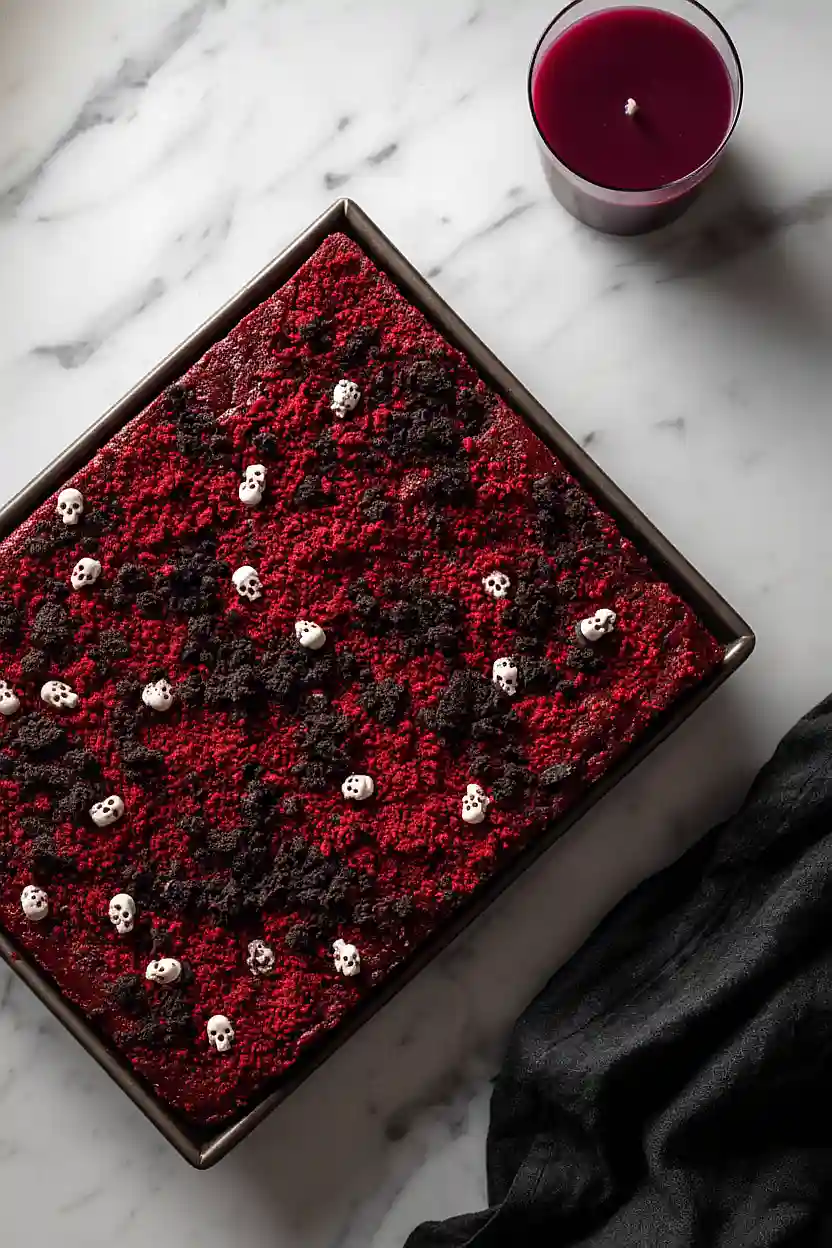
If you ask me, red velvet brownies are the perfect Halloween treat.
These fudgy brownies bring together the tangy flavor of red velvet cake with the dense texture of a classic brownie. A touch of cocoa powder and espresso give them depth, while the bright red color makes them extra festive.
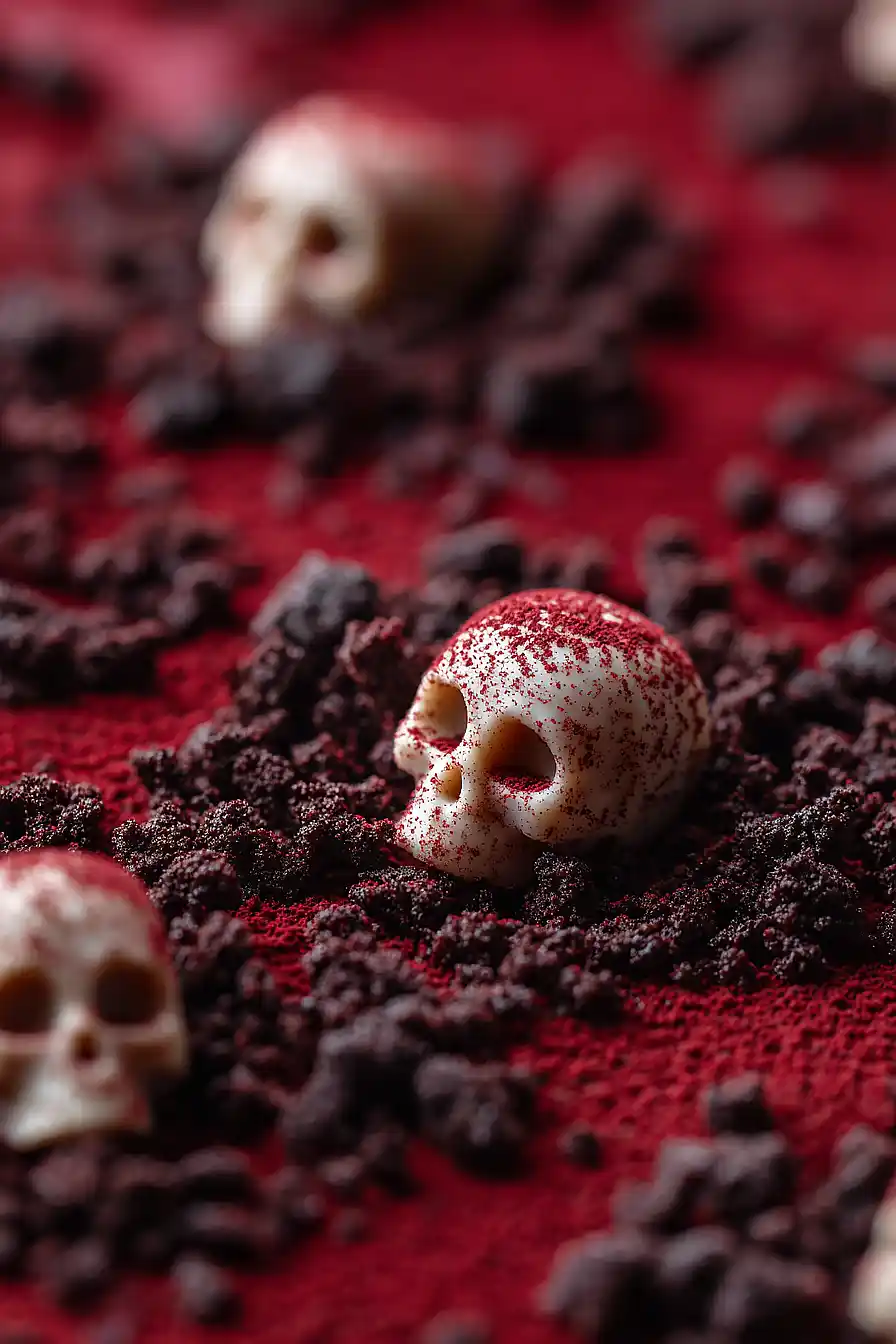
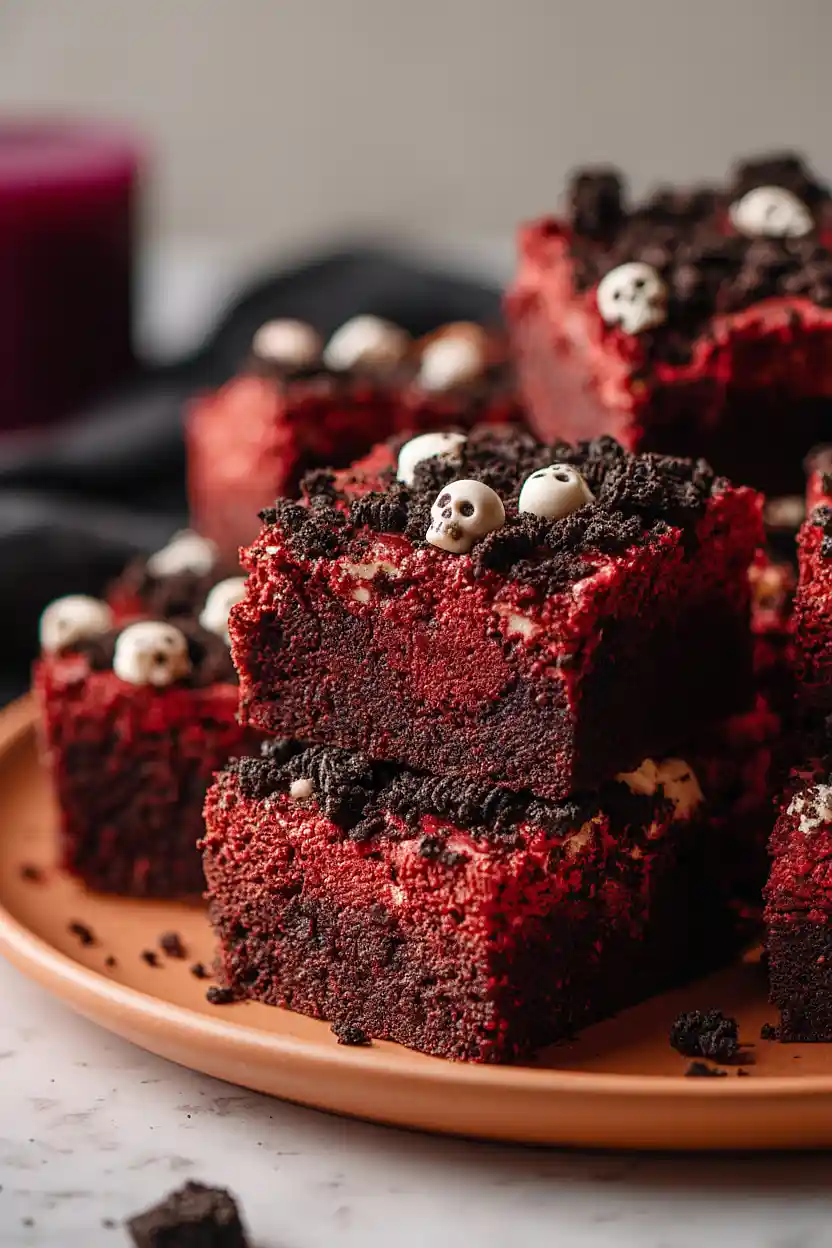
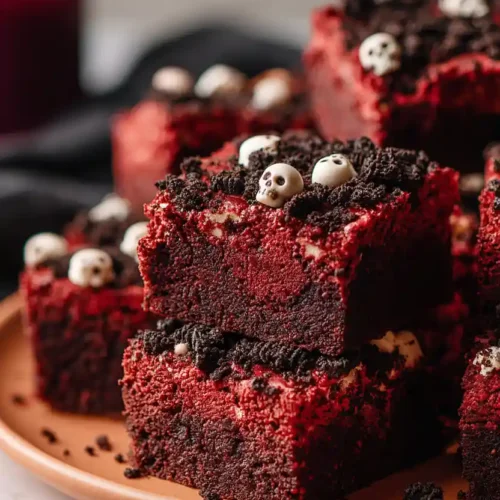
They’re loaded with melted chocolate wafers and crushed chocolate sandwich cookies that add little pockets of crunch. Chocolate skull chips on top make them look spooky without any fussy decorating.
It’s a fun dessert that’s easy enough for a weeknight but special enough to bring to a Halloween party.
Why You’ll Love These Red Velvet Brownies
- Perfect for Halloween parties – These spooky brownies with chocolate skulls and crushed Oreos make a fun treat that kids and adults will love at any Halloween gathering.
- Quick and easy to make – Ready in under an hour, these brownies come together with simple mixing and baking, no fancy techniques required.
- Eye-catching presentation – The bright red color combined with the chocolate decorations creates a dessert that looks impressive without requiring any special decorating skills.
- Rich, fudgy texture – These brownies have that classic red velvet flavor with a dense, chocolatey bite that’s way better than anything from a box mix.
What Kind of Chocolate Should I Use?
For these Halloween brownies, you’ll want to grab milk chocolate melting wafers, which you can find in the baking aisle near the chocolate chips. Melting wafers are specifically made to melt smoothly and set up nicely, making them perfect for drizzling or creating decorative toppings. If you can’t find melting wafers, regular milk chocolate chips will work in a pinch, though they might not melt quite as smoothly – just add a teaspoon of coconut oil or shortening to help them along. As for the chocolate skull chips, these are seasonal decorations you’ll find around Halloween time, but if you can’t track them down, any Halloween-themed chocolate candies or even regular chocolate chips will do the trick.
Options for Substitutions
These brownies are pretty forgiving when it comes to swapping ingredients:
- Butter: You can use coconut oil or vegetable oil instead of butter. If using oil, stick with 1/2 cup since it’s more concentrated than butter.
- Brown sugar: If you’re out of brown sugar, just use all white sugar. You’ll lose a tiny bit of moisture and molasses flavor, but the brownies will still turn out great.
- Red food coloring: Gel food coloring works better than liquid if you have it – you’ll need less and get a deeper red color. You can also skip it entirely for chocolate brownies without the red velvet look.
- Milk chocolate melting wafers: Regular chocolate chips work fine here. You can also use semi-sweet or dark chocolate if you prefer less sweetness.
- Oreo cookies: Any sandwich cookies will do – try chocolate chip cookies, Nutter Butters, or even homemade cookies if you’re feeling ambitious.
- Chocolate skull chips: These are just for decoration, so get creative! Use any Halloween-themed candies, regular chocolate chips, or candy eyes to keep the spooky theme going.
Watch Out for These Mistakes While Baking
The biggest mistake with red velvet brownies is overbaking them, which turns fudgy brownies into dry cake – pull them out when a toothpick inserted in the center comes out with a few moist crumbs, not completely clean.
Another common error is adding too much red food coloring at once, which can affect the texture and taste, so start with 1 tablespoon and add more gradually if you want a deeper color.
Don’t skip the step of letting the melted chocolate sit for 2 minutes before spreading – if you try to spread it immediately, you’ll tear up the brownie surface and create a messy top layer.
For cleaner cuts, wipe your knife between each slice and make sure the brownies are completely cool, otherwise the chocolate topping will smear and your cookie crumb layer will shift around.
What to Serve With Red Velvet Brownies?
These brownies are rich and decadent on their own, but they’re even better with a big scoop of vanilla ice cream on top while they’re still warm. A glass of cold milk is always a good choice for dunking, especially if you’re serving these at a Halloween party where kids will be around. For a more grown-up dessert spread, pair them with hot coffee or even a cream-based cocktail like a White Russian. You could also set up a dessert board with these brownies alongside other Halloween treats like candy corn, chocolate-covered pretzels, and fresh berries for a fun party presentation.
Storage Instructions
Store: Keep your red velvet brownies in an airtight container at room temperature for up to 3 days, or in the fridge for about a week. They actually taste even better the next day once all the flavors have had time to settle in together.
Freeze: These brownies freeze really well if you want to make them ahead for your Halloween party. Just wrap them individually in plastic wrap, then store in a freezer bag for up to 3 months. You can pull out just what you need whenever a chocolate craving hits.
Serve: Let frozen brownies thaw at room temperature for about an hour before serving. If you stored them in the fridge, I like to let them sit out for 15-20 minutes so they’re not too cold and the chocolate gets a little softer.
| Preparation Time | 20-30 minutes |
| Cooking Time | 30-40 minutes |
| Total Time | 50-70 minutes |
| Level of Difficulty | Medium |
| Servings | 16 squares |
Estimated Nutrition
Estimated nutrition for the whole recipe (without optional ingredients):
- Calories: 2900-3200
- Protein: 30-35 g
- Fat: 130-150 g
- Carbohydrates: 410-440 g
Ingredients
For the red velvet brownies:
- 1 1/4 cups all-purpose flour
- 4 tbsp cocoa powder
- 1/2 tsp salt
- 1/2 cup butter (melted and cooled to room temperature)
- 1 1/4 cups sugar
- 1 cup brown sugar
- 3 eggs (room temperature, about 70°F)
- 2 tsp vanilla extract
- 1 tbsp red food coloring
- 1/2 tsp espresso powder
For the topping and skulls:
- 1 cup chocolate melting wafers (I prefer Ghirardelli for a smoother melt)
- 8 chocolate sandwich cookies (crushed into 1/4-inch pieces for texture)
- chocolate skull chips
Step 1: Prepare the Chocolate Skulls
- 1 cup chocolate melting wafers
Melt the chocolate wafers according to package directions (typically in a double boiler or microwave in 30-second intervals, stirring between each).
Pour the melted chocolate into silicone skull molds, filling them completely.
Freeze for 3-5 minutes until set, then pop the skulls out of the molds.
Repeat this process 1-2 more times to build up thicker, more durable skulls.
Set the finished skulls aside in the freezer while you prepare the brownies—they’ll stay perfectly firm.
Step 2: Mise en Place and Oven Prep
- 1 1/4 cups all-purpose flour
- 4 tbsp cocoa powder
- 1/2 tsp salt
- 8 chocolate sandwich cookies
Preheat your oven to 350°F and line a 9×13 inch baking pan with parchment paper, leaving a slight overhang for easy removal.
Crush the chocolate sandwich cookies into roughly 1/4-inch pieces—you want some texture variation, not fine crumbs.
Whisk together the flour, cocoa powder, and salt in a small bowl and set aside.
This prep work ensures you’re not scrambling mid-batter.
Step 3: Build the Wet Mixture
- 1/2 cup butter
- 1 1/4 cups sugar
- 1 cup brown sugar
- 3 eggs
- 2 tsp vanilla extract
- 1 tbsp red food coloring
- 1/2 tsp espresso powder
In a large mixing bowl, whisk together the melted and cooled butter with both the granulated sugar and brown sugar until well combined.
Add the room-temperature eggs one at a time, whisking thoroughly after each addition to fully incorporate.
Stir in the vanilla extract, red food coloring, and espresso powder, mixing until the batter is uniformly deep red and the espresso powder has dissolved—it won’t add noticeable coffee flavor, but it deepens the red hue and enhances the chocolate notes.
I like to use espresso powder here because it adds complexity without making the brownies taste like coffee.
Step 4: Combine and Bake
- dry ingredient mixture from Step 2
- wet ingredient mixture from Step 3
Gently fold the dry ingredient mixture from Step 2 into the wet batter from Step 3 using a spatula, stirring just until no flour streaks remain—overmixing can lead to dense brownies.
Pour the batter into your prepared pan and smooth the top.
Bake at 350°F for 30-40 minutes; the brownies are done when a toothpick inserted into the center comes out with a few moist crumbs (not completely clean, as you want them fudgy).
The baking time will vary slightly depending on your oven, so start checking at 30 minutes.
Step 5: Add the Chocolate and Cookie Topping
- chocolate skull chips
- crushed cookie pieces from Step 2
Remove the brownies from the oven and immediately sprinkle the chocolate skull chips evenly across the surface.
Let them sit for 2 minutes to soften slightly, then spread them gently across the brownies with a spatula to create a thin chocolate layer.
While the chocolate is still warm and slightly tacky, sprinkle the crushed cookies from Step 2 over the entire surface, pressing them gently so they adhere.
This layering ensures the cookies stay in place and give you that signature texture contrast.
Step 6: Cool and Serve
- chocolate skulls from Step 1
Let the brownies cool in the pan for 15 minutes, which allows the chocolate topping to set and makes them easier to cut.
Once partially cooled, arrange the chocolate skulls from Step 1 on top of the brownies, pressing them gently into the chocolate layer so they stay put.
Allow the brownies to cool completely to room temperature (about 1-2 hours), then lift them out using the parchment overhang and cut into 16 squares using a sharp, clean knife.
Tasty Halloween Red Velvet Brownies
Ingredients
For the red velvet brownies::
- 1 1/4 cups all-purpose flour
- 4 tbsp cocoa powder
- 1/2 tsp salt
- 1/2 cup butter (melted and cooled to room temperature)
- 1 1/4 cups sugar
- 1 cup brown sugar
- 3 eggs (room temperature, about 70°F)
- 2 tsp vanilla extract
- 1 tbsp red food coloring
- 1/2 tsp espresso powder
For the topping and skulls::
- 1 cup chocolate melting wafers (I prefer Ghirardelli for a smoother melt)
- 8 chocolate sandwich cookies (crushed into 1/4-inch pieces for texture)
- chocolate skull chips
Instructions
- Melt the chocolate wafers according to package directions (typically in a double boiler or microwave in 30-second intervals, stirring between each). Pour the melted chocolate into silicone skull molds, filling them completely. Freeze for 3-5 minutes until set, then pop the skulls out of the molds. Repeat this process 1-2 more times to build up thicker, more durable skulls. Set the finished skulls aside in the freezer while you prepare the brownies—they'll stay perfectly firm.
- Preheat your oven to 350°F and line a 9x13 inch baking pan with parchment paper, leaving a slight overhang for easy removal. Crush the chocolate sandwich cookies into roughly 1/4-inch pieces—you want some texture variation, not fine crumbs. Whisk together the flour, cocoa powder, and salt in a small bowl and set aside. This prep work ensures you're not scrambling mid-batter.
- In a large mixing bowl, whisk together the melted and cooled butter with both the granulated sugar and brown sugar until well combined. Add the room-temperature eggs one at a time, whisking thoroughly after each addition to fully incorporate. Stir in the vanilla extract, red food coloring, and espresso powder, mixing until the batter is uniformly deep red and the espresso powder has dissolved—it won't add noticeable coffee flavor, but it deepens the red hue and enhances the chocolate notes. I like to use espresso powder here because it adds complexity without making the brownies taste like coffee.
- Gently fold the dry ingredient mixture from Step 2 into the wet batter from Step 3 using a spatula, stirring just until no flour streaks remain—overmixing can lead to dense brownies. Pour the batter into your prepared pan and smooth the top. Bake at 350°F for 30-40 minutes; the brownies are done when a toothpick inserted into the center comes out with a few moist crumbs (not completely clean, as you want them fudgy). The baking time will vary slightly depending on your oven, so start checking at 30 minutes.
- Remove the brownies from the oven and immediately sprinkle the chocolate skull chips evenly across the surface. Let them sit for 2 minutes to soften slightly, then spread them gently across the brownies with a spatula to create a thin chocolate layer. While the chocolate is still warm and slightly tacky, sprinkle the crushed cookies from Step 2 over the entire surface, pressing them gently so they adhere. This layering ensures the cookies stay in place and give you that signature texture contrast.
- Let the brownies cool in the pan for 15 minutes, which allows the chocolate topping to set and makes them easier to cut. Once partially cooled, arrange the chocolate skulls from Step 1 on top of the brownies, pressing them gently into the chocolate layer so they stay put. Allow the brownies to cool completely to room temperature (about 1-2 hours), then lift them out using the parchment overhang and cut into 16 squares using a sharp, clean knife.


