Finding a side dish that pleases everyone at the dinner table can feel like an impossible task. After all, you want something that’s comforting enough for picky eaters, impressive enough for guests, and simple enough that you won’t stress out making it on a busy weeknight.
Luckily, these evaporated milk scalloped potatoes hit all the right notes: they’re creamy and satisfying, surprisingly easy to put together, and work perfectly alongside everything from weeknight roast chicken to holiday ham.
Why You’ll Love This Scalloped Potatoes
- Creamy, rich texture – The evaporated milk creates an incredibly smooth and velvety sauce that coats every layer of potato perfectly without being too heavy.
- Quick and easy – Ready in under an hour, this recipe is much faster than traditional scalloped potatoes that can take hours to bake.
- Simple pantry ingredients – You probably have most of these basic ingredients on hand already, making it perfect for last-minute side dishes.
- Perfect comfort food – These tender, cheesy layers make the ideal side dish for holidays, family dinners, or any time you want something warm and satisfying.
- Foolproof recipe – The evaporated milk prevents curdling and ensures your sauce turns out smooth every single time, even for beginner cooks.
What Kind of Potatoes Should I Use?
For scalloped potatoes, you’ll want to choose a potato that holds its shape well during baking and has a good balance of starch and moisture. Yukon Gold potatoes are my top pick because they have a creamy texture and won’t fall apart as easily as russets might. Russet potatoes can work too, but they tend to be more starchy and might break down a bit more during cooking, which some people actually prefer for a creamier result. Red potatoes are another solid choice since they hold their shape really well, though they’ll give you a slightly firmer texture. Whether you peel them or leave the skins on is totally up to you – the skins add a nice rustic touch and extra nutrients, but peeled potatoes give you that classic smooth look.
Options for Substitutions
This creamy scalloped potato recipe is pretty forgiving when it comes to swaps:
- Evaporated milk: This is really the star of the recipe, so I’d stick with evaporated milk if possible. But if you’re in a pinch, you can use heavy cream mixed with equal parts water, or whole milk (though it won’t be quite as rich).
- Potatoes: Russet or Yukon Gold potatoes work best here. Russets give you that classic fluffy texture, while Yukons hold their shape better. Red potatoes can work too, but they’ll be a bit more waxy.
- All-purpose flour: You can swap this with cornstarch (use 1½ tablespoons mixed with a little cold water first) or even instant mashed potato flakes for thickening.
- Parmesan cheese: Feel free to use sharp cheddar, gruyere, or even skip the cheese altogether. If using cheddar, add it in the last 15 minutes of baking to prevent it from getting too brown.
- Butter: Olive oil or vegetable oil can work for greasing and cooking the onions, though you’ll miss out on that rich butter flavor.
Watch Out for These Mistakes While Baking
The biggest mistake with scalloped potatoes is slicing them too thick, which leads to uneven cooking and hard centers – aim for slices about 1/8 inch thick using a mandoline or sharp knife for consistent results.
Another common error is not cooking the flour mixture long enough, so make sure to whisk and cook your butter, flour, and seasonings for at least 2-3 minutes to eliminate any raw flour taste before adding the liquids.
Don’t skip covering the dish with foil for the first part of baking, as this prevents the top from browning too quickly while the potatoes underneath are still cooking through.
Finally, resist the urge to dig in right away – letting the casserole rest for 10-15 minutes after baking allows the sauce to thicken properly and makes serving much neater.
What to Serve With Scalloped Potatoes?
Scalloped potatoes are the perfect side dish for almost any protein, but they really shine alongside roasted chicken, baked ham, or grilled pork chops. The creamy, cheesy layers pair beautifully with something green and fresh, so I love serving them with steamed broccoli, roasted Brussels sprouts, or a simple mixed greens salad. For special occasions like Easter or Christmas dinner, these potatoes make an excellent companion to prime rib or roasted turkey. You could also turn them into a more complete meal by adding some cooked bacon bits or ham pieces right into the layers before baking.
Storage Instructions
Refrigerate: Leftover scalloped potatoes taste amazing the next day! Cover your baking dish tightly with foil or transfer portions to airtight containers and keep in the fridge for up to 4 days. The flavors actually get even better after sitting overnight, so don’t worry if you have extras.
Freeze: You can freeze scalloped potatoes for up to 3 months, though the texture might be slightly different when thawed. Let them cool completely first, then wrap the whole dish in plastic wrap and foil, or portion into freezer-safe containers. I like to freeze individual servings for easy weeknight dinners.
Reheat: To warm up your scalloped potatoes, cover with foil and bake at 350°F for about 20-25 minutes until heated through. If reheating from frozen, thaw overnight in the fridge first. You can also microwave individual portions, but the oven gives you that nice crispy top again.
| Preparation Time | 15-20 minutes |
| Cooking Time | 30-35 minutes |
| Total Time | 45-55 minutes |
| Level of Difficulty | Medium |
Estimated Nutrition
Estimated nutrition for the whole recipe (without optional ingredients):
- Calories: 1300-1500
- Protein: 28-32 g
- Fat: 28-34 g
- Carbohydrates: 250-270 g
Ingredients
For the casserole:
- 1 tsp salt (for boiling potatoes)
- Salted butter, for greasing (I use Kerrygold for this)
- 2 lb potatoes, thinly sliced (about 1/8-inch thick, peeled or unpeeled)
- 1 large onion, chopped (about 1-inch pieces)
For the sauce:
- 1 can (12 oz) evaporated milk (creates a rich, creamy sauce)
- 1 cup water
- 1 tsp salt
- 3 tbsp all-purpose flour (I use King Arthur all-purpose flour)
- 3 tbsp salted butter (melted and cooled slightly)
- 1/2 tsp ground black pepper (freshly ground preferred)
For assembly:
- 1/3 cup grated parmesan cheese (optional but recommended for extra flavor and a slight golden top)
Step 1: Prepare and Parboil the Potatoes
- 2 lb potatoes, thinly sliced
- 1 tsp salt
Peel the potatoes if desired (I leave the skin on for extra texture and nutrients), then slice them into thin, even 1/8-inch slices—uniform thickness is key so they cook evenly.
Bring a large pot of salted water to a boil and add the potato slices.
Parboil for 3-4 minutes until they’re just barely tender but still hold their shape; they should still have some resistance when pierced with a fork.
Drain well in a colander and set aside.
This partial cooking ensures the potatoes finish tender throughout while maintaining their structure in the final dish.
Step 2: Build the Cream Sauce Base
- 3 tbsp salted butter
- 1 large onion, chopped
- 3 tbsp all-purpose flour
- 1 tsp salt
- 1/2 tsp ground black pepper
While the potatoes cook, melt the 3 tablespoons of salted butter in a medium saucepan over medium heat.
Add the chopped onion and cook for 1-2 minutes until softened but not browned—you want the onion to become tender and slightly translucent.
Sprinkle the flour, salt, and black pepper over the onions and stir constantly for 1 minute.
This toasts the flour slightly and creates a roux, which will thicken your sauce and give it body.
I prefer freshly ground black pepper here as it provides a cleaner, more vibrant flavor than pre-ground.
Step 3: Create the Creamy Sauce
- 1 can evaporated milk
- 1 cup water
- roux mixture from Step 2
Slowly whisk the evaporated milk and water into the roux, stirring constantly to prevent lumps from forming.
Continue stirring over medium heat for 2-3 minutes until the sauce thickens enough to coat the back of a spoon.
The evaporated milk creates a naturally rich, silky sauce without needing cream, and the starch from the roux ensures it clings beautifully to the potatoes.
Once thickened, remove from heat and let cool slightly—this prevents the sauce from cooking the potatoes prematurely when layered.
Step 4: Preheat Oven and Prepare Baking Dish
- Salted butter, for greasing
While the sauce cools, preheat your oven to 350°F.
Lightly grease a 9×13-inch baking dish with salted butter—I use Kerrygold because the higher fat content prevents sticking and adds subtle flavor.
This step can happen alongside the sauce-making so you’re not wasting time.
Step 5: Layer and Assemble the Dish
- parboiled potatoes from Step 1
- cream sauce from Step 3
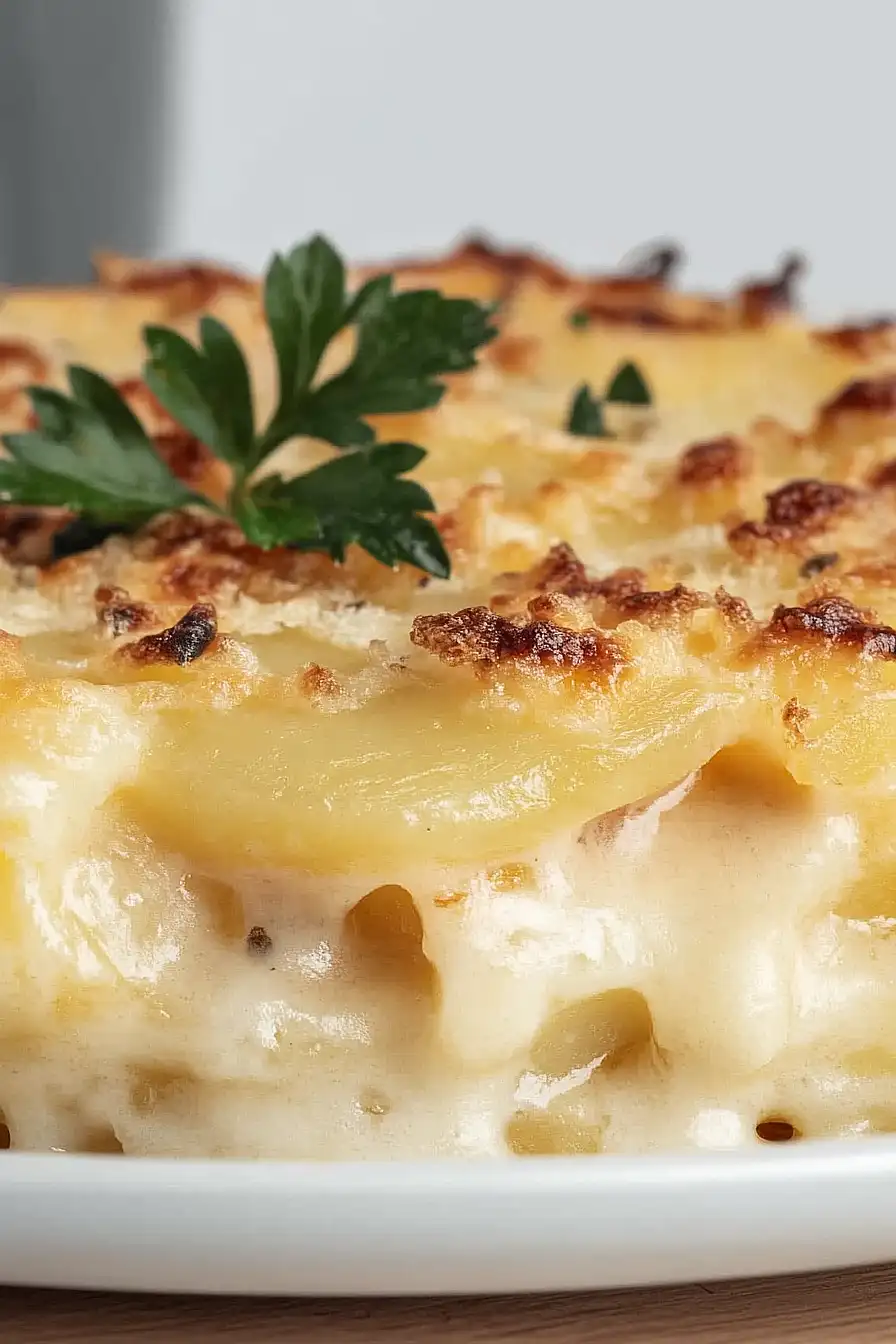
Arrange half of the parboiled potatoes from Step 1 in an even layer on the bottom of the greased baking dish.
Pour half of the cream sauce from Step 3 evenly over the potatoes, making sure the sauce reaches into the gaps.
Repeat with the remaining potatoes and sauce for the second layer.
The layering technique ensures every bite has both potato and creamy sauce, and the thin potato slices allow the sauce to penetrate throughout during baking.
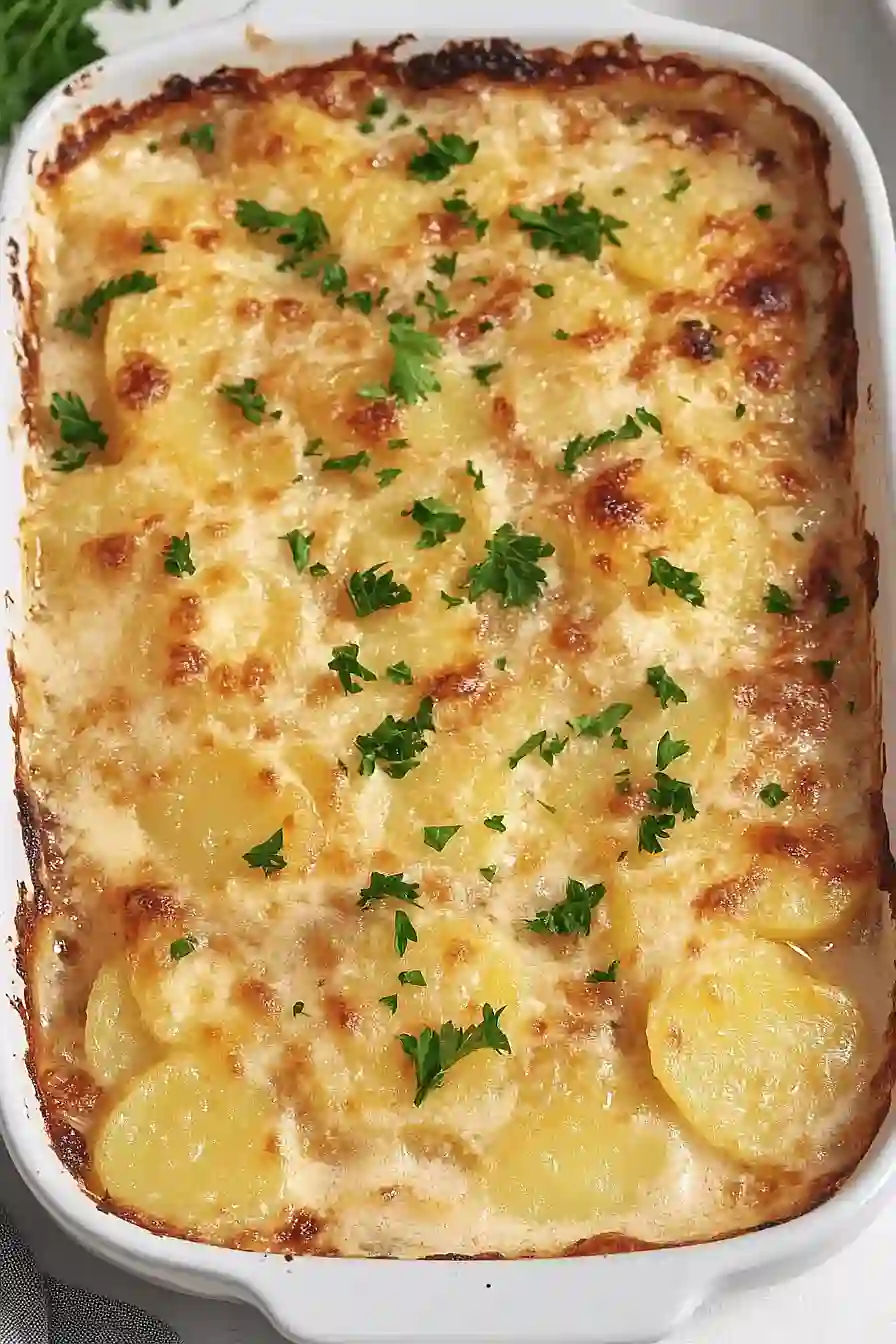
Step 6: Top with Cheese and Bake
- 1/3 cup grated parmesan cheese
Sprinkle the grated Parmesan cheese evenly across the top of the assembled dish.
While optional, I highly recommend it—the cheese creates a light golden crust and adds a nutty, savory depth that complements the creamy potatoes perfectly.
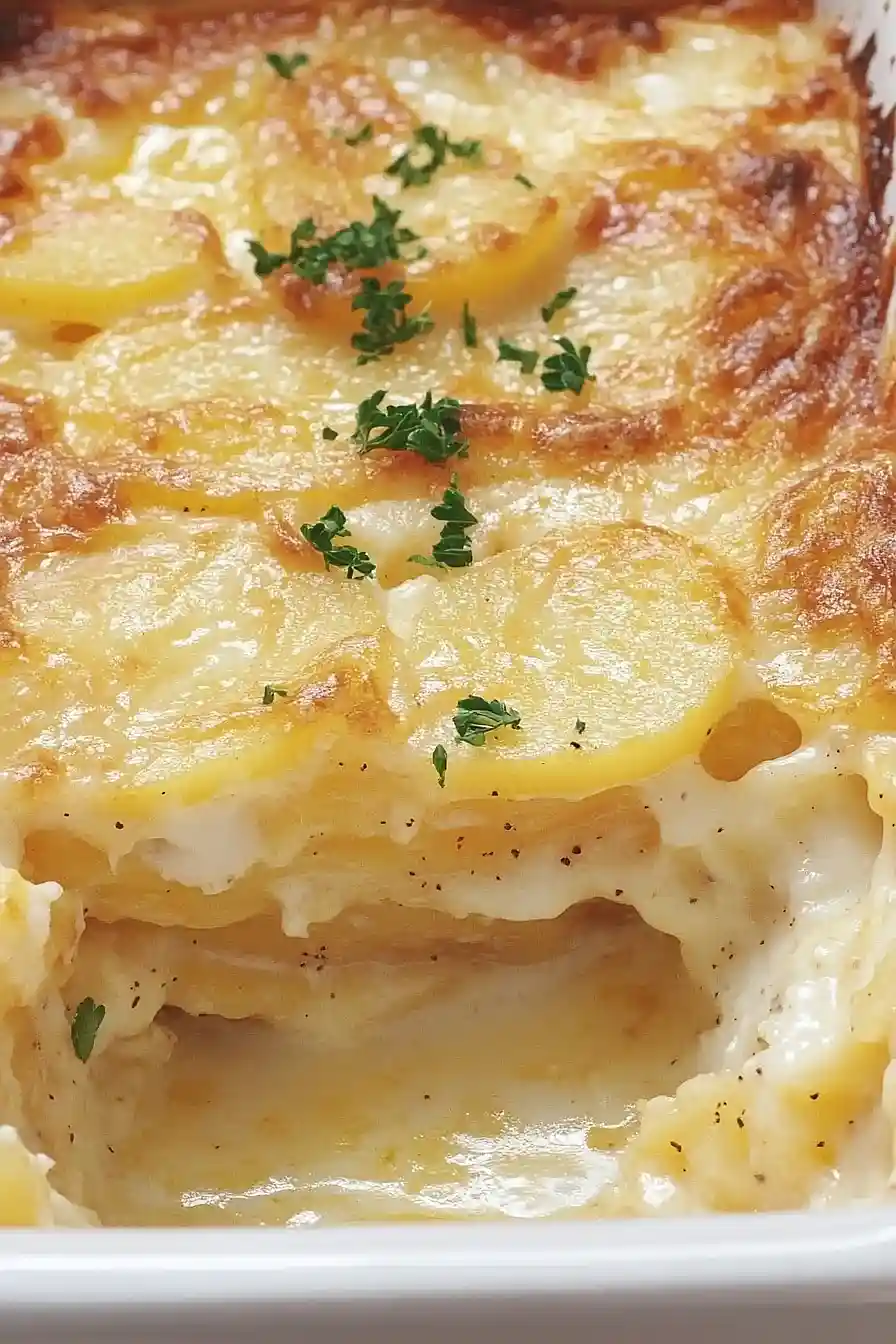
Bake uncovered in the preheated 350°F oven for 25-30 minutes until the top is golden and the potatoes are completely tender when pierced with a fork.
Step 7: Rest and Serve
Remove from the oven and let the scalloped potatoes rest for 10-15 minutes before serving.
This resting period allows the sauce to set slightly, making portions easier to serve and more cohesive.
The residual heat continues gently cooking the potatoes to perfect tenderness while the flavors settle and meld together.


