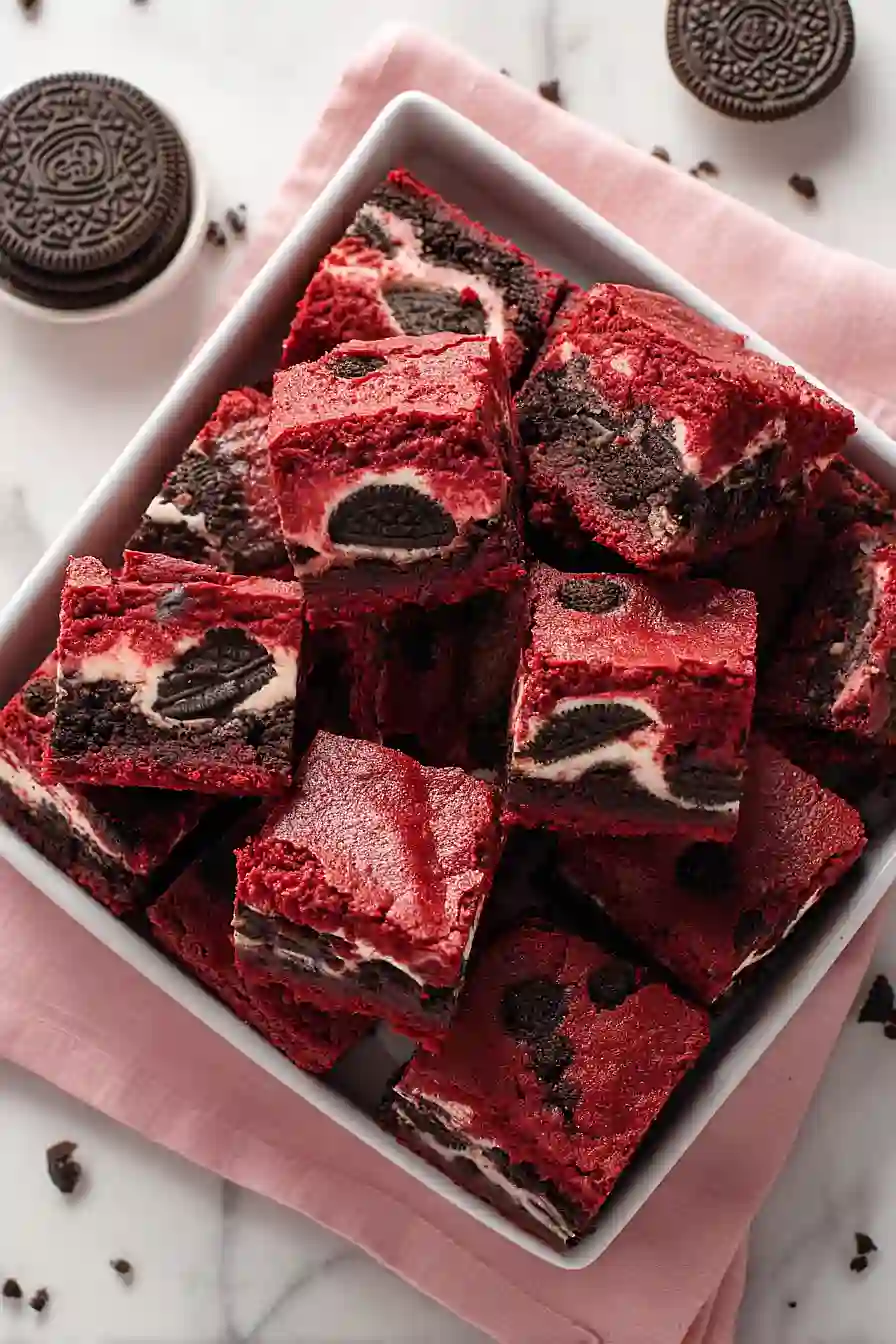
If you ask me, red velvet and cookies and cream are two of the best dessert flavors out there.
These fudgy brownies bring both together in one pan, giving you that signature red velvet taste with a surprise of chocolate cookies mixed right in. Rich cocoa flavor meets sweet vanilla, all wrapped up in that classic red color.
The brownies get their depth from real butter and a touch of espresso powder that makes the chocolate taste even better. Chopped chocolate cookies fold into the batter, creating pockets of crunch throughout.
They’re an easy dessert that feels a bit fancy, perfect for when you want to make something fun without spending all day in the kitchen.
Why You’ll Love These Red Velvet Cookies and Cream Brownies
- Eye-catching dessert – The bright red color combined with chunks of chocolate cookies makes these brownies look as good as they taste, perfect for parties or special occasions.
- Simple ingredients – You probably have most of these pantry staples on hand already, and the chocolate cookies add a fun twist without complicating things.
- Quick to make – Ready in just over an hour, these brownies come together faster than you’d think for such an impressive treat.
- Crowd-pleaser – The combination of red velvet and cookies and cream flavors means everyone at the table will be reaching for seconds.
What Kind of Chocolate Cookies Should I Use?
For these brownies, you’ll want to use sandwich-style chocolate cookies like Oreos, which are the classic choice and work perfectly. You can use the regular version or go for double-stuffed if you want extra creaminess throughout your brownies. Generic store-brand chocolate sandwich cookies work just as well as name brands and can save you a few bucks. Just roughly chop or break up the cookies into chunks before mixing them into your batter – you want some bigger pieces for texture, but not cookies that are so large they make the brownies hard to cut.

Options for Substitutions
This recipe is pretty forgiving when it comes to swaps, so here are some options if you need them:
- Butter: You can use margarine or coconut oil in place of butter. If using coconut oil, make sure it’s at room temperature so it mixes well with the sugar.
- Red food coloring: If you want to skip the artificial coloring, try using beet juice or beet powder for a natural red hue. You’ll need about 3-4 tablespoons of beet juice, though the color won’t be quite as bright. Or just leave it out completely for regular chocolate brownies.
- Chocolate cookies: Oreos are the classic choice here, but any chocolate sandwich cookies will work. You can also use chocolate chip cookies or even chocolate wafer cookies broken into chunks.
- Cocoa powder: Dutch-processed or natural cocoa powder both work fine. Just stick with unsweetened cocoa powder, not hot chocolate mix.
- Eggs: For each egg, you can substitute with 1/4 cup applesauce or a flax egg (1 tablespoon ground flaxseed mixed with 3 tablespoons water, let sit for 5 minutes).
Watch Out for These Mistakes While Baking
The biggest mistake with red velvet brownies is overbaking them, which turns fudgy brownies into dry cake – start checking at 40 minutes by inserting a toothpick into the center, and look for a few moist crumbs rather than a completely clean toothpick.
Using too much red food coloring can give your brownies a bitter, artificial taste, so stick to the 2 tablespoons called for and remember that the color will deepen as they bake.
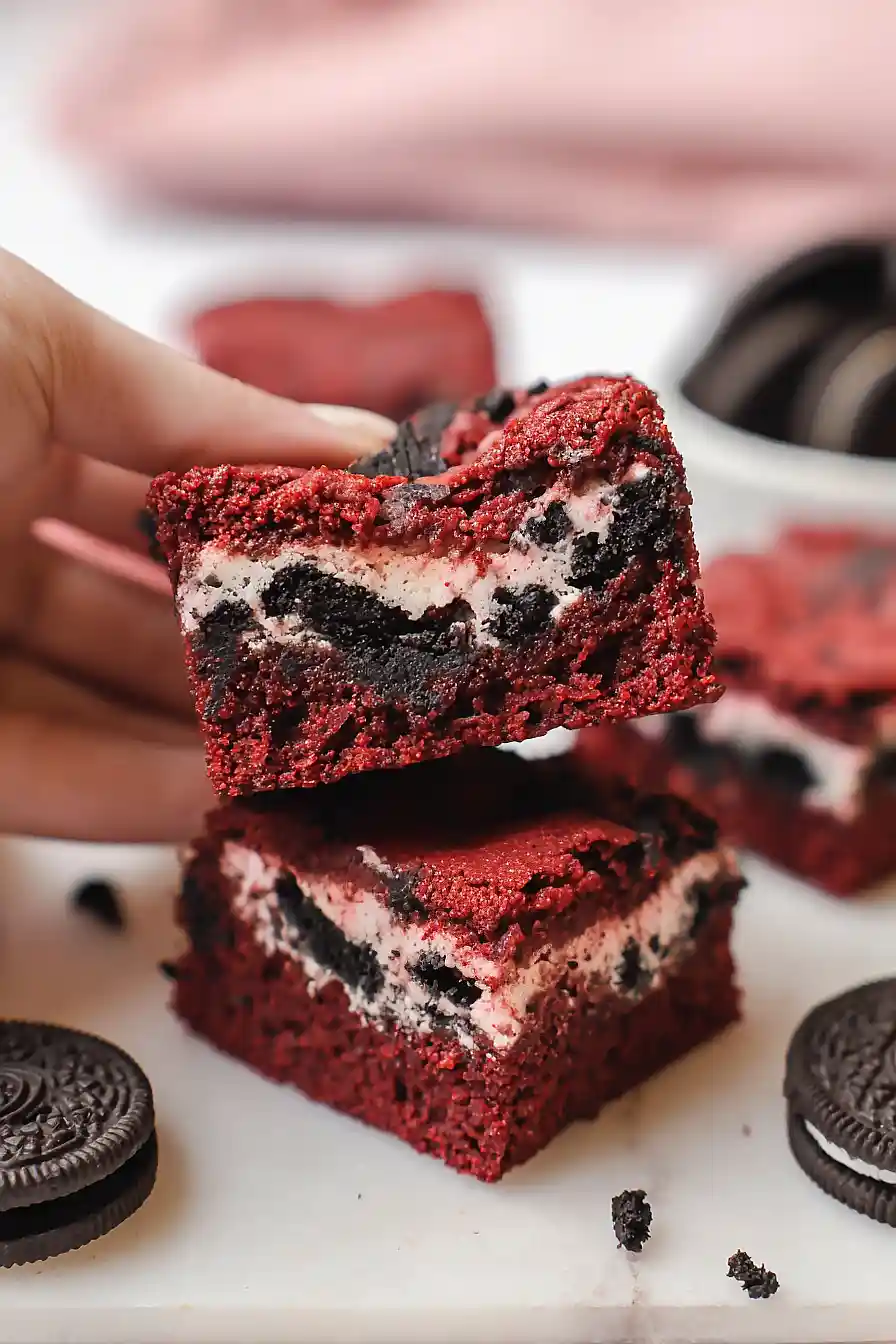
When folding in the chocolate cookies, avoid crushing them completely – you want chunks throughout for that cookies and cream texture, not just crumbs.
Finally, resist the urge to cut into these brownies right away, as letting them cool completely in the pan for at least an hour helps them set properly and makes cutting clean squares much easier.
What to Serve With Red Velvet Cookies and Cream Brownies?
These brownies are rich and decadent, so they pair perfectly with a cold glass of milk or a scoop of vanilla ice cream on the side. If you’re serving them at a party or gathering, consider setting out some fresh whipped cream or even cream cheese frosting for people to add on top, since red velvet and cream cheese are always a winning combination. A hot cup of coffee or hot chocolate also works great if you’re enjoying these as an afternoon treat. For a fun dessert spread, you can serve them alongside fresh strawberries or raspberries to add a little fruity brightness that cuts through the sweetness.
Storage Instructions
Store: Keep your red velvet cookies and cream brownies in an airtight container at room temperature for up to 3 days, or in the fridge for about a week. They actually taste amazing cold from the fridge if you like a fudgier texture!
Freeze: These brownies freeze really well for up to 3 months. Cut them into individual squares and wrap each one in plastic wrap, then store them all together in a freezer bag. That way you can grab just one or two whenever a craving hits.
Thaw: Let frozen brownies sit at room temperature for about 30 minutes to an hour, or if you’re impatient like me, microwave them for 15-20 seconds for that fresh-baked warmth. They’ll taste just as good as the day you made them!
| Preparation Time | 15-20 minutes |
| Cooking Time | 45-50 minutes |
| Total Time | 60-70 minutes |
| Level of Difficulty | Easy |
| Servings | 16 pieces |
Estimated Nutrition
Estimated nutrition for the whole recipe (without optional ingredients):
- Calories: 3300-3500
- Protein: 30-35 g
- Fat: 180-200 g
- Carbohydrates: 430-460 g
Ingredients
- 1 cup butter (I prefer Kerrygold unsalted butter for this)
- 1 1/4 cup sugar
- 2 eggs (room temperature, about 70°F for better emulsion)
- 2 1/2 tsp vanilla extract
- 2 tbsp red food coloring
- 1 1/4 cup flour (I always use King Arthur all-purpose flour)
- 4 tbsp cocoa powder
- 1/2 tsp salt
- 1/4 tsp espresso powder
- 3 cups chocolate cookies (coarsely chopped into 1/2-inch chunks)
Step 1: Prepare the Pan and Mix Dry Ingredients
- 1 1/4 cup flour
- 4 tbsp cocoa powder
- 1/2 tsp salt
- 1/4 tsp espresso powder
Preheat your oven to 350°F and line a 9×13 inch baking dish with parchment paper, leaving some overhang on the sides for easy removal later.
While the oven heats, whisk together the flour, cocoa powder, salt, and espresso powder in a medium bowl.
The espresso powder won’t make these taste like coffee—it deepens and intensifies the chocolate flavor, which is essential for balancing the sweetness of red velvet.
Set this dry mixture aside.
Step 2: Cream Butter and Sugar
- 1 cup butter
- 1 1/4 cup sugar
In a large mixing bowl, melt the butter over low heat or in the microwave (avoid overheating), then add the sugar and mix until combined.
I prefer using quality butter like Kerrygold because it creates a richer, more luxurious texture in these brownies.
The mixture should be well blended but won’t be fluffy like traditional creaming—this is normal since we’re starting with melted rather than softened butter.
Step 3: Build the Wet Mixture with Eggs and Flavoring
- 2 eggs
- 2 1/2 tsp vanilla extract
- 2 tbsp red food coloring
Add the room-temperature eggs one at a time to the butter-sugar mixture, stirring well after each addition to ensure proper emulsion.
Then stir in the vanilla extract and red food coloring, mixing until the batter is a deep, vibrant red color and completely smooth.
Room-temperature eggs incorporate more smoothly and create a better texture than cold eggs, which can break the emulsion and make the brownies grainy.
Step 4: Combine Wet and Dry Ingredients
- dry ingredient mixture from Step 1
Add the dry ingredient mixture from Step 1 to the wet mixture from Step 3, stirring until just combined—be careful not to overmix, as this can develop too much gluten and make the brownies tough.
The batter should be thick and fudgy-looking with no visible flour streaks.
Stop mixing as soon as the dry ingredients are incorporated.
Step 5: Fold in Cookies and Assemble
- 3 cups chocolate cookies
Reserve about 1/2 cup of the coarsely chopped cookies for topping.
Gently fold the remaining 2.5 cups of chopped cookies into the batter using a spatula, being careful to maintain the texture—you want distinct cookie chunks throughout, not a uniform mix.
Pour the batter into the prepared pan and spread evenly, then distribute the reserved cookie pieces across the top, pressing them down slightly so they stay in place during baking.
I like to use cookies with visible cream filling layers so they create appealing texture contrast when you bite into the finished brownies.
Step 6: Bake and Cool
Bake for 45 minutes, until a toothpick inserted in the center comes out with just a few moist crumbs—don’t overbake, as these brownies will continue to set as they cool.
Remove from the oven and let cool completely in the pan for at least 2 hours before cutting (or place in the refrigerator for 30-45 minutes if you’re in a hurry).
The cooling time is crucial because it allows the brownies to firm up enough to cut cleanly while maintaining their fudgy interior.

Classic Red Velvet Cookies and Cream Brownies
Ingredients
- 1 cup butter (I prefer Kerrygold unsalted butter for this)
- 1 1/4 cup sugar
- 2 eggs (room temperature, about 70°F for better emulsion)
- 2 1/2 tsp vanilla extract
- 2 tbsp red food coloring
- 1 1/4 cup flour (I always use King Arthur all-purpose flour)
- 4 tbsp cocoa powder
- 1/2 tsp salt
- 1/4 tsp espresso powder
- 3 cups chocolate cookies (coarsely chopped into 1/2-inch chunks)
Instructions
- Preheat your oven to 350°F and line a 9x13 inch baking dish with parchment paper, leaving some overhang on the sides for easy removal later. While the oven heats, whisk together the flour, cocoa powder, salt, and espresso powder in a medium bowl. The espresso powder won't make these taste like coffee—it deepens and intensifies the chocolate flavor, which is essential for balancing the sweetness of red velvet. Set this dry mixture aside.
- In a large mixing bowl, melt the butter over low heat or in the microwave (avoid overheating), then add the sugar and mix until combined. I prefer using quality butter like Kerrygold because it creates a richer, more luxurious texture in these brownies. The mixture should be well blended but won't be fluffy like traditional creaming—this is normal since we're starting with melted rather than softened butter.
- Add the room-temperature eggs one at a time to the butter-sugar mixture, stirring well after each addition to ensure proper emulsion. Then stir in the vanilla extract and red food coloring, mixing until the batter is a deep, vibrant red color and completely smooth. Room-temperature eggs incorporate more smoothly and create a better texture than cold eggs, which can break the emulsion and make the brownies grainy.
- Add the dry ingredient mixture from Step 1 to the wet mixture from Step 3, stirring until just combined—be careful not to overmix, as this can develop too much gluten and make the brownies tough. The batter should be thick and fudgy-looking with no visible flour streaks. Stop mixing as soon as the dry ingredients are incorporated.
- Reserve about 1/2 cup of the coarsely chopped cookies for topping. Gently fold the remaining 2.5 cups of chopped cookies into the batter using a spatula, being careful to maintain the texture—you want distinct cookie chunks throughout, not a uniform mix. Pour the batter into the prepared pan and spread evenly, then distribute the reserved cookie pieces across the top, pressing them down slightly so they stay in place during baking. I like to use cookies with visible cream filling layers so they create appealing texture contrast when you bite into the finished brownies.
- Bake for 45 minutes, until a toothpick inserted in the center comes out with just a few moist crumbs—don't overbake, as these brownies will continue to set as they cool. Remove from the oven and let cool completely in the pan for at least 2 hours before cutting (or place in the refrigerator for 30-45 minutes if you're in a hurry). The cooling time is crucial because it allows the brownies to firm up enough to cut cleanly while maintaining their fudgy interior.


