I used to be terrified of making dinner rolls from scratch. Store-bought was easier, and honestly, I thought homemade bread was something only grandmas could pull off. My first attempt was a disaster—dense, tough rolls that could have doubled as hockey pucks.
Then I learned the secret wasn’t some fancy technique or special equipment. Good dinner rolls just need time and patience. The dough does most of the work while you go about your day. Once I figured that out, homemade rolls became my go-to side dish that always impresses without the stress.

Why You’ll Love These Dinner Rolls
- Quick homemade bread – These dinner rolls come together in just 35-45 minutes, so you can have fresh, warm bread on the table without spending all day in the kitchen.
- Simple pantry ingredients – You probably already have everything you need – just basic baking staples like flour, yeast, and oil that most home cooks keep on hand.
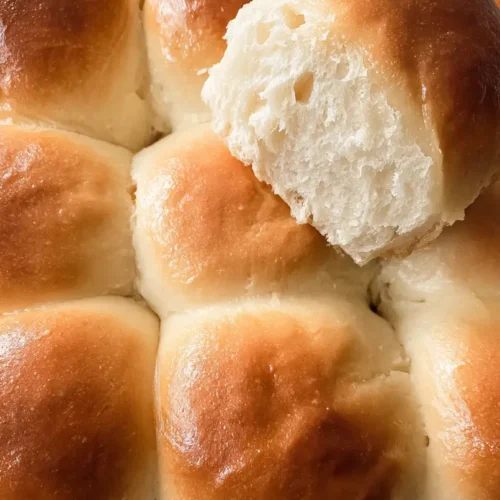
- Soft and fluffy texture – The combination of oil and egg creates tender, pillowy rolls that are perfect for soaking up gravy or butter.
- Perfect for any meal – Whether you’re serving them with Sunday dinner, holiday meals, or just a weeknight soup, these rolls make every meal feel a little more special.
- Beginner-friendly recipe – Even if you’re new to bread making, this straightforward recipe is hard to mess up and gives you confidence to tackle more baking projects.
What Kind of Flour Should I Use?
All-purpose flour is perfect for these dinner rolls and gives you that soft, tender texture you’re looking for. You can use any brand of all-purpose flour you have on hand – whether it’s King Arthur, Gold Medal, or your store brand, they’ll all work great. If you only have bread flour available, that will work too, though your rolls might be slightly more chewy rather than soft. Just avoid using cake flour or self-rising flour, as these will change the texture and rise of your rolls in ways you don’t want.

Options for Substitutions
These dinner rolls are pretty forgiving when it comes to swaps, but there are a few things to keep in mind:
- Active dry yeast: You can use instant yeast instead – just use the same amount and mix it directly with the dry ingredients (no need to proof it first). If you only have fresh yeast, use about 1.5 ounces and crumble it into the warm water.
- Vegetable oil: Melted butter works great here and adds extra flavor – use the same amount but let it cool slightly before adding. You can also try canola oil or even olive oil for a different taste.
- All-purpose flour: Bread flour will give you chewier, more structured rolls if that’s what you’re after. Don’t substitute with whole wheat flour completely, but you can replace up to half the all-purpose flour with whole wheat for heartier rolls.
- Sugar: Honey or maple syrup work well too – use about 3 tablespoons and reduce the water by 1 tablespoon since these are liquid sweeteners.
- Egg: If you’re out of eggs, try 1/4 cup unsweetened applesauce or 3 tablespoons of milk mixed with 1 tablespoon of ground flaxseed (let it sit for 5 minutes first).
Watch Out for These Mistakes While Baking
The biggest mistake when making dinner rolls is using water that’s too hot for the yeast, which will kill it and leave you with dense, flat rolls – aim for water that feels just warm to the touch, around 105-110°F.
Another common error is not letting the dough rise long enough in both stages, so be patient and wait until it doubles in size, which can take 1-2 hours depending on your kitchen temperature.
Don’t add too much flour while kneading, as this will make your rolls tough and dry – the dough should be slightly sticky but manageable, and you can always dust your hands with flour instead of adding more to the dough.
Finally, avoid overbaking by checking your rolls at the minimum baking time and looking for a golden brown color on top – they should sound hollow when tapped on the bottom.

What to Serve With Dinner Rolls?
These soft, fluffy dinner rolls are perfect alongside just about any main dish you can think of! They’re amazing for soaking up gravy at Thanksgiving dinner, or for wiping your plate clean after a hearty stew or pot roast. I love serving them with butter and honey on the side, but they’re also great for making little sandwiches with leftover turkey or ham. Whether you’re having a casual weeknight dinner or a big family gathering, these rolls will disappear fast – so you might want to make a double batch!
Storage Instructions
Keep Fresh: These dinner rolls stay soft and fluffy when stored in an airtight container or wrapped in plastic wrap at room temperature for up to 3 days. I like to keep them in a bread box or sealed bag so they don’t dry out. They’re perfect for making ahead when you’re planning a big dinner!
Freeze: You can freeze these rolls either after baking or before the final rise. If freezing baked rolls, wrap them tightly in foil or freezer bags for up to 3 months. For unbaked rolls, shape them and freeze on a tray, then transfer to bags once solid.
Warm Up: To bring back that fresh-baked taste, wrap the rolls in a damp paper towel and microwave for 15-20 seconds, or warm them in a 350°F oven for about 5 minutes. If you froze unbaked rolls, just let them thaw and rise before baking as usual.
| Preparation Time | 15-25 minutes |
| Cooking Time | 20 minutes |
| Total Time | 35-45 minutes |
| Level of Difficulty | Medium |
Estimated Nutrition
Estimated nutrition for the whole recipe (without optional ingredients):
- Calories: 1850-2000
- Protein: 35-40 g
- Fat: 45-50 g
- Carbohydrates: 330-350 g
Ingredients
- 1 large egg (room temperature)
- 2 tbsp active dry yeast (I use Red Star)
- 1/3 cup vegetable oil (or any neutral oil like canola)
- 3 3/4 cups all-purpose flour (I use King Arthur)
- 1 1/4 cups water (warm, about 110°F for activating yeast)
- 1 tsp salt
- 1/4 cup sugar
Step 1: Activate the Yeast and Prepare Your Workspace
- 1 1/4 cups water
- 1/4 cup sugar
- 2 tbsp active dry yeast
Combine the warm water (about 110°F—test it on your wrist like you would a baby’s bath), sugar, and yeast in a large mixing bowl.
Let it sit for 2-5 minutes until it becomes foamy and fragrant; this confirms your yeast is alive and ready to work.
While waiting, grease a 9×13 inch baking pan with oil or butter, making sure to coat the bottom and sides evenly so your rolls won’t stick.
Step 2: Build the Dough
- yeast mixture from Step 1
- 1/3 cup vegetable oil
- 1 tsp salt
- 1 large egg
- 3 3/4 cups all-purpose flour
Pour the vegetable oil into the foamy yeast mixture, then add the salt and room-temperature egg.
Stir everything together until roughly combined.
Add the flour gradually, stirring as you go, until a shaggy dough forms.
I like to use warm eggs because they incorporate more smoothly and help the dough come together faster.
Once the flour is absorbed, knead the dough right in the bowl for about 4 minutes, working it with your hands until it becomes smooth and slightly tacky—it should feel soft but not sticky.
Step 3: Shape and Pan the Rolls
- dough from Step 2
- vegetable oil for hands
Lightly oil or spray your hands to prevent sticking.
Divide the dough into 15 equal pieces by pinching off portions and rolling them between your palms into smooth, tight balls.
Arrange the balls seam-side down in the prepared pan in three rows of five, leaving about half an inch between each roll so they have room to expand.
Cover the pan loosely with plastic wrap or a damp towel to trap moisture and encourage rising.
Step 4: Let Rolls Rise Until Puffy
Preheat your oven to 375°F.
Once the oven reaches temperature, turn it off and place the covered pan of rolls inside the warm (not hot) oven to rise.
This gentle, consistent warmth is ideal for proofing—the rolls need about 30-45 minutes to become puffy and nearly doubled in size.
You’ll know they’re ready when they’re soft to the touch and have visibly risen to fill most of the pan.
Step 5: Bake the Rolls Until Golden
- risen rolls from Step 4
Remove the pan from the oven and preheat it again to 375°F.
Once preheated, carefully place the risen rolls back in the oven and bake for 18-20 minutes, until the tops are deep golden brown.
The rolls are done when they’re firm on top and a light golden color on the sides where they’ve touched each other.
If your oven runs hot, check at 18 minutes to avoid over-browning.
Step 6: Finish and Serve
- baked rolls from Step 5
Remove the rolls from the oven and let them cool in the pan for just 2-3 minutes so they’re still warm but set enough to handle.
If you have melted butter available, brush it generously over the warm rolls for extra richness and shine.
Serve them warm—they’re best enjoyed within the first hour of baking, when the interiors are still soft and the exteriors have that perfect tender-crisp texture.
Irresistible Dinner Rolls
Ingredients
- 1 large egg (room temperature)
- 2 tbsp active dry yeast (I use Red Star)
- 1/3 cup vegetable oil (or any neutral oil like canola)
- 3 3/4 cups all-purpose flour (I use King Arthur)
- 1 1/4 cups water (warm, about 110°F for activating yeast)
- 1 tsp salt
- 1/4 cup sugar
Instructions
- Combine the warm water (about 110°F—test it on your wrist like you would a baby’s bath), sugar, and yeast in a large mixing bowl. Let it sit for 2-5 minutes until it becomes foamy and fragrant; this confirms your yeast is alive and ready to work. While waiting, grease a 9×13 inch baking pan with oil or butter, making sure to coat the bottom and sides evenly so your rolls won’t stick.
- Pour the vegetable oil into the foamy yeast mixture, then add the salt and room-temperature egg. Stir everything together until roughly combined. Add the flour gradually, stirring as you go, until a shaggy dough forms. I like to use warm eggs because they incorporate more smoothly and help the dough come together faster. Once the flour is absorbed, knead the dough right in the bowl for about 4 minutes, working it with your hands until it becomes smooth and slightly tacky—it should feel soft but not sticky.
- Lightly oil or spray your hands to prevent sticking. Divide the dough into 15 equal pieces by pinching off portions and rolling them between your palms into smooth, tight balls. Arrange the balls seam-side down in the prepared pan in three rows of five, leaving about half an inch between each roll so they have room to expand. Cover the pan loosely with plastic wrap or a damp towel to trap moisture and encourage rising.
- Preheat your oven to 375°F. Once the oven reaches temperature, turn it off and place the covered pan of rolls inside the warm (not hot) oven to rise. This gentle, consistent warmth is ideal for proofing—the rolls need about 30-45 minutes to become puffy and nearly doubled in size. You’ll know they’re ready when they’re soft to the touch and have visibly risen to fill most of the pan.
- Remove the pan from the oven and preheat it again to 375°F. Once preheated, carefully place the risen rolls back in the oven and bake for 18-20 minutes, until the tops are deep golden brown. The rolls are done when they’re firm on top and a light golden color on the sides where they’ve touched each other. If your oven runs hot, check at 18 minutes to avoid over-browning.
- Remove the rolls from the oven and let them cool in the pan for just 2-3 minutes so they’re still warm but set enough to handle. If you have melted butter available, brush it generously over the warm rolls for extra richness and shine. Serve them warm—they’re best enjoyed within the first hour of baking, when the interiors are still soft and the exteriors have that perfect tender-crisp texture.


