Finding a dessert that feels fancy but doesn’t require turning on your oven can seem nearly impossible, especially during those warm spring and summer months when the last thing you want is more heat in your kitchen. And let’s be honest, most no-bake desserts either take forever to set up properly or require some complicated technique that leaves you wondering if it was really worth the effort.
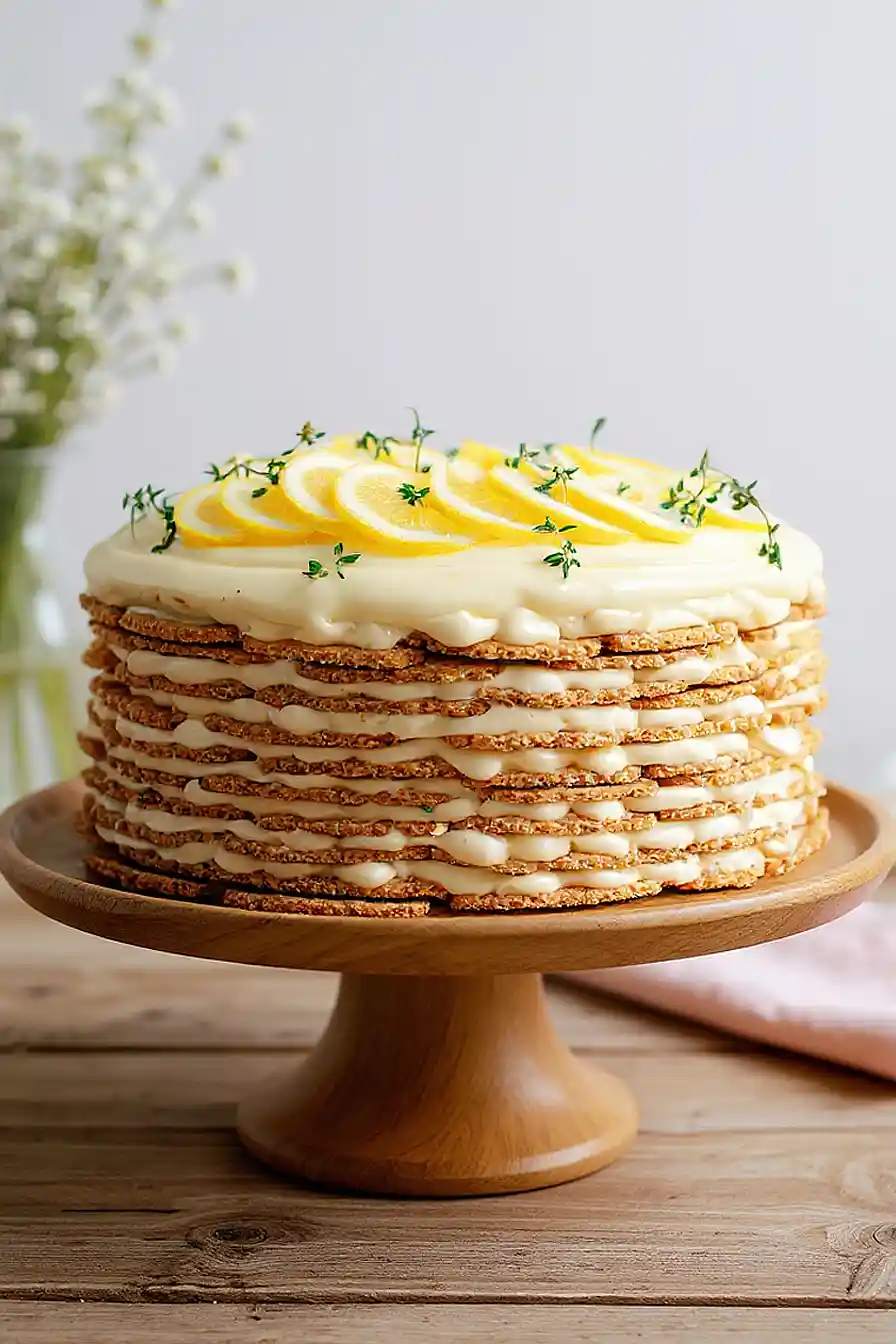
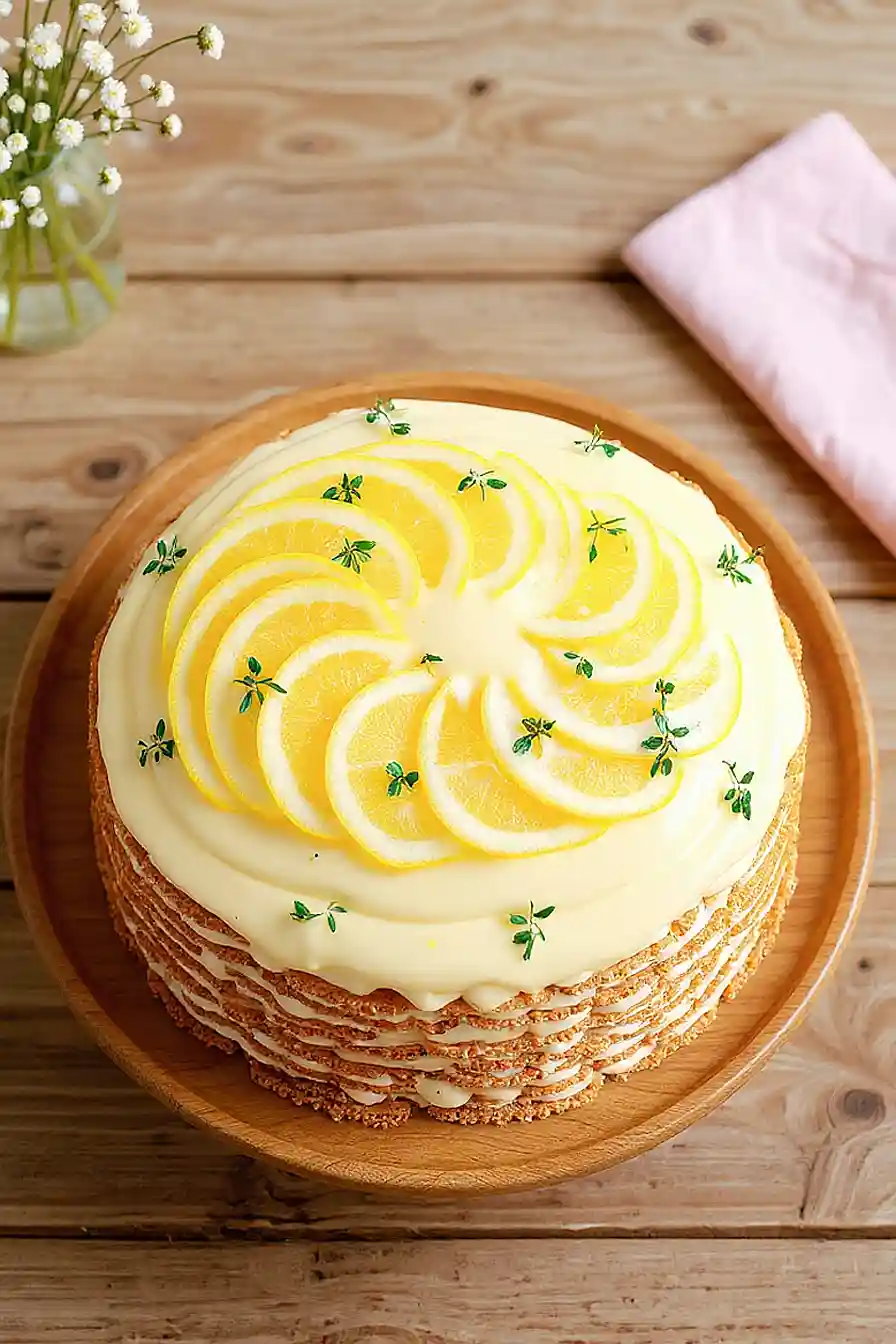
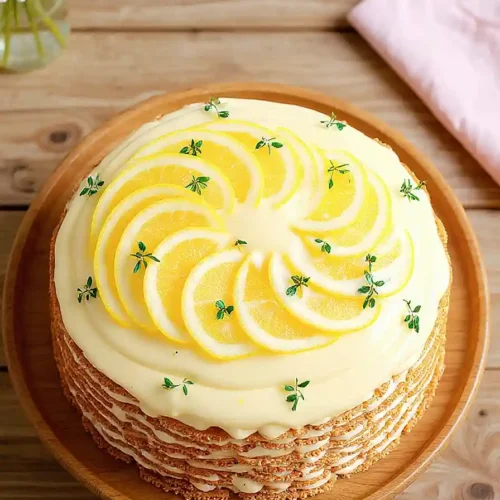
That’s where this Meyer lemon icebox cake comes in to save the day. It’s a no-bake wonder that layers vanilla cookies with a creamy, tangy filling made with Meyer lemons, honey, and fresh thyme. The best part? You can assemble the whole thing in about 20 minutes, then let your refrigerator do all the work while you go about your day.
Why You’ll Love This Meyer Lemon Icebox Cake
- No-bake dessert – You don’t need to turn on your oven for this one. Just layer the ingredients and let the fridge do all the work while the cookies soften into cake-like layers.
- Make-ahead friendly – This dessert actually needs to chill for several hours, so you can prepare it the night before and have one less thing to worry about when entertaining guests.
- Bright, refreshing flavor – The Meyer lemon and fresh thyme create a light, citrusy taste that’s perfect for spring and summer gatherings or when you want something that isn’t too heavy.
- Impressive presentation – This layered cake looks fancy and tastes amazing, but it’s actually much easier to make than traditional layer cakes. Your guests will think you spent hours on it.
What Kind of Cookies Should I Use?
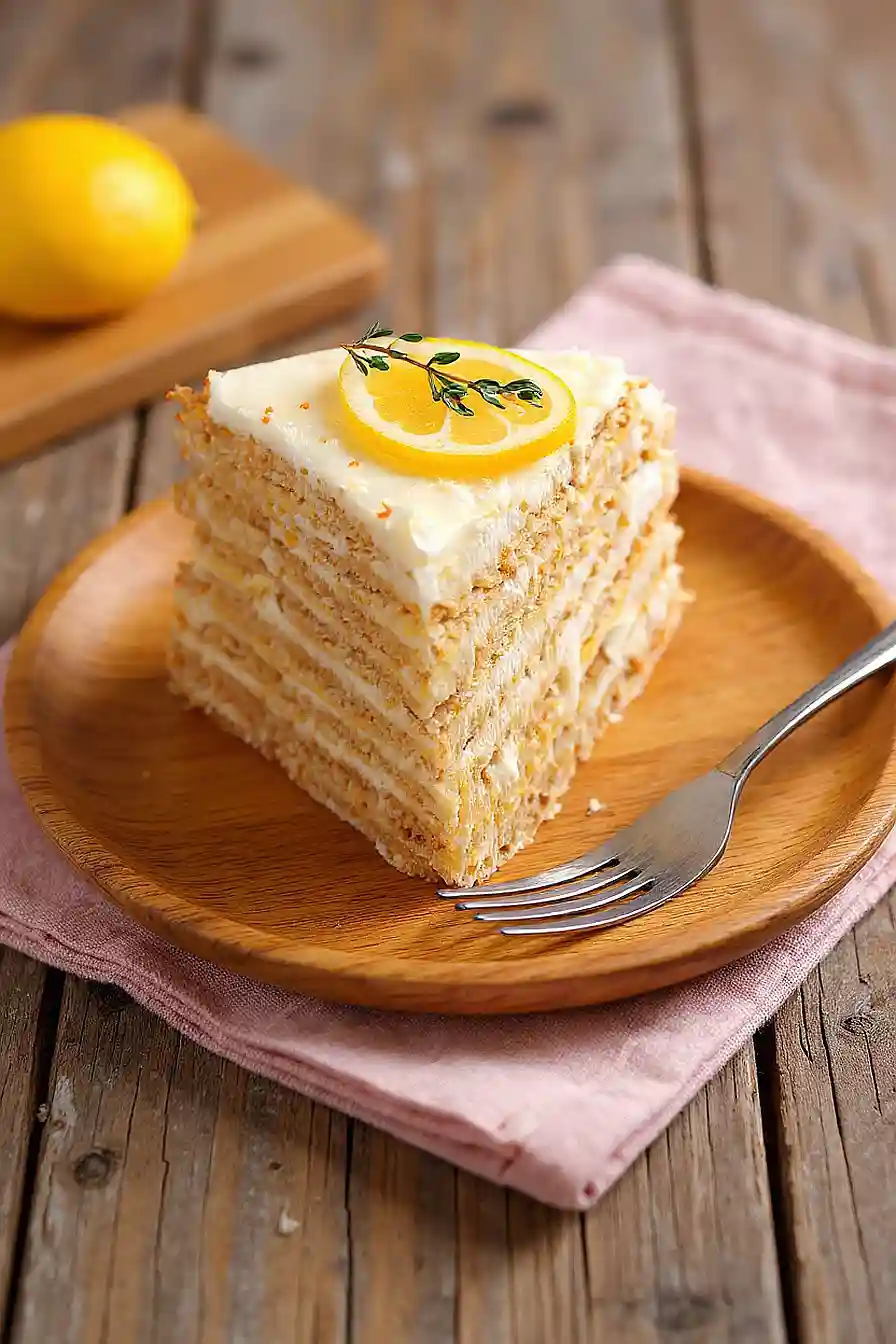
For this icebox cake, you’ll want to use thin, crispy cookies that are about 2 inches in size – think along the lines of vanilla wafers or those classic lemon cookies you find at the store. The key is that they need to be thin enough to soften properly as they absorb moisture from the cream mixture, which is what gives icebox cakes their signature cake-like texture. You can use either vanilla or lemon-flavored cookies depending on what you prefer, though lemon cookies will give you an extra citrus punch that pairs nicely with the Meyer lemon. If your cookies are larger or smaller than 2 inches, just adjust the quantity so you have enough to create your layers without gaps.
Options for Substitutions
This icebox cake is pretty forgiving when it comes to swaps:
- Meyer lemons: If you can’t find Meyer lemons, regular lemons work fine. They’re more tart, so you might want to add an extra tablespoon of honey to balance the flavor. Use the same amount of juice and zest.
- Fresh thyme: Not a fan of thyme? Try fresh basil or mint for a different herbal note, or skip the herbs altogether for a classic lemon flavor.
- Honey: You can swap honey for granulated sugar (use the same amount) or maple syrup. Just keep in mind that sugar will give you a less floral sweetness.
- Vanilla or lemon cookies: Graham crackers, ladyfingers, or even shortbread cookies work well here. The key is using thin, crisp cookies that will soften as they absorb the cream mixture.
- Cream cheese: Make sure to use full-fat cream cheese for this recipe – it’s essential for the right texture and stability. Low-fat versions won’t set properly and will make your cake runny.
- Heavy cream: Heavy cream is really important here and shouldn’t be substituted. You need the high fat content to whip properly and create that creamy, stable filling.
Watch Out for These Mistakes While Baking
The biggest mistake with icebox cakes is not whipping the cream to stiff peaks, which can cause your layers to slide around and create a messy, unstable cake – make sure the cream holds its shape when you lift the beaters.
Another common error is assembling the cake right before serving, but this dessert actually needs at least 6-8 hours in the fridge (or overnight) so the cookies can soften and meld with the cream into that signature cake-like texture.
When zesting your Meyer lemons, avoid pressing too hard and getting the white pith underneath, which adds bitterness instead of that bright citrus flavor you’re after.
Finally, don’t skip weighing down the top layer with plastic wrap pressed directly onto the surface – this helps everything compress evenly and prevents the cookies from drying out in the fridge.
What to Serve With Meyer Lemon Icebox Cake?
This icebox cake is pretty rich and creamy on its own, so I like to keep things simple on the side. A cup of hot tea or coffee is perfect for balancing out the sweetness, especially something like Earl Grey or a light roast that won’t overpower the lemon flavor. If you’re serving this for a dinner party, it pairs nicely after a lighter meal like grilled fish or roasted chicken with vegetables. You could also add some fresh berries on the side – raspberries or blueberries work great – to give your guests a little something tart and fresh to go with each bite of the cake.
Storage Instructions
Chill: This icebox cake actually gets better as it sits! Keep it covered in the refrigerator for at least 6 hours before serving, but it’s even better after overnight. Once it’s set, you can store it in the fridge for up to 3 days, though it’s usually gone way before that at my house.
Cover Well: Make sure to cover your cake tightly with plastic wrap or keep it in an airtight container so it doesn’t pick up any funky fridge smells. The cookies will continue to soften as they absorb the cream, creating that perfect cake-like texture we’re after.
Serve Cold: This dessert is meant to be enjoyed straight from the fridge, so no need to let it sit out. Just slice and serve it nice and cold for the best texture and flavor. If you’re taking it to a party, keep it chilled until the last minute.
| Preparation Time | 20-30 minutes |
| Cooking Time | 0-0 minutes |
| Total Time | 180-240 minutes |
| Level of Difficulty | Medium |
Estimated Nutrition
Estimated nutrition for the whole recipe (without optional ingredients):
- Calories: 5500-6000
- Protein: 55-65 g
- Fat: 390-420 g
- Carbohydrates: 470-510 g
Ingredients
For the filling:
- 4 cups heavy cream (cold, for best whipping results)
- 2 tbsp fresh thyme (finely chopped)
- 2 tbsp lemon zest (finely grated from Meyer lemons)
- 3/4 cup honey
- 6 tbsp Meyer lemon juice (freshly squeezed preferred)
- 16 oz cream cheese (softened to room temperature)
For assembly:
- 230 vanilla cookies (2-inch, such as Nabisco Nilla Wafers)
Step 1: Prepare the Cream Cheese Filling Base
- 16 oz cream cheese
- 6 tbsp Meyer lemon juice
- 3/4 cup honey
Start by beating the softened cream cheese, Meyer lemon juice, and honey together in a large bowl until the mixture is completely smooth and creamy with no lumps.
This creates the tangy, sweet foundation of your cake.
Make sure to scrape down the sides of the bowl occasionally to ensure everything is evenly combined.
I find that taking the cream cheese out of the fridge about 30 minutes before you start makes this step much easier and prevents overmixing.
Step 2: Whip the Cream with Aromatics
- 4 cups heavy cream
- 2 tbsp fresh thyme
- 2 tbsp lemon zest
In a separate bowl (or the bowl of an electric mixer), whip the cold heavy cream with the finely chopped fresh thyme and grated Meyer lemon zest until stiff peaks form.
The cold cream is essential here—it whips faster and holds its shape better.
The thyme and lemon zest should be distributed evenly throughout for consistent flavor in every bite.
I like to add the zest and thyme right at the beginning of whipping so they get fully incorporated into the cream.
Step 3: Combine the Filling and Chill
- cream cheese filling from Step 1
- whipped cream mixture from Step 2
Gently fold the whipped cream mixture from Step 2 into the cream cheese filling from Step 1 using a rubber spatula, being careful not to deflate the whipped cream—use broad, sweeping motions and fold just until no streaks remain.
Once combined, transfer the filling to the refrigerator while you assemble the cake layers.
This keeps everything cold and allows the flavors to meld slightly.
Step 4: Layer the Cake
- 230 vanilla cookies
- filling mixture from Step 3
Arrange 12 vanilla cookies on a cake plate or serving dish in a single layer (breaking them as needed to fit), then spread about 1/2 cup of the chilled filling from Step 3 evenly over the cookies.
Repeat this layering process—cookies, then filling—until you’ve used all ingredients, ending with a final layer of filling on top.
This classic icebox cake method allows the cookies to gradually soften and absorb moisture from the filling, creating a unique creamy, almost pudding-like texture.
Finish by spreading the remaining filling on top or reserving it as a garnish.
Step 5: Refrigerate and Set
Cover the assembled cake loosely with plastic wrap and refrigerate for at least 3 hours, though overnight is ideal.
This resting time allows the cookies to soften and absorb the creamy filling, transforming the texture into something between a cake and mousse.
The flavors also deepen and meld together beautifully during this time.
Serve straight from the refrigerator for the best texture and temperature.
Lemon Thyme Icebox Cake
Ingredients
For the filling:
- 4 cups heavy cream (cold, for best whipping results)
- 2 tbsp fresh thyme (finely chopped)
- 2 tbsp lemon zest (finely grated from Meyer lemons)
- 3/4 cup honey
- 6 tbsp Meyer lemon juice (freshly squeezed preferred)
- 16 oz cream cheese (softened to room temperature)
For assembly:
- 230 vanilla cookies (2-inch, such as Nabisco Nilla Wafers)
Instructions
- Start by beating the softened cream cheese, Meyer lemon juice, and honey together in a large bowl until the mixture is completely smooth and creamy with no lumps. This creates the tangy, sweet foundation of your cake. Make sure to scrape down the sides of the bowl occasionally to ensure everything is evenly combined. I find that taking the cream cheese out of the fridge about 30 minutes before you start makes this step much easier and prevents overmixing.
- In a separate bowl (or the bowl of an electric mixer), whip the cold heavy cream with the finely chopped fresh thyme and grated Meyer lemon zest until stiff peaks form. The cold cream is essential here—it whips faster and holds its shape better. The thyme and lemon zest should be distributed evenly throughout for consistent flavor in every bite. I like to add the zest and thyme right at the beginning of whipping so they get fully incorporated into the cream.
- Gently fold the whipped cream mixture from Step 2 into the cream cheese filling from Step 1 using a rubber spatula, being careful not to deflate the whipped cream—use broad, sweeping motions and fold just until no streaks remain. Once combined, transfer the filling to the refrigerator while you assemble the cake layers. This keeps everything cold and allows the flavors to meld slightly.
- Arrange 12 vanilla cookies on a cake plate or serving dish in a single layer (breaking them as needed to fit), then spread about 1/2 cup of the chilled filling from Step 3 evenly over the cookies. Repeat this layering process—cookies, then filling—until you've used all ingredients, ending with a final layer of filling on top. This classic icebox cake method allows the cookies to gradually soften and absorb moisture from the filling, creating a unique creamy, almost pudding-like texture. Finish by spreading the remaining filling on top or reserving it as a garnish.
- Cover the assembled cake loosely with plastic wrap and refrigerate for at least 3 hours, though overnight is ideal. This resting time allows the cookies to soften and absorb the creamy filling, transforming the texture into something between a cake and mousse. The flavors also deepen and meld together beautifully during this time. Serve straight from the refrigerator for the best texture and temperature.


