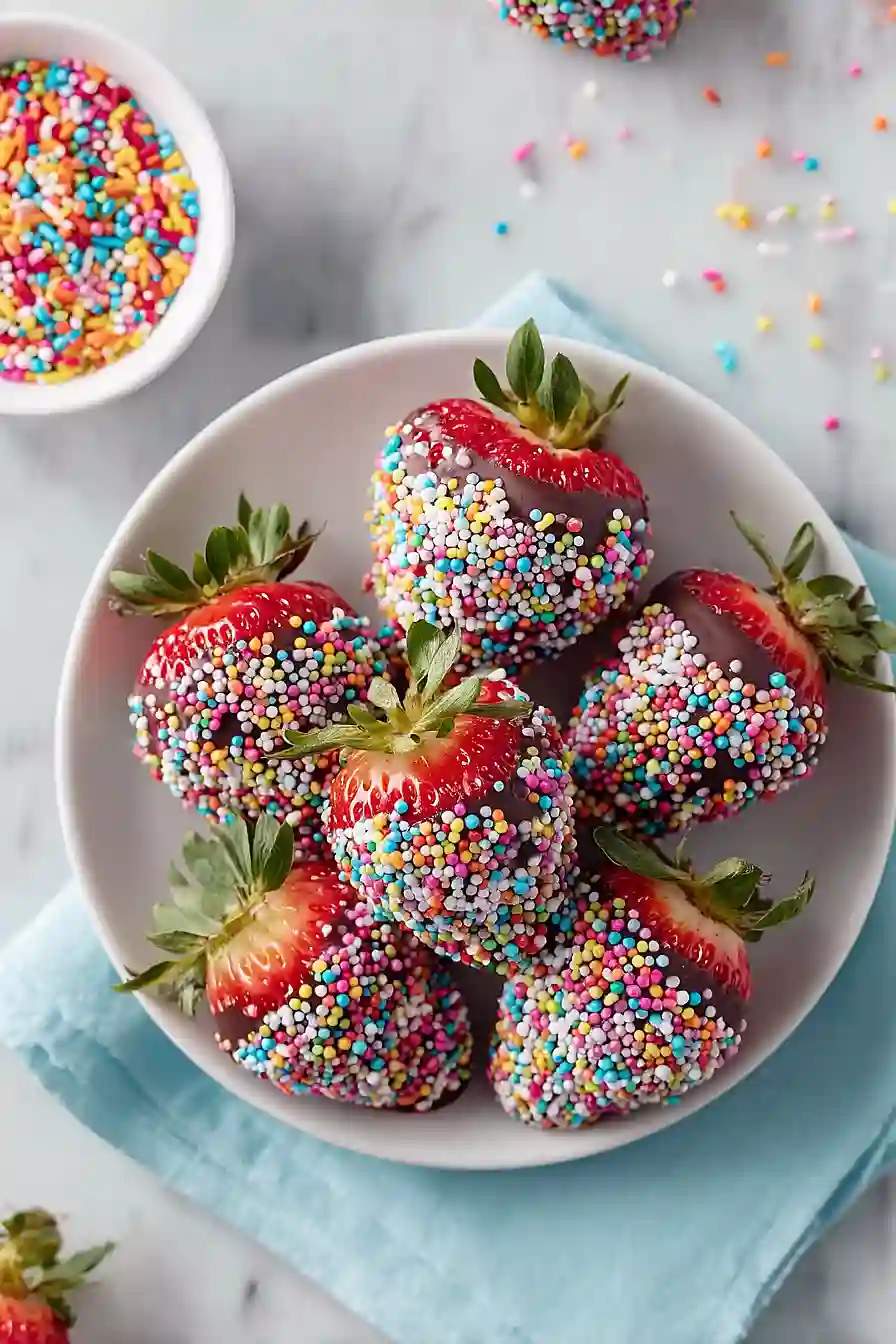
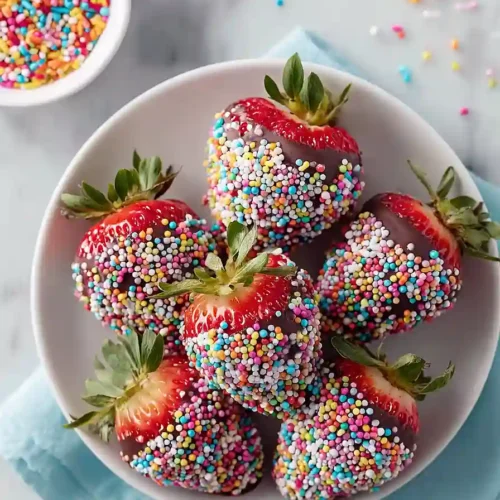
I used to think chocolate covered strawberries were something you could only get at fancy chocolate shops or order for special occasions. They seemed too complicated to make at home—like something that required special tools or secret techniques.
Then I actually tried making them, and I felt pretty silly. Turns out, chocolate covered strawberries are one of the easiest treats you can make in your own kitchen. The “secret” is just melting chocolate and dipping fruit. That’s it. The sprinkles? Those are just for fun and to make them look like you spent way more effort than you actually did. My kids can help make these, and they turn out great every time.
Why You’ll Love These Chocolate Covered Strawberries
- Quick and easy to make – These chocolate covered strawberries come together in under 35 minutes, making them perfect for last-minute party treats or spontaneous dessert cravings.
- Simple ingredients – You only need strawberries, chocolate, and sprinkles to create an impressive dessert that looks like it came from a fancy bakery.
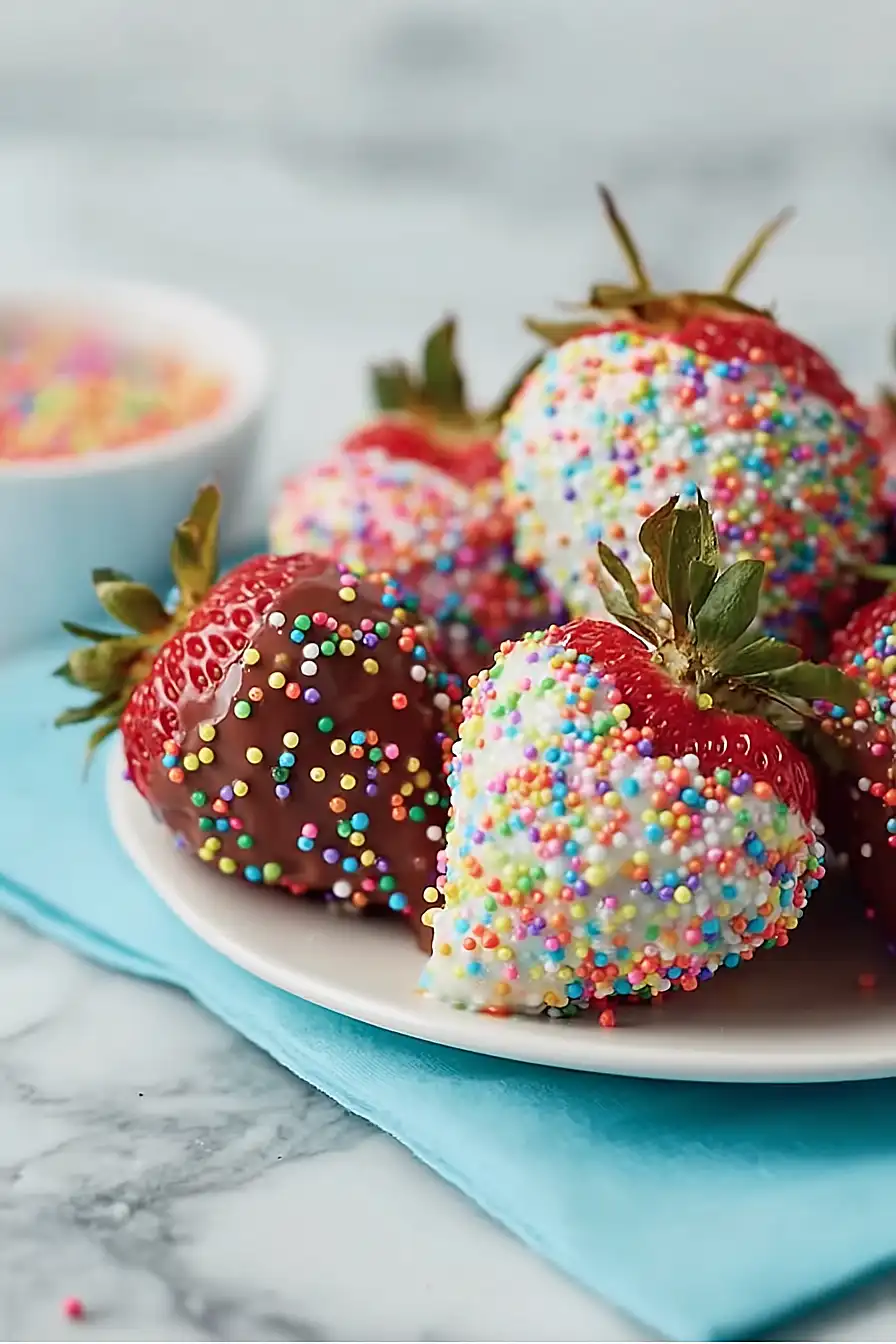
- Fun to customize – You can use white or dark chocolate and decorate with any sprinkles you like, making them perfect for holidays, birthdays, or any celebration.
- No baking required – Just melt, dip, and decorate—no oven needed, which means less cleanup and an easier cooking experience.
- Great for entertaining – These look fancy and taste amazing, so they’re always a hit at parties, potlucks, or as homemade gifts for friends and family.
What Kind of Strawberries Should I Use?
Fresh strawberries are always your best bet for chocolate-covered treats, and you’ll want to pick ones that are firm, bright red, and free from any soft spots or bruises. Medium to large strawberries work better than small ones since they’re easier to dip and hold, plus they give you a better chocolate-to-fruit ratio. Make sure your strawberries are completely dry before dipping them – even a little bit of moisture can cause the chocolate to seize up and get grainy. If you wash them, pat them dry with paper towels and let them sit out for about 30 minutes to make sure all the moisture evaporates before you start dipping.
Options for Substitutions
This simple recipe is easy to customize with a few ingredient swaps:
- White chocolate: You can use milk chocolate instead of white chocolate if that’s what you have on hand. Ruby chocolate is another fun option that gives a pink color and fruity taste.
- Dark chocolate: Semi-sweet or milk chocolate work just as well if you prefer something less intense. You can also use chocolate chips instead of bar chocolate – they melt the same way.
- Sprinkles: Get creative here! Try crushed nuts, shredded coconut, mini chocolate chips, crushed cookies, or even sea salt flakes. You can also drizzle melted chocolate in a contrasting color instead of using toppings.
- Fresh strawberries: Make sure your strawberries are fresh and dry – this isn’t really something you can substitute. Wet berries will cause the chocolate to seize up and not stick properly. Pat them completely dry with paper towels before dipping.
Watch Out for These Mistakes While Making
The biggest mistake people make with chocolate covered strawberries is not drying them completely after washing – even a tiny bit of water will cause the chocolate to seize up and become grainy instead of smooth.
When melting your chocolate, whether you’re using the microwave or a double boiler, overheating is your enemy since chocolate can burn quickly and turn lumpy, so heat it in short 30-second bursts and stir frequently until just melted.
Make sure to add your sprinkles immediately after dipping while the chocolate is still wet, because once it starts to set, the sprinkles won’t stick and will just fall right off.
Finally, let your strawberries come to room temperature before dipping them – cold strawberries from the fridge can cause condensation that makes the chocolate crack or slide off once they’re chilled again.
What to Serve With Chocolate Covered Strawberries?
Chocolate covered strawberries are perfect on their own, but they really shine when you serve them as part of a dessert spread at parties or date nights. I love pairing them with a glass of champagne or sparkling wine for something fancy, or even just some hot coffee if you’re keeping things casual. They also work great alongside other finger desserts like brownies, cookies, or mini cheesecakes when you’re putting together a dessert board. If you want to make it extra special, serve them with some whipped cream on the side for dipping, or arrange them next to fresh berries and nuts for a simple fruit and chocolate platter.
Storage Instructions
Store: Keep your chocolate covered strawberries in a single layer on a parchment-lined plate or container in the fridge for up to 2 days. Make sure they’re not touching each other so the chocolate doesn’t stick together, and don’t cover them too tightly or condensation can make the chocolate weepy.
Best Enjoyed: These are definitely best eaten the day you make them when the strawberries are at their freshest and the chocolate has that perfect snap. After a day or two, the berries start releasing moisture which can make the chocolate soft and the fruit a bit mushy.
Avoid Freezing: I don’t recommend freezing chocolate covered strawberries because the berries get really watery and mushy when they thaw. The chocolate also tends to get condensation on it, which doesn’t look pretty and affects the texture.
| Preparation Time | 15-20 minutes |
| Cooking Time | 10-15 minutes |
| Total Time | 25-35 minutes |
| Level of Difficulty | Easy |
| Servings | 20 pieces |
Estimated Nutrition
Estimated nutrition for the whole recipe (without optional ingredients):
- Calories: 3900-4200
- Protein: 35-45 g
- Fat: 230-250 g
- Carbohydrates: 470-500 g
Ingredients
For the base:
- 20 strawberries (stemmed and patted completely dry with paper towels)
For the coatings:
- 3.5 cups white chocolate (I always use Ghirardelli baking chips)
- 3.5 cups dark chocolate (at least 60% cacao for better flavor balance)
- 2 teaspoons coconut oil (divided, 1 tsp per chocolate type)
For the garnish:
- sprinkles (I prefer Wilton nonpareils for a great pop of color)
Step 1: Prepare the Strawberries
- 20 strawberries
Wash the strawberries under cool running water and pat them completely dry with paper towels, making sure to remove all moisture from the stems and surface.
Moisture is the enemy of chocolate coating—it causes the chocolate to seize and won’t adhere properly.
Set the dried strawberries aside on a clean plate or parchment paper while you prepare the chocolate.
Step 2: Melt and Temper the White Chocolate
- 3.5 cups white chocolate
- 1 teaspoon coconut oil
Place the white chocolate chips and 1 teaspoon of coconut oil in a heat-safe bowl.
If using a double boiler method, set the bowl over simmering (not boiling) water, stirring occasionally until melted and smooth—this gives you more control than microwaving.
If using the microwave, heat in 30-second intervals, stirring between each, until fully melted.
The coconut oil helps thin the chocolate to the perfect dipping consistency without affecting the flavor.
I always use a double boiler for white chocolate because it’s more forgiving and less likely to seize.
Step 3: Dip and Coat with White Chocolate
- melted white chocolate mixture from Step 2
- strawberries from Step 1
- sprinkles
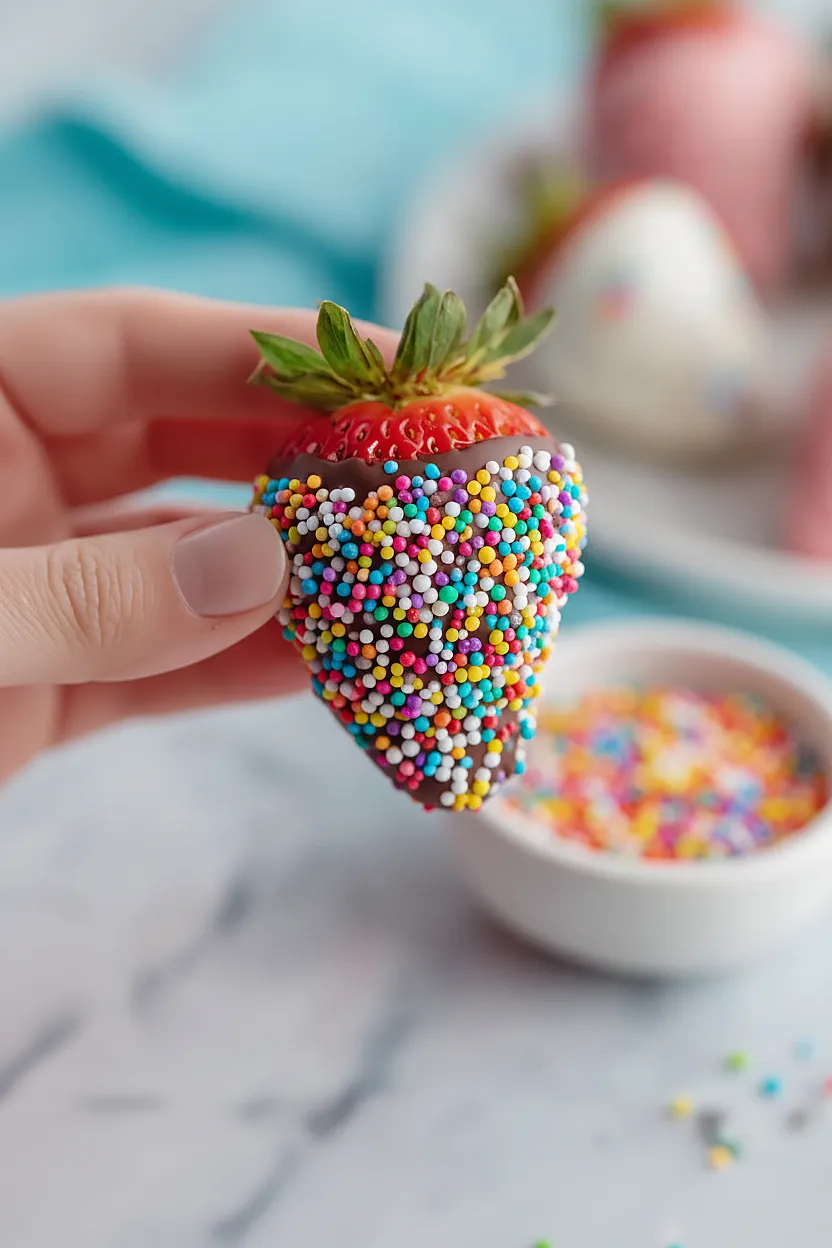
Holding a strawberry by the stem, dip it into the melted white chocolate, tilting and rotating to coat the entire berry while leaving the stem exposed.
Lift it out and gently tap off excess chocolate back into the bowl, then immediately place it on a parchment-lined baking sheet.
Work quickly but carefully—if the chocolate begins to set, gently rewarm it.
Once all strawberries are dipped in white chocolate, immediately sprinkle the nonpareils over the coating while it’s still wet so they adhere properly.
Step 4: Chill and Set the White Chocolate Coating
Place the baking sheet with white chocolate-coated strawberries into the refrigerator for 15-20 minutes until the chocolate is completely set and hard to the touch.
This gives you a firm base so the dark chocolate coating won’t mix with the white layer.
Step 5: Melt and Temper the Dark Chocolate
- 3.5 cups dark chocolate
- 1 teaspoon coconut oil
While the white chocolate sets, melt the dark chocolate chips with 1 teaspoon of coconut oil using the same method as Step 2.
Dark chocolate can handle slightly higher temperatures than white chocolate, but still avoid overheating.
The coconut oil again helps achieve a smooth, pourable consistency ideal for dipping.
Step 6: Dip and Coat with Dark Chocolate and Final Chill
- white chocolate-coated strawberries from Step 4
- melted dark chocolate mixture from Step 5
- sprinkles
Remove the chilled white chocolate-coated strawberries from the refrigerator.
Using the same dipping technique as Step 3, hold each strawberry by the stem and dip it into the melted dark chocolate, rotating to coat the lower half or two-thirds of the berry, creating a contrast with the white chocolate layer underneath.
Return each dipped berry to the parchment-lined baking sheet and immediately add sprinkles to the dark chocolate while wet.
Once all strawberries are dipped and decorated, refrigerate the finished strawberries for at least 20-30 minutes until fully set.
I like to keep them in the fridge until ready to serve—they stay fresh and firm for up to 3 days.
Quick Chocolate Covered Strawberries with Sprinkles
Ingredients
For the base::
- 20 strawberries (stemmed and patted completely dry with paper towels)
For the coatings::
- 3.5 cups white chocolate (I always use Ghirardelli baking chips)
- 3.5 cups dark chocolate (at least 60% cacao for better flavor balance)
- 2 teaspoons coconut oil (divided, 1 tsp per chocolate type)
For the garnish::
- sprinkles (I prefer Wilton nonpareils for a great pop of color)
Instructions
- Wash the strawberries under cool running water and pat them completely dry with paper towels, making sure to remove all moisture from the stems and surface. Moisture is the enemy of chocolate coating—it causes the chocolate to seize and won't adhere properly. Set the dried strawberries aside on a clean plate or parchment paper while you prepare the chocolate.
- Place the white chocolate chips and 1 teaspoon of coconut oil in a heat-safe bowl. If using a double boiler method, set the bowl over simmering (not boiling) water, stirring occasionally until melted and smooth—this gives you more control than microwaving. If using the microwave, heat in 30-second intervals, stirring between each, until fully melted. The coconut oil helps thin the chocolate to the perfect dipping consistency without affecting the flavor. I always use a double boiler for white chocolate because it's more forgiving and less likely to seize.
- Holding a strawberry by the stem, dip it into the melted white chocolate, tilting and rotating to coat the entire berry while leaving the stem exposed. Lift it out and gently tap off excess chocolate back into the bowl, then immediately place it on a parchment-lined baking sheet. Work quickly but carefully—if the chocolate begins to set, gently rewarm it. Once all strawberries are dipped in white chocolate, immediately sprinkle the nonpareils over the coating while it's still wet so they adhere properly.
- Place the baking sheet with white chocolate-coated strawberries into the refrigerator for 15-20 minutes until the chocolate is completely set and hard to the touch. This gives you a firm base so the dark chocolate coating won't mix with the white layer.
- While the white chocolate sets, melt the dark chocolate chips with 1 teaspoon of coconut oil using the same method as Step 2. Dark chocolate can handle slightly higher temperatures than white chocolate, but still avoid overheating. The coconut oil again helps achieve a smooth, pourable consistency ideal for dipping.
- Remove the chilled white chocolate-coated strawberries from the refrigerator. Using the same dipping technique as Step 3, hold each strawberry by the stem and dip it into the melted dark chocolate, rotating to coat the lower half or two-thirds of the berry, creating a contrast with the white chocolate layer underneath. Return each dipped berry to the parchment-lined baking sheet and immediately add sprinkles to the dark chocolate while wet. Once all strawberries are dipped and decorated, refrigerate the finished strawberries for at least 20-30 minutes until fully set. I like to keep them in the fridge until ready to serve—they stay fresh and firm for up to 3 days.


