Finding the perfect pumpkin pie recipe that doesn’t require a bunch of complicated steps can feel impossible, especially when you’re juggling everything else that comes with the fall season. Between work deadlines, school events, and trying to make the holidays feel special, who has time to make pie crust from scratch or deal with temperamental custard fillings?
That’s where this pumpkin pie with condensed milk comes to the rescue. It’s creamy, has all the classic fall flavors you crave, and uses simple ingredients you probably already have in your pantry – no fussy techniques required.

Why You’ll Love This Pumpkin Pie
- Simple ingredients – With just a handful of pantry staples and canned pumpkin, you can whip up this classic dessert without hunting down specialty items.
- Quick and easy preparation – No need to spend hours in the kitchen – this pie comes together in about 15 minutes of prep time, then the oven does the rest.
- Foolproof recipe – Using sweetened condensed milk instead of heavy cream and sugar makes this recipe nearly impossible to mess up, giving you perfect results every time.
- Perfect for holidays – This traditional pumpkin pie tastes just like the one grandma used to make, making it ideal for Thanksgiving dinner or any fall gathering.
- Make-ahead friendly – You can bake this pie a day or two ahead of time, which is a lifesaver during busy holiday meal prep.
What Kind of Pumpkin Puree Should I Use?
For this recipe, you’ll want to stick with canned pumpkin puree rather than fresh pumpkin that you cook and mash yourself. Canned pumpkin has a consistent texture and moisture content that works perfectly for pies, plus it saves you tons of time. Make sure you’re grabbing plain pumpkin puree and not pumpkin pie filling, which already has spices and sugar added. Libby’s is a popular brand that works great, but any pure pumpkin puree from the baking aisle will do the trick. If you do decide to use fresh pumpkin, just make sure to drain any excess moisture by letting it sit in a fine-mesh strainer for about 30 minutes before using.
Options for Substitutions
This pumpkin pie recipe is pretty forgiving when it comes to swaps, though a few ingredients are best left as-is:
- Pumpkin puree: Stick with canned pumpkin puree for the best texture – it’s consistent and smooth. Fresh pumpkin can work, but you’ll need to roast and puree it yourself, which might make the filling watery.
- Sweetened condensed milk: This is what makes the pie so creamy and sweet, so don’t substitute it with regular milk or evaporated milk. If you’re out, you can make your own by simmering 1 cup whole milk with ½ cup sugar until thick.
- Pumpkin pie spice: No pumpkin pie spice? Mix together 1 teaspoon cinnamon, ½ teaspoon ginger, ¼ teaspoon nutmeg, and ¼ teaspoon cloves.
- Premade pie crust: You can definitely use homemade crust if you prefer, or try a graham cracker crust for a different twist. Just pre-bake it for 8-10 minutes before adding the filling.
- Large eggs: If you only have medium eggs, use 4 instead of 3. For an egg-free version, try 3 tablespoons of cornstarch mixed with 3 tablespoons water, though the texture will be slightly different.
Watch Out for These Mistakes While Baking
The biggest mistake when making pumpkin pie is not pre-baking your crust for 10-12 minutes before adding the filling, which can lead to a soggy bottom that nobody wants.
Another common error is overmixing the filling once you add the eggs – gentle whisking is all you need to avoid incorporating too much air, which can cause cracks on the surface as it bakes.
To prevent the dreaded cracked top, bake your pie at a higher temperature (425°F) for the first 15 minutes, then reduce to 350°F for the remaining time, and always check for doneness by inserting a knife near the center – it should come out mostly clean with just a slight wobble in the very center.
Let your pie cool completely at room temperature before refrigerating, as rushing this process can cause the filling to weep or separate.

What to Serve With Pumpkin Pie?
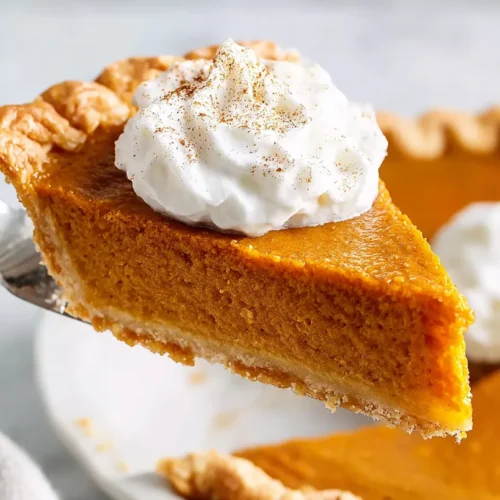
Pumpkin pie is pretty perfect on its own, but a dollop of freshly whipped cream or a scoop of vanilla ice cream takes it to the next level. I love serving it with a hot cup of coffee or spiced chai tea – the warm spices in both really complement each other nicely. For holidays or special occasions, you can add a sprinkle of cinnamon or a drizzle of caramel sauce on top for extra indulgence. Some people also enjoy it with a small glass of milk, especially if you’re serving it to kids who might find the spiced flavors a bit strong on their own.
Storage Instructions
Refrigerate: Once your pumpkin pie has cooled completely, cover it loosely with plastic wrap or foil and keep it in the fridge. It’ll stay fresh for up to 4 days, and honestly, I think it tastes even better the next day when all those spices have had time to meld together.
Freeze: This pie freezes really well if you want to make it ahead for the holidays! Wrap the whole pie tightly in plastic wrap, then aluminum foil, and it’ll keep in the freezer for up to 2 months. You can even freeze individual slices wrapped the same way for quick desserts later.
Thaw and Serve: To serve frozen pie, just move it to the fridge overnight to thaw slowly. If you’re in a hurry, you can let individual slices sit at room temperature for about 30 minutes. Serve it cold or at room temperature with a dollop of whipped cream – no need to reheat this creamy treat!
| Preparation Time | 15-20 minutes |
| Cooking Time | 55-70 minutes |
| Total Time | 70-90 minutes |
| Level of Difficulty | Medium |
Estimated Nutrition
Estimated nutrition for the whole recipe (without optional ingredients):
- Calories: 2300-2500
- Protein: 40-45 g
- Fat: 75-85 g
- Carbohydrates: 370-390 g
Ingredients
- 3 large eggs (room temperature for better mixing)
- 1 can pumpkin puree (I use Libby’s for consistent flavor and texture)
- 1 can sweetened condensed milk (14 fl oz, gives the pie its rich, creamy texture)
- 1 premade 9-inch pie shell (I use Wholly Wholesome if available for better texture)
- 3/4 tsp salt (enhances sweetness and balances spices)
- 1 tbsp pure vanilla extract
- 1 1/2 tbsp pumpkin pie spice blend (freshly ground preferred for more aromatic flavor)
Step 1: Prepare the Oven and Blind Bake the Crust
- 1 premade 9-inch pie shell
Preheat your oven to 350°F.
While it heats, place the pie shell on a baking sheet (this helps with even heat distribution and prevents a soggy bottom).
Blind bake the shell for 10-12 minutes until it’s set but not fully cooked—this partial bake prevents the crust from becoming too soft when the wet filling is added.
Remove from oven and set aside to cool slightly while you prepare the filling.
Step 2: Mix the Filling Base
- 3 large eggs
- 1 can sweetened condensed milk
- 1 can pumpkin puree
- 1 1/2 tbsp pumpkin pie spice blend
- 1 tbsp pure vanilla extract
- 3/4 tsp salt
In a large bowl, whisk together the room temperature eggs, condensed milk, pumpkin puree, pumpkin pie spice, vanilla extract, and salt.
Mix until smooth and fully combined with no lumps—the condensed milk should be evenly distributed throughout.
I prefer to whisk by hand here rather than using a mixer because it prevents overbeating, which can introduce too much air into the filling and create a less dense, less creamy final texture.
Step 3: Fill and Initial High-Heat Bake
- filling mixture from Step 2
- blind-baked pie shell from Step 1
Pour the filling mixture from Step 2 into the partially baked pie shell from Step 1.
Increase the oven temperature to 425°F and bake for exactly 15 minutes.
This high initial heat sets the edges and creates a subtle caramelization, which adds depth to the flavor and helps prevent the filling from being too custardy in texture.
Step 4: Finish Baking at Lower Temperature
After 15 minutes at 425°F, reduce the oven temperature to 325°F and continue baking for 30-40 minutes more.
The pie is done when the edges are set and firm but the center still has a slight jiggle (about 1 inch in diameter)—this residual carryover cooking will set it perfectly as it cools.
I like to check doneness by gently shaking the pie; if only the very center wobbles slightly, it’s ready.
Step 5: Cool and Set the Pie
Remove the pie from the oven and place it on a wire rack or countertop to cool.
Let it cool to room temperature for at least 2-3 hours (this allows the custard to fully set), then refrigerate for at least 4 hours or overnight for the best texture and slice-ability.
The cooling process is crucial—rushing this step will result in a softer, less stable pie that’s difficult to slice cleanly.
Rich Pumpkin Pie with Condensed Milk
Ingredients
- 3 large eggs (room temperature for better mixing)
- 1 can pumpkin puree (I use Libby’s for consistent flavor and texture)
- 1 can sweetened condensed milk (14 fl oz, gives the pie its rich, creamy texture)
- 1 premade 9-inch pie shell (I use Wholly Wholesome if available for better texture)
- 3/4 tsp salt (enhances sweetness and balances spices)
- 1 tbsp pure vanilla extract
- 1 1/2 tbsp pumpkin pie spice blend (freshly ground preferred for more aromatic flavor)
Instructions
- Preheat your oven to 350°F. While it heats, place the pie shell on a baking sheet (this helps with even heat distribution and prevents a soggy bottom). Blind bake the shell for 10-12 minutes until it’s set but not fully cooked—this partial bake prevents the crust from becoming too soft when the wet filling is added. Remove from oven and set aside to cool slightly while you prepare the filling.
- In a large bowl, whisk together the room temperature eggs, condensed milk, pumpkin puree, pumpkin pie spice, vanilla extract, and salt. Mix until smooth and fully combined with no lumps—the condensed milk should be evenly distributed throughout. I prefer to whisk by hand here rather than using a mixer because it prevents overbeating, which can introduce too much air into the filling and create a less dense, less creamy final texture.
- Pour the filling mixture from Step 2 into the partially baked pie shell from Step 1. Increase the oven temperature to 425°F and bake for exactly 15 minutes. This high initial heat sets the edges and creates a subtle caramelization, which adds depth to the flavor and helps prevent the filling from being too custardy in texture.
- After 15 minutes at 425°F, reduce the oven temperature to 325°F and continue baking for 30-40 minutes more. The pie is done when the edges are set and firm but the center still has a slight jiggle (about 1 inch in diameter)—this residual carryover cooking will set it perfectly as it cools. I like to check doneness by gently shaking the pie; if only the very center wobbles slightly, it’s ready.
- Remove the pie from the oven and place it on a wire rack or countertop to cool. Let it cool to room temperature for at least 2-3 hours (this allows the custard to fully set), then refrigerate for at least 4 hours or overnight for the best texture and slice-ability. The cooling process is crucial—rushing this step will result in a softer, less stable pie that’s difficult to slice cleanly.


I made this Pumpkin Pie for our church’s first Thanksgiving dinner yesterday. we live in the UK, hence the first one.
I was a bit anxious about it because pumpkin does have a bad rep! BUT…. oh my goodness!! This Pumpkin Pie was absolutely AMAZING!! Even the uni students loved it and took left overs home for later!! I used pre-made pastry cases, but the filling was so delicious!! I’ve just had a slice that I brought home for breakfast, and discovered a new thing! This Pumpkin Pie is great for breakfast, warmed up and with cream!! THANK YOU for posting your recipe!!