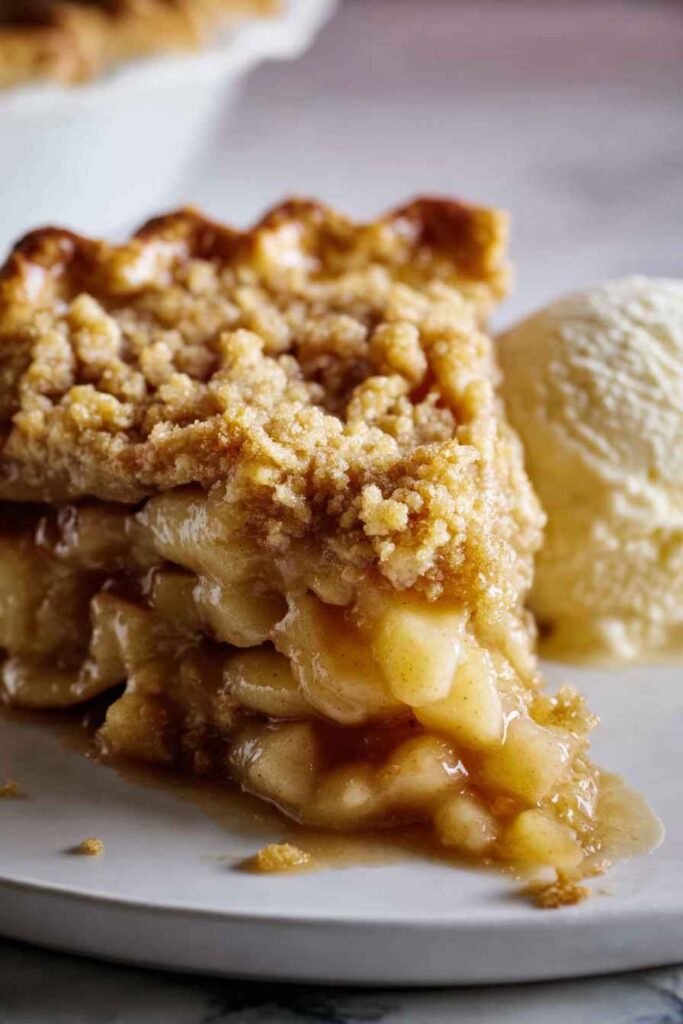
When it comes to fall desserts, nothing beats a good apple pie. But let me tell you, Dutch apple pie takes everything you love about regular apple pie and makes it even better. Instead of that top crust that sometimes gets soggy or doesn’t brown right, you get this amazing crumbly topping that’s crispy and sweet.
I started making Dutch apple pie because my kids always complained about the top crust on regular pies. They’d scrape it off and just eat the filling. Now with this crumb topping, they clean their plates and ask for seconds. Plus, it’s actually easier to make than a traditional two-crust pie.
The best part? You can smell it baking from three rooms away. That buttery, cinnamon smell fills the whole house and makes everyone gather in the kitchen asking when it’ll be ready. Fair warning though – you might want to make two because this pie disappears fast.

Why You’ll Love This Dutch Apple Pie
- Perfect balance of flavors – The warm spices like cinnamon, nutmeg, and cardamom create that cozy fall taste we all crave, while the lemon juice keeps the apples bright and fresh.
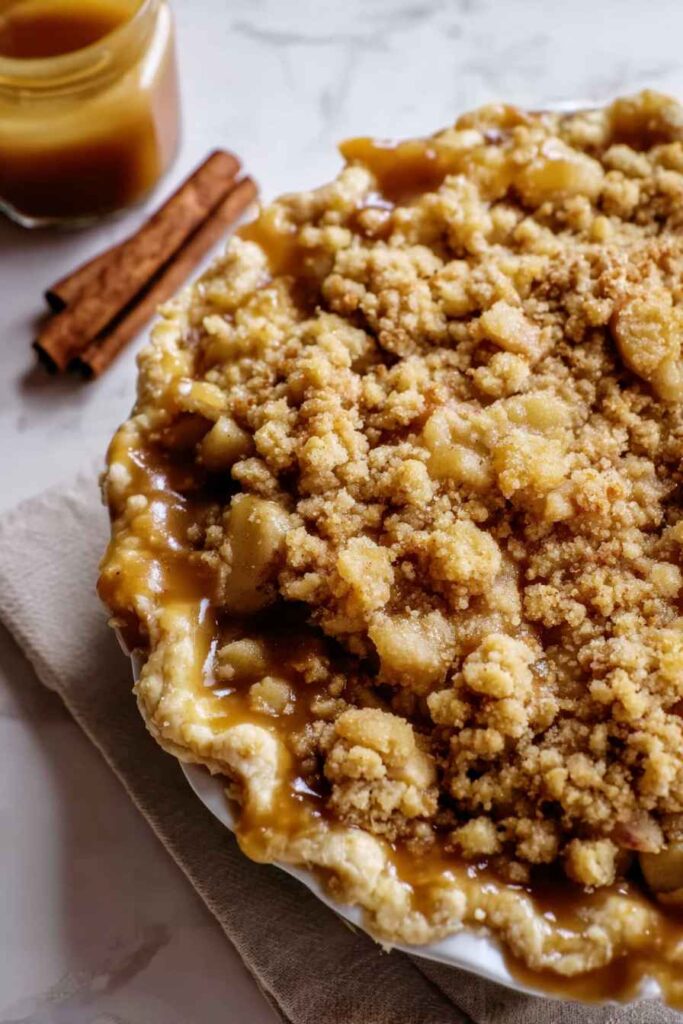
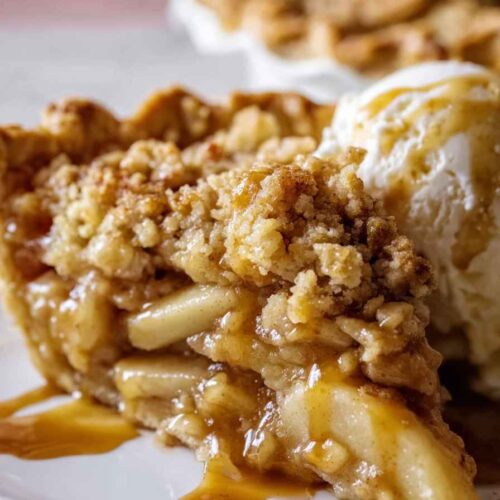
- Crispy crumb topping – Instead of a traditional top crust, this Dutch-style pie features a buttery, crunchy streusel that adds amazing texture and makes every bite special.
- Great for any occasion – Whether it’s Thanksgiving dinner, a weekend family gathering, or just because you’re craving homemade pie, this recipe always delivers.
- Impressive but manageable – While it looks like something from a fancy bakery, the steps are straightforward enough for home bakers to master with confidence.
What Kind of Apples Should I Use?
For Dutch apple pie, you’ll want to use apples that hold their shape well during baking and won’t turn to mush. Good choices include Granny Smith, Honeycrisp, Braeburn, or Jonagold – these varieties keep their texture and provide a nice balance of sweet and tart flavors. You can also mix different types of apples for more complex flavor, like combining tart Granny Smiths with sweeter Galas. Just avoid really soft apples like Red Delicious, as they tend to break down too much during the long baking time and can make your pie filling watery.
Options for Substitutions
This classic Dutch apple pie is pretty forgiving when it comes to swaps and substitutions:
- Pie crust: If making homemade crust feels like too much work, a store-bought refrigerated pie crust works perfectly fine. You can also use a graham cracker crust for a different twist, though it won’t be traditional.
- Apples: Mix and match your apple varieties! Granny Smith, Honeycrisp, Braeburn, or Jonagold all work great. Just avoid super soft apples like Red Delicious that turn mushy when baked.
- Brown sugar: You can substitute brown sugar with an equal amount of granulated sugar plus 1 tablespoon molasses per cup. Or use coconut sugar for a slightly different flavor profile.
- Cardamom: Since cardamom is optional and can be pricey, feel free to skip it or replace it with a pinch of ginger or allspice for warm spice notes.
- Lemon juice and zest: If you’re out of fresh lemons, bottled lemon juice works in a pinch. You can also use lime juice, though the flavor will be slightly different.
- Butter for crumb topping: Cold butter works too – just cut it into small pieces and mix it in with your fingers or a pastry cutter until it forms coarse crumbs.
Watch Out for These Mistakes While Baking
The biggest mistake with Dutch apple pie is using apples that turn to mush during baking – stick with firm varieties like Granny Smith, Honeycrisp, or Braeburn that hold their shape and won’t create a watery filling. Another common error is skipping the pre-baking step for your bottom crust, which can lead to a soggy bottom, so blind bake it for 10-12 minutes before adding the filling. Don’t forget to toss your sliced apples with the lemon juice right away to prevent browning, and make sure your crumb topping isn’t too wet – it should look like coarse sand and clump together when squeezed. Finally, cover the pie with foil if the topping starts browning too quickly, and always let it cool for at least 2 hours before slicing so the filling has time to set properly.
What to Serve With Dutch Apple Pie?
Dutch apple pie is perfect on its own, but a scoop of vanilla ice cream on top makes it even better – the cold, creamy texture is such a nice contrast to the warm, spiced apples and crunchy topping. You can also serve it with a dollop of freshly whipped cream or even a drizzle of caramel sauce if you’re feeling fancy. For a cozy fall dinner, I love serving this pie after a hearty meal like roast chicken or pork chops, since the sweet cinnamon and nutmeg flavors are the perfect way to end things. A hot cup of coffee or spiced cider alongside each slice makes it feel like the ultimate autumn dessert.
Storage Instructions
Keep Fresh: Your Dutch apple pie will stay delicious covered loosely with foil or plastic wrap at room temperature for up to 2 days. After that, pop it in the fridge where it’ll keep for up to 5 days. I actually think it tastes even better the next day when all those apple and spice flavors have had time to meld together!
Freeze: This pie freezes wonderfully for up to 3 months! You can freeze it whole (wrapped tightly in plastic wrap and foil) or cut it into individual slices first. I like to pre-slice mine so I can grab just one piece at a time for a quick dessert.
Warm Up: To bring back that fresh-baked taste, warm individual slices in the microwave for about 30 seconds, or pop the whole pie in a 350°F oven for 10-15 minutes. The crumb topping gets nice and crispy again, and it’s perfect with a scoop of vanilla ice cream!
| Preparation Time | 45-60 minutes |
| Cooking Time | 55-65 minutes |
| Total Time | 100-125 minutes |
| Level of Difficulty | Medium |
Estimated Nutrition
Estimated nutrition for the whole recipe (without optional ingredients):
- Calories: 3800-4200
- Protein: 25-30 g
- Fat: 150-170 g
- Carbohydrates: 630-700 g
Ingredients
For the crust:
- 1 single homemade pie dough (1 sheet, thawed if frozen)
For the apple layer:
- 3/4 tsp nutmeg
- 1/2 tsp cardamom (optional, adds warm complexity)
- 1/4 tsp lemon zest (freshly grated for best flavor)
- 1/2 cup sugar
- 1/2 tsp kosher salt
- 1/3 cup all-purpose flour (King Arthur preferred)
- 1 1/2 tsp cinnamon (freshly ground for more spice)
- 1/2 cup brown sugar (packed)
- 5 lb apples (a mix of Granny Smith and Honeycrisp works well)
- 1 tsp vanilla
- 2 tbsp lemon juice (from 1/2 lemon)
For the crumble topping:
- 1 1/2 cups all-purpose flour
- 1/3 cup sugar
- 1/2 tsp kosher salt
- 3/4 cup melted butter (Kerrygold unsalted preferred for rich flavor)
- 3/4 cup brown sugar (packed)
Step 1: Prepare the Pie Dough and Crumble Topping
- 1 single homemade pie dough
- 1 1/2 cups all-purpose flour
- 1/3 cup sugar
- 3/4 cup brown sugar
- 1/2 tsp kosher salt
- 3/4 cup melted butter
Remove your pie dough from the freezer to thaw if needed.
While it thaws, prepare the crumble topping by combining the flour, sugar, brown sugar, and salt in a bowl.
Pour the melted butter over the dry mixture and stir with a fork until the mixture resembles coarse breadcrumbs with some pea-sized clumps remaining.
Transfer the crumble to the refrigerator to chill while you work on other components.
I prefer using Kerrygold butter here because its rich, cultured flavor really shines through in the topping.
Step 2: Cook and Prepare the Apple Filling
- 1/4 tsp lemon zest
- 2 tbsp lemon juice
- 5 lb apples
- 1/2 cup brown sugar
- 1/2 cup sugar
- 1/3 cup all-purpose flour
- 1/2 tsp kosher salt
- 1 1/2 tsp cinnamon
- 3/4 tsp nutmeg
- 1/2 tsp cardamom
- 1 tsp vanilla
In a large skillet over medium heat, add the lemon zest and lemon juice, letting them warm for about 30 seconds.
While the lemon heats, peel, core, and slice all 5 pounds of apples into quarter-inch thick slices, working quickly to prevent oxidation.
Add the sliced apples to the skillet and toss to coat with the lemon.
Sprinkle in the brown sugar, sugar, flour, salt, cinnamon, nutmeg, and cardamom, stirring gently to combine everything evenly.
Cover the skillet and cook on medium heat for about 20 minutes, stirring frequently, until the apples are tender but still hold their shape.
Remove from heat and stir in the vanilla extract.
Spread the filling onto a sheet pan and refrigerate for at least 2 hours (or freeze for 30 minutes) to cool completely and allow the flavors to meld.
Step 3: Line and Chill the Pie Crust
- 1 single homemade pie dough
Roll out the thawed pie dough on a lightly floured surface until it’s about an eighth-inch thick and large enough to fit your 9-inch pie dish with a slight overhang.
Carefully transfer the dough to the pie dish, gently pressing it into the bottom and sides without stretching.
Trim any excess dough and crimp the edges decoratively if desired.
Place the lined pie dish in the refrigerator for 30 minutes to chill and relax the gluten, which will help prevent shrinking during baking.
Step 4: Assemble and Begin Baking
- cooled apple filling from Step 2
- 1 to 2 cups cold crumble from Step 1
Preheat your oven to 425°F and place a baking sheet on the lowest rack to catch any drips.
Remove the chilled pie crust from the refrigerator and add the cooled apple filling from Step 2, spreading it evenly.
Remove the crumble topping from the refrigerator and sprinkle 1 to 2 cups of it over the apples, leaving about 1 cup reserved for later.
The first application won’t cover the filling completely, which is intentional.
Place the pie on the middle rack and bake at 425°F for 15 minutes until the crust begins to set.
Step 5: Reduce Heat and Continue Baking
After the initial 15 minutes, reduce the oven temperature to 350°F and bake for an additional 10 minutes.
This temperature drop prevents the crumble from browning too quickly while the filling finishes cooking through.
Step 6: Add Remaining Crumble and Finish Baking
- reserved crumble from Step 1
Remove the pie from the oven and carefully spread the reserved crumble from Step 1 over the areas where the apples are still visible, creating an even, complete topping.
Cover the pie’s crust edge with foil to prevent over-browning, then return it to the 350°F oven and bake for 25 to 35 minutes more, until the crumble is golden brown and the filling bubbles slightly at the edges.
I like to remove the foil for the last 5-10 minutes of baking if I want an extra-golden, crunchy top—just keep an eye on it to make sure the crust doesn’t burn.
Step 7: Cool and Serve
Remove the pie from the oven and transfer it to a wire cooling rack.
Allow it to cool for at least 4 hours before slicing—this resting period lets the filling set properly so it slices cleanly without running.
Serve at room temperature or slightly warm, optionally with vanilla ice cream or whipped cream.
Sweet Dutch Apple Pie
Ingredients
Apple layer
- 3/4 tsp nutmeg
- 1/2 tsp cardamom (optional, adds warm complexity)
- 1/4 tsp lemon zest (freshly grated for best flavor)
- 1/2 cup sugar
- 1/2 tsp kosher salt
- 1/3 cup all-purpose flour (King Arthur preferred)
- 1 1/2 tsp cinnamon (freshly ground for more spice)
- 1/2 cup brown sugar (packed)
- 5 lb apples (a mix of Granny Smith and Honeycrisp works well)
- 1 tsp vanilla
- 2 tbsp lemon juice (from 1/2 lemon)
Crumble topping
- 1 1/2 cups all-purpose flour
- 1/3 cup sugar
- 1/2 tsp kosher salt
- 3/4 cup melted butter (Kerrygold unsalted preferred for rich flavor)
- 3/4 cup brown sugar (packed)
Instructions
- Remove your pie dough from the freezer to thaw if needed. While it thaws, prepare the crumble topping by combining the flour, sugar, brown sugar, and salt in a bowl. Pour the melted butter over the dry mixture and stir with a fork until the mixture resembles coarse breadcrumbs with some pea-sized clumps remaining. Transfer the crumble to the refrigerator to chill while you work on other components. I prefer using Kerrygold butter here because its rich, cultured flavor really shines through in the topping.
- In a large skillet over medium heat, add the lemon zest and lemon juice, letting them warm for about 30 seconds. While the lemon heats, peel, core, and slice all 5 pounds of apples into quarter-inch thick slices, working quickly to prevent oxidation. Add the sliced apples to the skillet and toss to coat with the lemon. Sprinkle in the brown sugar, sugar, flour, salt, cinnamon, nutmeg, and cardamom, stirring gently to combine everything evenly. Cover the skillet and cook on medium heat for about 20 minutes, stirring frequently, until the apples are tender but still hold their shape. Remove from heat and stir in the vanilla extract. Spread the filling onto a sheet pan and refrigerate for at least 2 hours (or freeze for 30 minutes) to cool completely and allow the flavors to meld.
- Roll out the thawed pie dough on a lightly floured surface until it’s about an eighth-inch thick and large enough to fit your 9-inch pie dish with a slight overhang. Carefully transfer the dough to the pie dish, gently pressing it into the bottom and sides without stretching. Trim any excess dough and crimp the edges decoratively if desired. Place the lined pie dish in the refrigerator for 30 minutes to chill and relax the gluten, which will help prevent shrinking during baking.
- Preheat your oven to 425°F and place a baking sheet on the lowest rack to catch any drips. Remove the chilled pie crust from the refrigerator and add the cooled apple filling from Step 2, spreading it evenly. Remove the crumble topping from the refrigerator and sprinkle 1 to 2 cups of it over the apples, leaving about 1 cup reserved for later. The first application won’t cover the filling completely, which is intentional. Place the pie on the middle rack and bake at 425°F for 15 minutes until the crust begins to set.
- After the initial 15 minutes, reduce the oven temperature to 350°F and bake for an additional 10 minutes. This temperature drop prevents the crumble from browning too quickly while the filling finishes cooking through.
- Remove the pie from the oven and carefully spread the reserved crumble from Step 1 over the areas where the apples are still visible, creating an even, complete topping. Cover the pie’s crust edge with foil to prevent over-browning, then return it to the 350°F oven and bake for 25 to 35 minutes more, until the crumble is golden brown and the filling bubbles slightly at the edges. I like to remove the foil for the last 5-10 minutes of baking if I want an extra-golden, crunchy top—just keep an eye on it to make sure the crust doesn’t burn.
- Remove the pie from the oven and transfer it to a wire cooling rack. Allow it to cool for at least 4 hours before slicing—this resting period lets the filling set properly so it slices cleanly without running. Serve at room temperature or slightly warm, optionally with vanilla ice cream or whipped cream.


I had a question about your recipe. Before you went through the actual recipe, in the comments before you mentioned that we should bake the crust 10 minutes before we put the filling in. But in the actual recipe, this is not mentioned at all. If this is the case still, could you tell me the temperature that I would bake the crust? 425? I would love to know the answer as I would love to make this recipe for a pie party tomorrow. 🙂 Thank you!
Yes, at 425 for approximately 10-12 minutes.
I would like to know the same thing!
I had the same question. Bake crust before or bake all together? Beforehand you say to bake before but in the recipe it does not say this.
Thanks, excited to try this out for the holidays.
So I just peeled and cut 5 pounds of apples. It seems like a huge amount, like 12 cups. Is this correct?
Yes 🙂
I sure wish the blind bake step was listed in the recipe. My pie is in the oven and my crust wasn’t blind baked. Hope it doesn’t ruin the pie I just spent hours preparing
Ugh, same. It wasn’t in the actual recipe so I didn’t blind bake… I’m hoping my crust isn’t soggy! 🙁 At least the taste should be there!