Cheesecake might be my weakness, but I’m always looking for ways to make it more exciting. When I first heard about Dubai chocolate, I knew I had to try turning it into a cheesecake. The combination of creamy cheesecake with that rich pistachio and tahini flavor just made sense to me.
This isn’t your typical New York style cheesecake. The Dubai chocolate adds this nutty, slightly sweet twist that makes every bite feel special. Plus, it’s easier to make than you might think. I use a simple graham cracker crust and fold the Dubai chocolate right into the filling.
My kids were skeptical at first, but now they ask for this cheesecake for birthdays instead of regular cake. Even my husband, who usually sticks to plain desserts, goes back for seconds. It’s become our go-to dessert when we want something that feels fancy but doesn’t require a culinary degree to pull off.

Why You’ll Love This Dubai Chocolate Cheesecake
- Trendy viral flavor combination – This cheesecake captures the popular Dubai chocolate trend with its rich pistachio and tahini filling that’s been taking social media by storm.
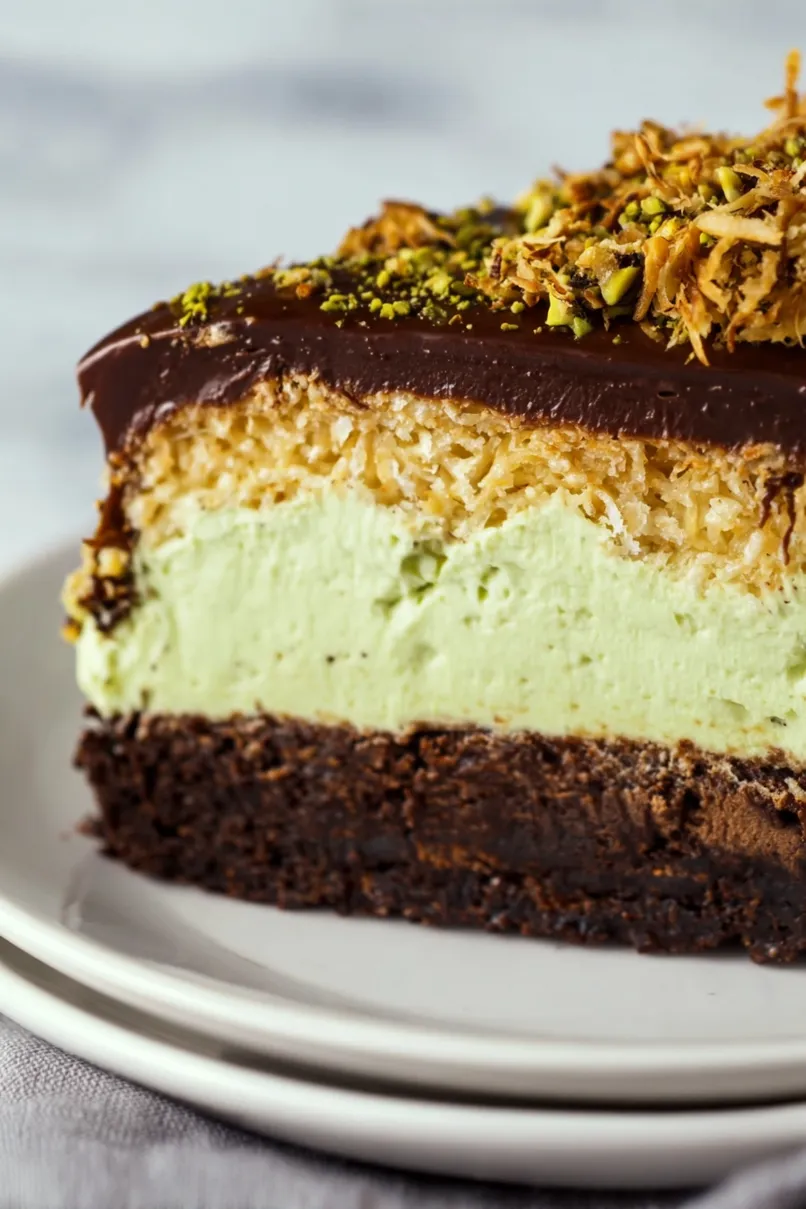
- Impressive presentation – The crispy kataifi dough and chocolate ganache topping make this dessert look like it came straight from a fancy bakery, perfect for special occasions.
- Unique texture contrast – You get the creamy cheesecake base, crunchy kataifi topping, and smooth chocolate ganache all in one bite for an amazing textural experience.
- Make-ahead friendly – This cheesecake actually tastes better after chilling overnight, so you can prepare it a day before your event and let it set to perfection.
- Restaurant-quality at home – Skip the expensive dessert menu and create this bakery-style cheesecake in your own kitchen using ingredients you can find at most grocery stores.
What Kind of Cream Cheese Should I Use?
For this cheesecake, you’ll want to stick with full-fat cream cheese – don’t try to substitute with low-fat or light versions as they contain more water and will affect the texture. Make sure your cream cheese is completely softened to room temperature before you start mixing, which usually takes about 2-3 hours on the counter. If you’re in a hurry, you can cut the blocks into smaller pieces to speed up the softening process. Brand-wise, Philadelphia cream cheese is the gold standard for cheesecakes, but any full-fat cream cheese will work just fine as long as it’s properly softened.
Options for Substitutions
This fancy cheesecake has some unique ingredients, but here are some swaps you can make if needed:
- Chocolate bear grahams: Regular chocolate graham crackers work perfectly fine here. You can also use chocolate wafer cookies or even Oreos (remove the filling first) for the crust.
- Kataifi dough: This shredded phyllo dough can be tricky to find. Try crushed toasted vermicelli noodles, shredded wheat cereal, or even finely chopped toasted almonds for that crunchy texture.
- Pistachio paste: You can make your own by blending 1 cup shelled pistachios with 2-3 tablespoons neutral oil until smooth. Almond butter or cashew butter work as alternatives, though the flavor will be different.
- Tahini: If you don’t have tahini, try almond butter or sunflower seed butter. You could also skip it entirely and add an extra tablespoon of pistachio paste instead.
- Sour cream: Greek yogurt (plain, full-fat) works as a substitute, or you can use an extra ⅓ cup of cream cheese if that’s what you have on hand.
- Almond extract: This adds a nice nutty note, but you can skip it or replace with an extra ½ teaspoon of vanilla extract if you don’t have it.
Watch Out for These Mistakes While Baking
The biggest mistake when making this cheesecake is not having your cream cheese at proper room temperature, which can lead to lumps that won’t smooth out no matter how much you mix – take it out of the fridge at least 2 hours before baking for the silkiest texture.
Another common error is overworking the kataifi dough filling, which can make it tough instead of crispy, so gently toast it with butter just until golden and let it cool completely before mixing with the pistachio paste.
Don’t skip the water bath (bain-marie) when baking, as this prevents cracks on the surface and ensures even cooking throughout, and resist the urge to open the oven door during the first hour of baking.
Finally, be patient with the cooling process – let the cheesecake cool completely at room temperature before refrigerating overnight, as rushing this step can cause the filling to crack or become dense instead of creamy.
What to Serve With Dubai Chocolate Cheesecake?
This rich and indulgent cheesecake is honestly a showstopper on its own, but a few simple additions can make it even more special. A dollop of lightly sweetened whipped cream or a scoop of vanilla ice cream pairs beautifully with the nutty pistachio and chocolate flavors. For something refreshing, try serving it alongside fresh berries like raspberries or strawberries to cut through all that creamy richness. A hot cup of Turkish coffee or strong espresso also makes a perfect companion to this Middle Eastern-inspired dessert, and don’t forget to sprinkle some extra chopped pistachios on top for that final touch!
Storage Instructions
Refrigerate: This cheesecake needs to chill in the fridge to set properly and maintain its creamy texture. Cover it loosely with plastic wrap or store in an airtight container for up to 5 days. The flavors actually get better after a day or two, so don’t worry about making it ahead!
Freeze: You can absolutely freeze this Dubai chocolate cheesecake for up to 3 months. Wrap individual slices tightly in plastic wrap and then in foil, or freeze the whole thing in a freezer-safe container. It’s great to have portions ready when you want something special without all the work.
Serve: For the best texture, let frozen slices thaw in the fridge for about 4-6 hours or overnight. If you’re serving the whole cheesecake, give it about 8-10 hours to thaw completely. The kataifi topping might lose a tiny bit of its crunch after freezing, but it’s still absolutely delicious.
| Preparation Time | 30-45 minutes |
| Cooking Time | 70-90 minutes |
| Total Time | 100-135 minutes |
| Level of Difficulty | Medium |
Estimated Nutrition
Estimated nutrition for the whole recipe (without optional ingredients):
- Calories: 3800-4200
- Protein: 70-80 g
- Fat: 250-280 g
- Carbohydrates: 350-400 g
Ingredients
For the crust:
- 2 1/2 cups chocolate graham crackers (230g, finely crushed)
- 7 tbsp unsalted butter, melted (98g, I use Kerrygold)
For the kataifi-pistachio filling:
- 5 oz kataifi dough, chopped (150g)
- 6 tbsp unsalted butter (85g, room temperature)
- 3/4 cup pistachio paste (300g, creamy texture)
- 2 tbsp tahini (30g, for depth of flavor)
For the cheesecake batter:
- 2 tsp vanilla extract (for richness)
- 2 tbsp tahini
- 3 large eggs (at room temperature, brings better texture)
- 1/3 cup sour cream (at room temperature)
- 1/4 tsp almond extract
- 1/2 cup pistachio paste (creamy, not chunky)
- 24 oz cream cheese, softened (680g or three 8 oz packages, at room temperature for smooth mixing)
- 1/2 tsp salt
- 1 cup sugar (200g)
For the chocolate ganache:
- 1 1/4 cups semi-sweet chocolate, chopped (212g, I use Ghirardelli)
- 3/4 cup heavy cream (180ml, warmed for silky texture)
Step 1: Prepare the Crust and Toast the Kataifi
- 2 1/2 cups chocolate graham crackers
- 7 tbsp unsalted butter, melted
- 5 oz kataifi dough, chopped
- 6 tbsp unsalted butter
Preheat your oven to 325°F.
While it heats, finely crush the chocolate graham crackers into uniform crumbs—you want them small enough to pack tightly but not powdery.
Mix the crushed crackers with 7 tablespoons of melted butter until the mixture resembles wet sand, then press it firmly and evenly into an 8-9 inch springform pan.
Bake for 10 minutes to set the crust, then remove and let it cool while you work on the kataifi.
In a large skillet over medium-high heat, melt 6 tablespoons of room temperature butter, then add the chopped kataifi dough and cook for 8-10 minutes, stirring frequently, until it turns golden brown and becomes crispy—this toasting step develops crucial nutty flavor that makes this cheesecake special.
Step 2: Make the Pistachio-Kataifi Filling
- Toasted kataifi dough from Step 1
- 3/4 cup pistachio paste
- 2 tbsp tahini
Transfer the warm toasted kataifi from the skillet into a bowl and let it cool for a few minutes.
Add the 3/4 cup pistachio paste and 2 tablespoons of tahini to the kataifi, then stir until everything is evenly combined with no streaks of pistachio showing.
This mixture will become your filling—set it aside for now.
I like to make this while the crust is cooling because the warm kataifi incorporates the pistachio paste more smoothly than if it were completely cold.
Step 3: Build the Cheesecake Batter
- 24 oz cream cheese, softened
- 1 cup sugar
- 1/3 cup sour cream
- 1/2 cup pistachio paste
- 2 tbsp tahini
- 3 large eggs
- 1/4 tsp almond extract
- 2 tsp vanilla extract
- 1/2 tsp salt
Using an electric mixer, beat the softened cream cheese for 3 minutes until it’s completely smooth and creamy—this aerates the cheese and prevents a dense cake.
Add the sugar and beat for 1 minute more to combine.
Now add the 1/2 cup pistachio paste, sour cream, and 2 tablespoons tahini, beating for 2 minutes until everything is fully incorporated and the batter is silky.
Add the three room temperature eggs one at a time, beating on low speed after each addition to avoid overworking the batter, then add the almond extract, vanilla extract, and salt.
Stop mixing as soon as everything is combined—overmixing introduces air bubbles that can cause cracks.
I always make sure my eggs and cream cheese are at room temperature because cold ingredients don’t incorporate smoothly and can make the texture grainy.
Step 4: Assemble and Bake the Cheesecake
- Cooled crust from Step 1
- Pistachio-kataifi filling from Step 2
- Cheesecake batter from Step 3
Lightly grease the sides of your springform pan (the cooled crust should already be on the bottom).
Spread half of the pistachio-kataifi filling from Step 2 evenly over the crust, leaving a small border around the edge.
Carefully pour the cheesecake batter from Step 3 over the filling and smooth the top with an offset spatula.
Wrap the outside bottom of the pan tightly with aluminum foil to prevent water from seeping in.
Place the wrapped pan into a larger roasting pan and fill the roasting pan with hot water until it comes halfway up the sides of the springform pan—this water bath ensures gentle, even cooking.
Bake at 325°F for 60-70 minutes; the cheesecake is done when the edges are set but the center still has a slight jiggle when you gently shake the pan (about a 2-inch circle in the middle should wobble slightly).
Turn off the oven, crack the door open a few inches, and let the cheesecake sit inside for 1 hour to cool gradually—this slow cooling prevents the dreaded cracks.
Step 5: Chill the Cheesecake and Prepare the Ganache
- 1 1/4 cups semi-sweet chocolate, chopped
- 3/4 cup heavy cream
Remove the cheesecake from the oven and water bath, then refrigerate it for at least 6 hours (or overnight)—this chilling time is essential for the flavors to develop and the texture to become properly set.
While the cheesecake chills, you can prepare the ganache: heat 3/4 cup heavy cream until steaming (don’t boil it), then pour it over 1 1/4 cups of chopped semi-sweet chocolate in a bowl.
Let it sit undisturbed for 1 minute to allow the heat to soften the chocolate, then whisk until completely smooth and glossy.
Let the ganache cool to room temperature, stirring occasionally, until it reaches a spreadable consistency—it should be thick but still pourable.
Step 6: Finish and Set the Cheesecake
- Chilled cheesecake from Step 5
- Ganache from Step 5
- Remaining pistachio-kataifi filling from Step 2
Once the chilled cheesecake has been removed from the refrigerator, spread a thin, even layer of the room temperature ganache from Step 5 over the top surface.
Distribute the remaining half of the pistachio-kataifi filling from Step 2 evenly over this ganache layer, then finish by spreading the remaining ganache on top, creating a beautiful contrast of dark chocolate and golden-brown pistachio bits.
Let the ganache set at room temperature for about 20 minutes before slicing—this allows it to firm up just enough to hold its shape when you cut the cheesecake, but not so much that it becomes brittle.
