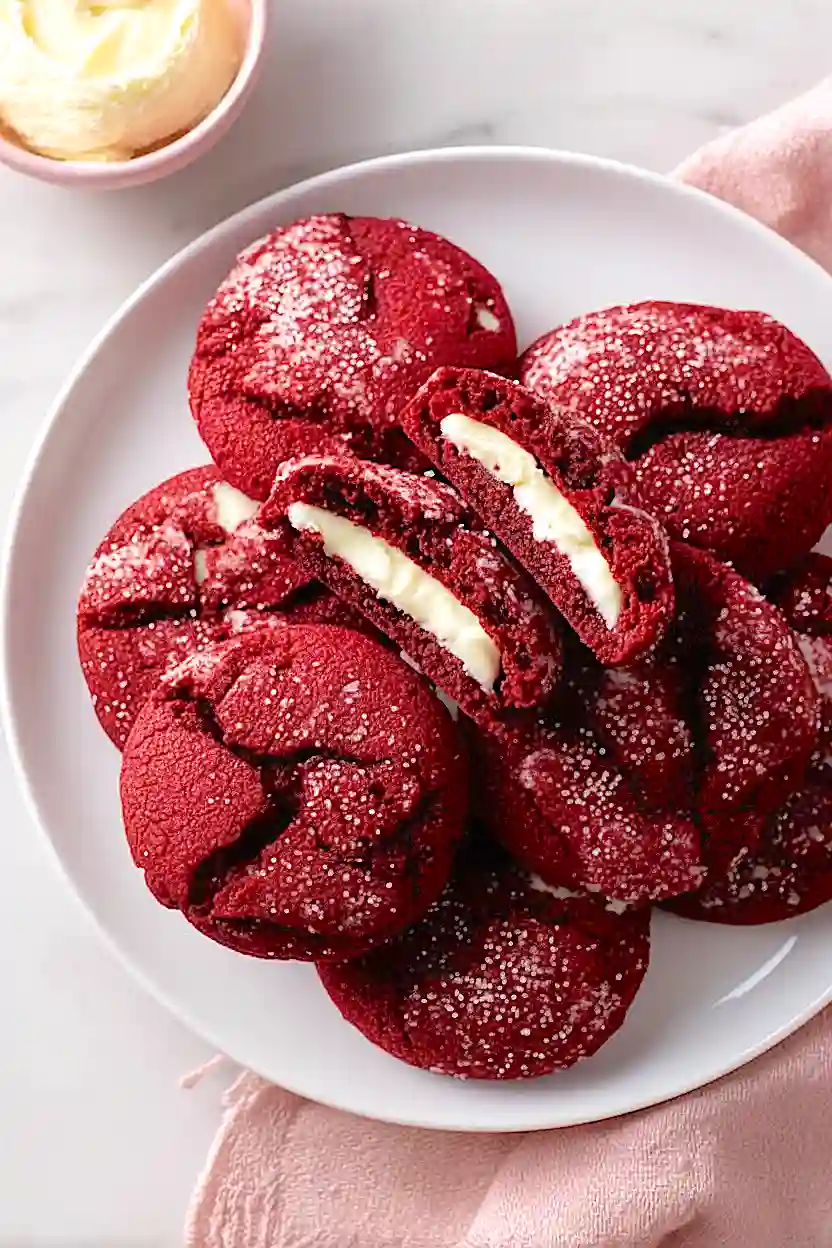
I’ve always thought red velvet cake was beautiful, but let’s be honest – I don’t always have time to bake a whole cake from scratch. That’s where these cookies come in. They give you that same red velvet flavor with a cream cheese surprise in the middle, and they’re done in about half the time.
The cream cheese filling is what really makes these special. It’s sweet and tangy, and it stays soft even after the cookies cool down. I like to make the filling first so it has time to chill while I mix up the cookie dough. That way it’s easier to work with and doesn’t get messy.
These cookies are perfect for Valentine’s Day or Christmas, but I’ll be real with you – I make them year-round. My kids ask for them at least once a month, and I’m not complaining. They look fancy enough to bring to a party, but they’re simple enough for a regular Tuesday afternoon.
Why You’ll Love These Cream Cheese Stuffed Red Velvet Cookies
- Impressive presentation – The bright red cookies with creamy white centers look bakery-quality and will wow everyone at parties or holiday gatherings.
- Perfect balance of flavors – The subtle chocolate cookie pairs beautifully with the tangy cream cheese filling, giving you that classic red velvet taste in cookie form.
- Make-ahead friendly – You can prepare the dough and filling in advance, making it easier to bake fresh cookies whenever you need them.
- Fun baking project – These cookies are a bit more involved than your average cookie recipe, making them a satisfying weekend baking activity that’s still totally doable for home bakers.
What Kind of Cream Cheese Should I Use?
For these stuffed cookies, you’ll want to use regular full-fat cream cheese – the kind that comes in a brick, not the spreadable tub version. The block-style cream cheese holds its shape better when you’re stuffing it into the cookie dough and won’t make your filling too runny. Make sure your cream cheese is softened to room temperature before you start mixing, otherwise you’ll end up with lumps in your filling. If you only have low-fat cream cheese on hand, it’ll work in a pinch, but your filling might be a bit less rich and creamy than the full-fat version.

Options for Substitutions
These cookies are pretty forgiving when it comes to swaps, so here are some options if you’re missing an ingredient:
- Red food coloring: You can skip the red coloring entirely and you’ll end up with chocolate cookies that taste just as good. If you want a natural option, try using beet powder (start with 1-2 teaspoons), though the color won’t be quite as bright.
- Cream cheese: Regular cream cheese is best for that classic tangy filling, but mascarpone cheese works in a pinch for a slightly sweeter, less tangy version. Make sure whatever you use is at room temperature for easy mixing.
- Brown sugar: If you’re out of brown sugar, mix 1/2 cup white sugar with 1 tablespoon of molasses. Or just use all white sugar – your cookies will be slightly less chewy but still tasty.
- Cocoa powder: Either natural or Dutch-process cocoa works here. If you only have natural cocoa, the cookies might be slightly lighter in color but the taste will be fine.
- Milk: Any milk works – whole, 2%, almond, or oat milk are all fine substitutes. You can even use water if that’s all you have on hand.
Watch Out for These Mistakes While Baking
The biggest mistake you can make with these cookies is skipping the chilling steps, which might seem like a hassle but keeps the cream cheese filling from melting out during baking and prevents the dough from spreading too thin.
When sealing the cream cheese inside the cookie dough, make sure there are no gaps or thin spots in the dough covering – any openings will let the filling leak out and create a mess in your oven.
Don’t overbake these cookies thinking they need to look “done” – they should still look slightly underbaked in the center when you pull them out at 12-13 minutes, as they’ll continue cooking on the hot baking sheet.
For the best texture, resist the urge to move the cookies right away and let them cool on the baking sheet for the full 5 minutes, which helps them firm up enough to transfer without breaking apart.

What to Serve With Red Velvet Cookies?
These cream cheese stuffed cookies are pretty rich and sweet on their own, so I like to keep things simple when serving them. A cold glass of milk is always the go-to pairing – it helps balance out the sweetness and makes for perfect dunking. If you’re serving these at a party or gathering, they pair nicely with hot coffee or even a scoop of vanilla ice cream on the side for an extra indulgent dessert. You could also arrange them on a platter with some fresh strawberries or raspberries to add a little fruity brightness to your dessert spread.
Storage Instructions
Store: Keep these cream cheese stuffed cookies in an airtight container at room temperature for up to 3 days, or in the fridge for up to a week. The cream cheese filling means they do better in the fridge, especially if your kitchen is warm.
Freeze: These cookies freeze really well for up to 3 months. You can freeze them already baked and stuffed, or freeze the cookie dough balls and cream cheese filling separately to bake fresh later. Just wrap everything tightly in plastic wrap and then put in a freezer bag.
Serve: If frozen, let the baked cookies thaw at room temperature for about 30 minutes before eating. For frozen dough, you can bake straight from frozen – just add a couple extra minutes to the baking time.
| Preparation Time | 190-210 minutes |
| Cooking Time | 10-15 minutes |
| Total Time | 200-225 minutes |
| Level of Difficulty | Hard |
| Servings | 24 cookies |
Estimated Nutrition
Estimated nutrition for the whole recipe (without optional ingredients):
- Calories: 3300-3600
- Protein: 28-34 g
- Fat: 145-160 g
- Carbohydrates: 470-510 g
Ingredients
For the cookie dough:
- 2 cups flour (I always use King Arthur all-purpose flour)
- 1/3 cup cocoa powder (sifted to remove lumps)
- 1 tsp baking soda
- 1/4 tsp salt
- 8 tablespoons unsalted butter (room temperature, about 70°F)
- 1/2 cup granulated sugar
- 1/2 cup light brown sugar
- 1 large egg
- 1.5 tablespoons whole milk
- 2.5 tsp vanilla extract
- 1.5 tablespoons red food coloring
For the filling:
- 4 oz cream cheese (I prefer Philadelphia brand for a stable texture)
- 2 cups powdered sugar
- 1.5 tablespoons all-purpose flour
- 1/2 tsp vanilla extract
- 1/8 teaspoon almond extract
For the coating:
- 1/2 cup granulated sugar
Step 1: Prepare the Dry Ingredients and Cream Cheese Filling
- 2 cups flour
- 1/3 cup cocoa powder
- 1 tsp baking soda
- 1/4 tsp salt
- 4 oz cream cheese
- 2 cups powdered sugar
- 1.5 tablespoons all-purpose flour
- 1/2 tsp vanilla extract
- 1/8 teaspoon almond extract
Sift together the flour, cocoa powder, baking soda, and salt in a medium bowl to remove any lumps and ensure even distribution of the leavening agents—this prevents dense pockets in your cookies.
In a separate small bowl, beat the cream cheese with the powdered sugar, flour, vanilla extract, and almond extract for 3 minutes until smooth and fluffy.
Using a small spoon or small cookie scoop, drop teaspoon-sized portions of the cream cheese mixture onto a parchment-lined plate and freeze for 1.5 hours until solid.
This advance preparation means your filling is ready when you need it.
Step 2: Make the Cookie Dough Base
- 8 tablespoons unsalted butter
- 1/2 cup granulated sugar
- 1/2 cup light brown sugar
- 1 large egg
- 1.5 tablespoons whole milk
- 2.5 tsp vanilla extract
- 1.5 tablespoons red food coloring
- dry ingredient mixture from Step 1
In a large bowl, beat the room-temperature butter with the granulated sugar and light brown sugar for 2 minutes until light and fluffy—this incorporates air and creates tender cookies.
Add the egg, milk, and vanilla extract, beating for another minute until fully combined and smooth.
Gently fold in the dry ingredient mixture from Step 1, then add the red food coloring, stirring until the color is evenly distributed throughout the dough.
The dough should be a deep red-brown color with no streaks.
Cover the bowl and refrigerate for 1.5 hours until the dough is firm enough to handle.
Step 3: Shape Filled Cookies and Prepare for Baking
- cookie dough from Step 2
- frozen cream cheese balls from Step 1
- 1/2 cup granulated sugar
Preheat your oven to 350°F.
Remove the frozen cream cheese balls from the freezer and roll them into tight little balls if they’ve lost their shape—I find that a quick roll between my palms firms them right back up.
Working with one portion at a time, roll a tablespoon of chilled cookie dough into a ball and gently press your thumb into the center to create a small indent.
Place one frozen cream cheese ball into the indent and carefully seal it closed by molding the dough around the filling and smoothing it into a ball.
Rolling each filled dough ball in the granulated sugar gives them an attractive sparkly coating and adds a light crunch to the exterior.
Step 4: Bake and Cool the Cookies
- filled cookie dough balls from Step 3
Space the sugar-coated cookie balls about 2 inches apart on a parchment-lined baking sheet and bake at 350°F for 12-13 minutes.
The tops should look set but still slightly soft to the touch—they’ll continue to firm up as they cool.
Let the cookies rest on the baking sheet for 5 minutes before transferring them to a wire rack to cool completely.
This resting period prevents them from breaking apart and allows the filling to set slightly.

Chewy Cream Cheese Stuffed Red Velvet Cookies
Ingredients
For the cookie dough
- 2 cups flour (I always use King Arthur all-purpose flour)
- 1/3 cup cocoa powder (sifted to remove lumps)
- 1 tsp baking soda
- 1/4 tsp salt
- 8 tablespoons unsalted butter (room temperature, about 70°F)
- 1/2 cup granulated sugar
- 1/2 cup light brown sugar
- 1 large egg
- 1.5 tablespoons whole milk
- 2.5 tsp vanilla extract
- 1.5 tablespoons red food coloring
For the filling
- 4 oz cream cheese (I prefer Philadelphia brand for a stable texture)
- 2 cups powdered sugar
- 1.5 tablespoons all-purpose flour
- 1/2 tsp vanilla extract
- 1/8 teaspoon almond extract
For the coating
- 1/2 cup granulated sugar
Instructions
- Sift together the flour, cocoa powder, baking soda, and salt in a medium bowl to remove any lumps and ensure even distribution of the leavening agents—this prevents dense pockets in your cookies. In a separate small bowl, beat the cream cheese with the powdered sugar, flour, vanilla extract, and almond extract for 3 minutes until smooth and fluffy. Using a small spoon or small cookie scoop, drop teaspoon-sized portions of the cream cheese mixture onto a parchment-lined plate and freeze for 1.5 hours until solid. This advance preparation means your filling is ready when you need it.
- In a large bowl, beat the room-temperature butter with the granulated sugar and light brown sugar for 2 minutes until light and fluffy—this incorporates air and creates tender cookies. Add the egg, milk, and vanilla extract, beating for another minute until fully combined and smooth. Gently fold in the dry ingredient mixture from Step 1, then add the red food coloring, stirring until the color is evenly distributed throughout the dough. The dough should be a deep red-brown color with no streaks. Cover the bowl and refrigerate for 1.5 hours until the dough is firm enough to handle.
- Preheat your oven to 350°F. Remove the frozen cream cheese balls from the freezer and roll them into tight little balls if they've lost their shape—I find that a quick roll between my palms firms them right back up. Working with one portion at a time, roll a tablespoon of chilled cookie dough into a ball and gently press your thumb into the center to create a small indent. Place one frozen cream cheese ball into the indent and carefully seal it closed by molding the dough around the filling and smoothing it into a ball. Rolling each filled dough ball in the granulated sugar gives them an attractive sparkly coating and adds a light crunch to the exterior.
- Space the sugar-coated cookie balls about 2 inches apart on a parchment-lined baking sheet and bake at 350°F for 12-13 minutes. The tops should look set but still slightly soft to the touch—they'll continue to firm up as they cool. Let the cookies rest on the baking sheet for 5 minutes before transferring them to a wire rack to cool completely. This resting period prevents them from breaking apart and allows the filling to set slightly.


