Finding a dessert that satisfies your sweet tooth while still supporting your fitness goals can feel nearly impossible. Traditional banana pudding is delicious, but it’s loaded with sugar and won’t do much for your protein intake, which makes it tough to enjoy guilt-free when you’re trying to eat healthier or build muscle.
That’s where this high protein banana pudding comes in: it delivers all the creamy, nostalgic flavor you crave with a serious protein boost, uses simple ingredients you can find at any grocery store, and comes together in less than 20 minutes with minimal effort required.

Why You’ll Love This High Protein Banana Pudding
- High-protein dessert – This banana pudding packs a protein punch, making it a guilt-free treat that actually helps you hit your daily protein goals while satisfying your sweet tooth.
- Quick and easy – With just under an hour from start to finish and minimal prep work, you can whip up this dessert without spending your whole evening in the kitchen.
- Classic comfort food with a healthy twist – You get all the creamy, nostalgic flavors of traditional banana pudding, but with added protein to make it more nutritious.
- Simple ingredients – Most of these items are probably already in your pantry and fridge, making this an easy recipe to throw together on short notice.
What Kind of Protein Powder Should I Use?
For this banana pudding, you’ll want to stick with vanilla or unflavored protein powder to keep the classic banana pudding taste intact. Whey protein is your best bet here since it mixes smoothly and doesn’t leave a chalky texture, but if you’re avoiding dairy, a good quality vanilla pea protein or brown rice protein will also work. Stay away from chocolate or strongly flavored protein powders unless you’re okay with a totally different flavor profile. The key is to make sure whatever protein powder you choose dissolves well in cold liquids, since you won’t be heating this pudding up.

Options for Substitutions
This protein-packed pudding is pretty adaptable, so here are some swaps you can make:
- Protein powder: Any flavor works here, but vanilla or banana protein powder blend best with the pudding. Whey, casein, or plant-based proteins all work fine – just note that plant-based proteins might make the texture slightly grainier.
- Instant pudding mix: Vanilla is the classic choice, but banana or cheesecake flavored pudding mix can add a fun twist. Sugar-free pudding mix works great if you’re watching your sugar intake.
- Milk: Any milk works – whole, 2%, skim, almond, oat, or soy. Keep in mind that lower fat milks will make a slightly thinner pudding, while whole milk keeps it creamier.
- Cream: You can use heavy cream, half-and-half, or even swap it entirely with more milk if you want to cut calories. The texture will be less rich but still tasty.
- Yogurt: Greek yogurt adds extra protein and tang, but regular yogurt or even sour cream works. For a dairy-free version, try coconut yogurt.
- Nilla Wafers: Graham crackers, vanilla cookies, or even shortbread cookies make good substitutes. You can also use low-carb vanilla wafers if you’re watching carbs.
Watch Out for These Mistakes While Making
The biggest mistake when making high protein banana pudding is not chilling the pudding mixture long enough, which can leave you with a runny texture that won’t hold up in layers – stick to the full 40 minutes for the best results.
Another common error is over-whipping the cream, which can turn it grainy and butter-like instead of light and fluffy, so stop as soon as stiff peaks form.
To keep your bananas from turning brown and unappetizing, slice them right before assembling and consider tossing them in a tiny bit of lemon juice.
When folding the whipped cream into the pudding, use a gentle hand and stop once you no longer see white streaks – over-mixing will deflate all that air you just whipped in and leave you with a dense, heavy pudding instead of a light one.
What to Serve With Banana Pudding?
Banana pudding is pretty rich and sweet on its own, so I like to keep things simple when serving it. A hot cup of coffee or cold glass of milk is really all you need to balance out the creamy sweetness. If you’re serving this at a gathering, it pairs nicely with other Southern-style dishes like fried chicken, pulled pork, or barbecue since the cool, sweet pudding is a nice contrast to savory main courses. You could also set out some fresh berries on the side for people who want a little extra fruit with their dessert.
Storage Instructions
Store: Keep your banana pudding covered tightly in the fridge for up to 3 days. The wafers will soften over time, which some people actually prefer! Just know that the bananas might start to brown a bit after the first day, but it still tastes great.
Make Ahead: You can prep this pudding a few hours before serving, which actually helps the flavors come together nicely. If you’re making it the night before, wait to add the top layer of wafers until right before serving so they stay a bit crunchier.
Serve: This pudding is best enjoyed cold straight from the fridge. Give it a quick stir if the layers have separated a bit, and add a few fresh banana slices on top if you want it to look extra nice for guests.
| Preparation Time | 15-20 minutes |
| Cooking Time | 0 minutes |
| Total Time | 55-60 minutes |
| Level of Difficulty | Easy |
| Servings | 6 servings |
Estimated Nutrition
Estimated nutrition for the whole recipe (without optional ingredients):
- Calories: 1900-2150
- Protein: 65-80 g
- Fat: 70-90 g
- Carbohydrates: 260-300 g
Ingredients
For the pudding base:
- 2/3 cup protein powder (I use Optimum Nutrition Gold Standard vanilla)
- 1.1 boxes instant pudding mix (Jell-O sugar-free vanilla is my favorite)
- 1.5 cups milk
- Pinch of salt
For the whipped cream mixture:
- 1.5 cups cream (chilled to roughly 38°F for better whipping)
- 1/3 cup yogurt (I prefer Fage 0% Greek yogurt for extra thickness)
For the assembly:
- 3 bananas (sliced into 1/4-inch rounds)
- 27 nilla wafers
- 4 nilla wafers (crushed for a decorative garnish)
Step 1: Prepare the Pudding Base
- 2/3 cup protein powder
- 1.1 boxes instant pudding mix
- 1.5 cups milk
- Pinch of salt
Combine the protein powder and instant pudding mix in a medium bowl, stirring together thoroughly to break up any lumps.
Add the milk and a pinch of salt, then stir vigorously for about 1 minute until the mixture is smooth and well combined.
The pudding will be relatively thin at this stage.
Cover and refrigerate for 40 minutes—this resting time allows the pudding to thicken and the flavors to meld beautifully.
Step 2: Whip and Fold the Cream Layer
- 1.5 cups cream
- 1/3 cup yogurt
- pudding mixture from Step 1
While the pudding chills, pour the chilled cream into a separate bowl and whip it with an electric mixer or by hand until soft peaks form (the cream should hold its shape but still look slightly fluffy).
Gently fold in the Greek yogurt for 30-60 seconds until just combined—this adds richness and thickness without deflating the whipped cream.
Reserve 1/2 cup of this cream mixture in a separate bowl for topping, then fold the remaining cream mixture into the thickened pudding from Step 1 using a spatula with broad, sweeping strokes to maintain the airy texture.
Step 3: Prepare Ingredients for Layering
- 3 bananas
- 27 nilla wafers
- 4 nilla wafers
While the cream whips, slice the bananas into 1/4-inch rounds (this thickness ensures they stay intact during layering and don’t become mushy).
I recommend slicing them just before assembly so they don’t brown or oxidize.
Have your 27 nilla wafers and 4 wafers for garnish ready, and gather your serving glasses or bowls.
Step 4: Layer and Assemble the Dessert
- creamy pudding mixture from Step 2
- banana slices from Step 3
- crushed nilla wafers from Step 3
- reserved cream mixture from Step 2
- whole nilla wafers from Step 3
- crushed nilla wafers for garnish
Divide the creamy pudding mixture from Step 2 among your serving glasses (typically 4-6 servings depending on glass size).
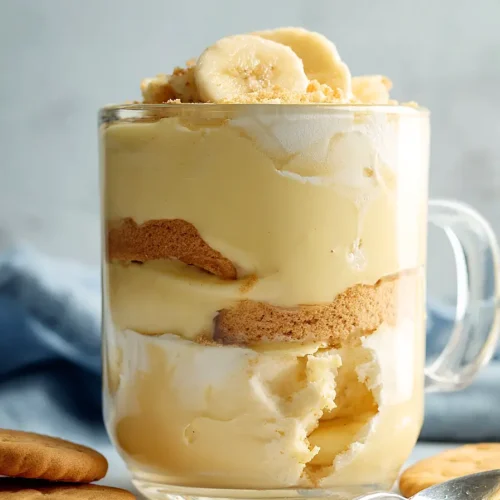
Create alternating layers by adding banana slices, then crushed nilla wafers, then more pudding, repeating until the glass is nearly full.
The wafers will slightly soften from the moisture, which creates a wonderful texture contrast.
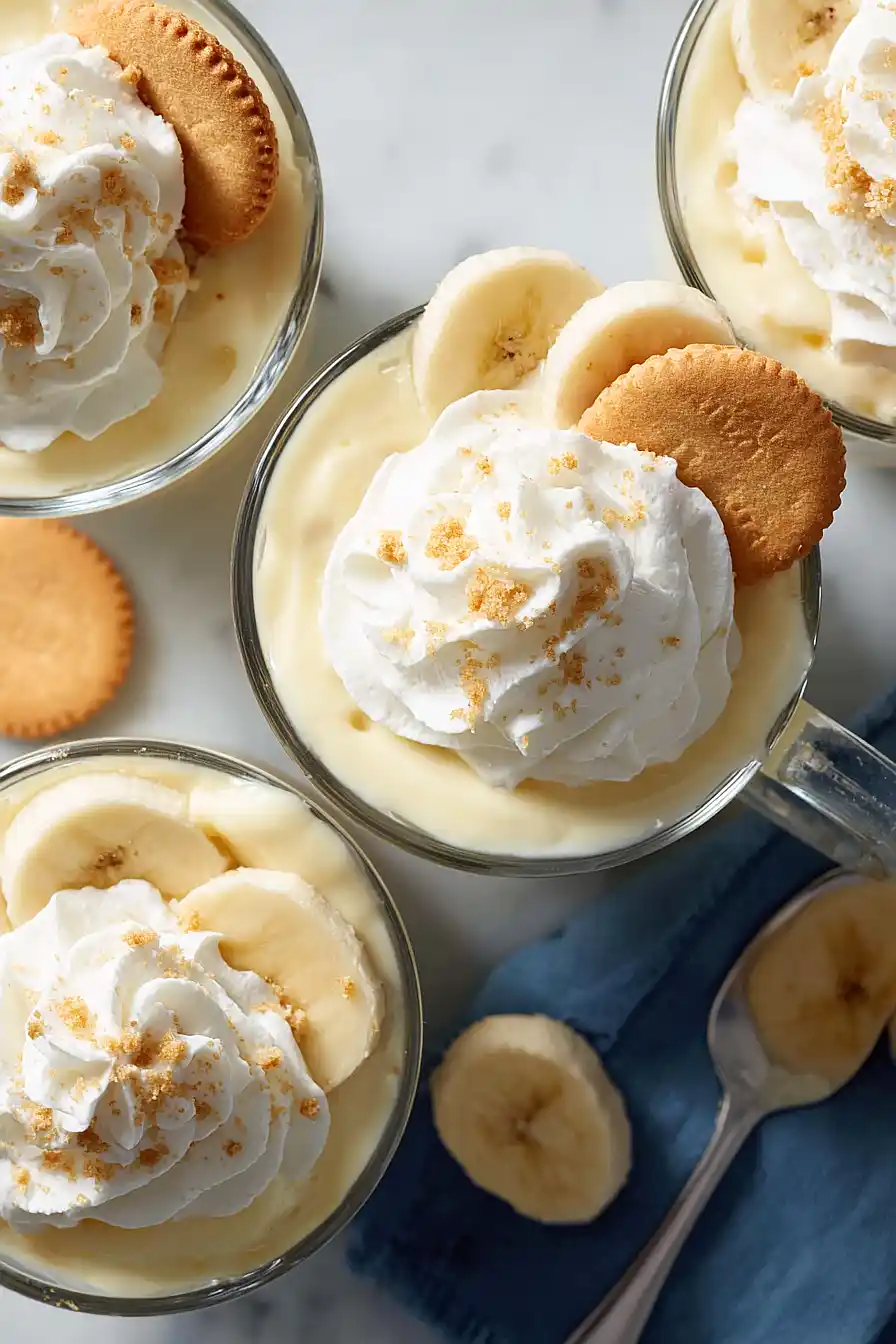
Top each serving with a generous dollop of the reserved whipped cream mixture from Step 2, then place a whole nilla wafer on top and garnish with a few fresh banana slices.
For extra crunch, sprinkle the crushed nilla wafer garnish over the top.
Creamy High Protein Banana Pudding
Ingredients
For the pudding base::
- 2/3 cup protein powder (I use Optimum Nutrition Gold Standard vanilla)
- 1.1 boxes instant pudding mix (Jell-O sugar-free vanilla is my favorite)
- 1.5 cups milk
- Pinch of salt
For the whipped cream mixture::
- 1.5 cups cream (chilled to roughly 38°F for better whipping)
- 1/3 cup yogurt (I prefer Fage 0% Greek yogurt for extra thickness)
For the assembly::
- 3 bananas (sliced into 1/4-inch rounds)
- 27 nilla wafers
- 4 nilla wafers (crushed for a decorative garnish)
Instructions
- Combine the protein powder and instant pudding mix in a medium bowl, stirring together thoroughly to break up any lumps. Add the milk and a pinch of salt, then stir vigorously for about 1 minute until the mixture is smooth and well combined. The pudding will be relatively thin at this stage. Cover and refrigerate for 40 minutes—this resting time allows the pudding to thicken and the flavors to meld beautifully.
- While the pudding chills, pour the chilled cream into a separate bowl and whip it with an electric mixer or by hand until soft peaks form (the cream should hold its shape but still look slightly fluffy). Gently fold in the Greek yogurt for 30-60 seconds until just combined—this adds richness and thickness without deflating the whipped cream. Reserve 1/2 cup of this cream mixture in a separate bowl for topping, then fold the remaining cream mixture into the thickened pudding from Step 1 using a spatula with broad, sweeping strokes to maintain the airy texture.
- While the cream whips, slice the bananas into 1/4-inch rounds (this thickness ensures they stay intact during layering and don't become mushy). I recommend slicing them just before assembly so they don't brown or oxidize. Have your 27 nilla wafers and 4 wafers for garnish ready, and gather your serving glasses or bowls.
- Divide the creamy pudding mixture from Step 2 among your serving glasses (typically 4-6 servings depending on glass size). Create alternating layers by adding banana slices, then crushed nilla wafers, then more pudding, repeating until the glass is nearly full. The wafers will slightly soften from the moisture, which creates a wonderful texture contrast. Top each serving with a generous dollop of the reserved whipped cream mixture from Step 2, then place a whole nilla wafer on top and garnish with a few fresh banana slices. For extra crunch, sprinkle the crushed nilla wafer garnish over the top.


