Finding a special dessert that truly captures the spirit of Easter without spending all day in the kitchen can feel like a tall order. Between decorating eggs, planning brunch, and getting the house ready for guests, who has time to fuss over complicated layer cakes with frosting techniques that require a culinary degree?
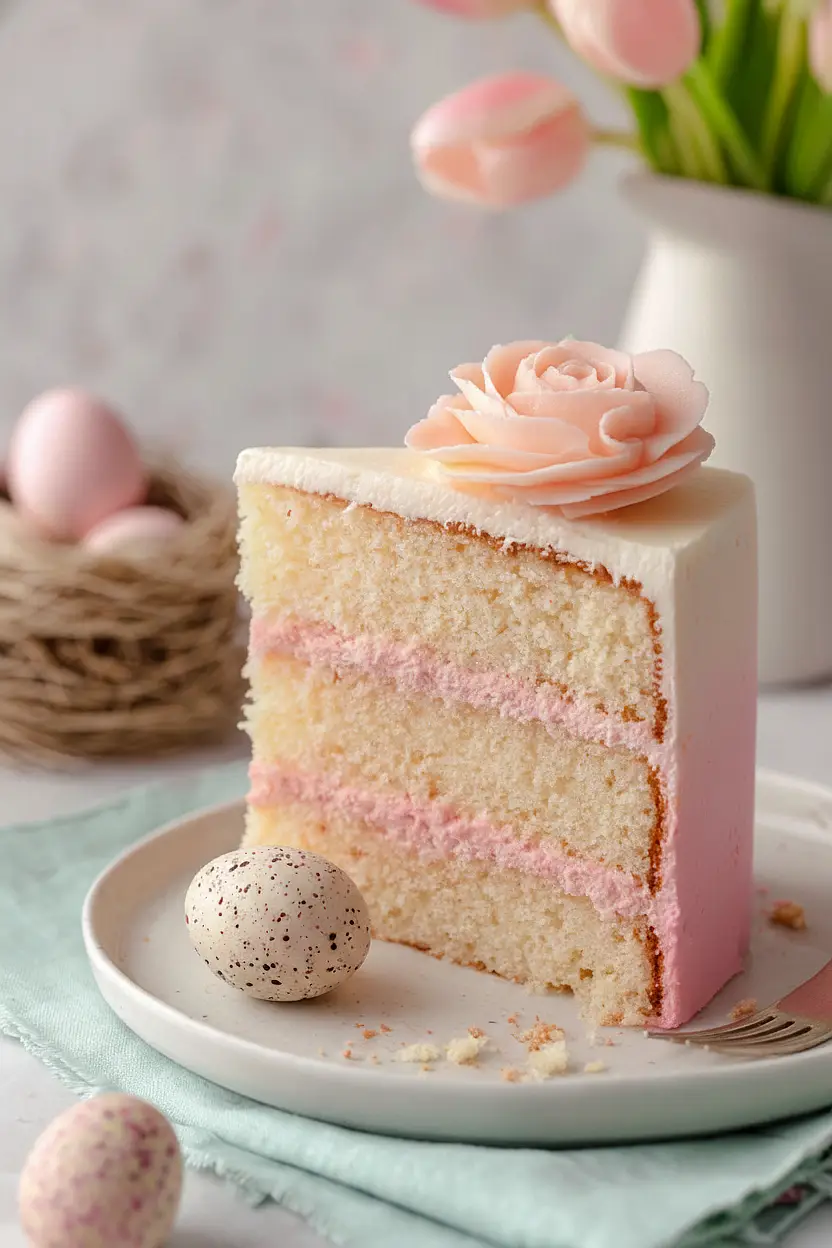
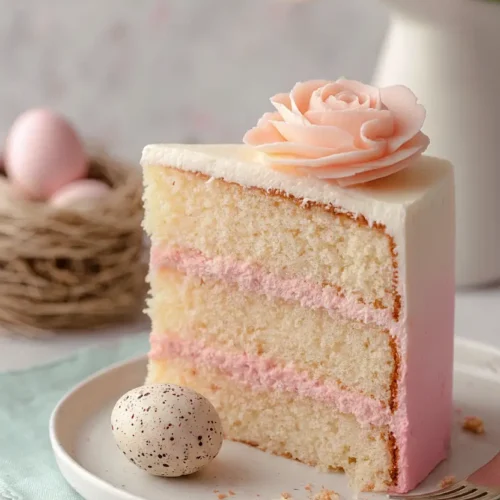
That’s where this strawberry Easter cake comes in. It’s a beautiful centerpiece for your holiday table that actually comes together more easily than you’d think, with a light strawberry-flavored cake, fluffy buttercream frosting, and adorable chocolate bunny decorations that kids and adults alike will love.
Why You’ll Love This Strawberry Easter Cake
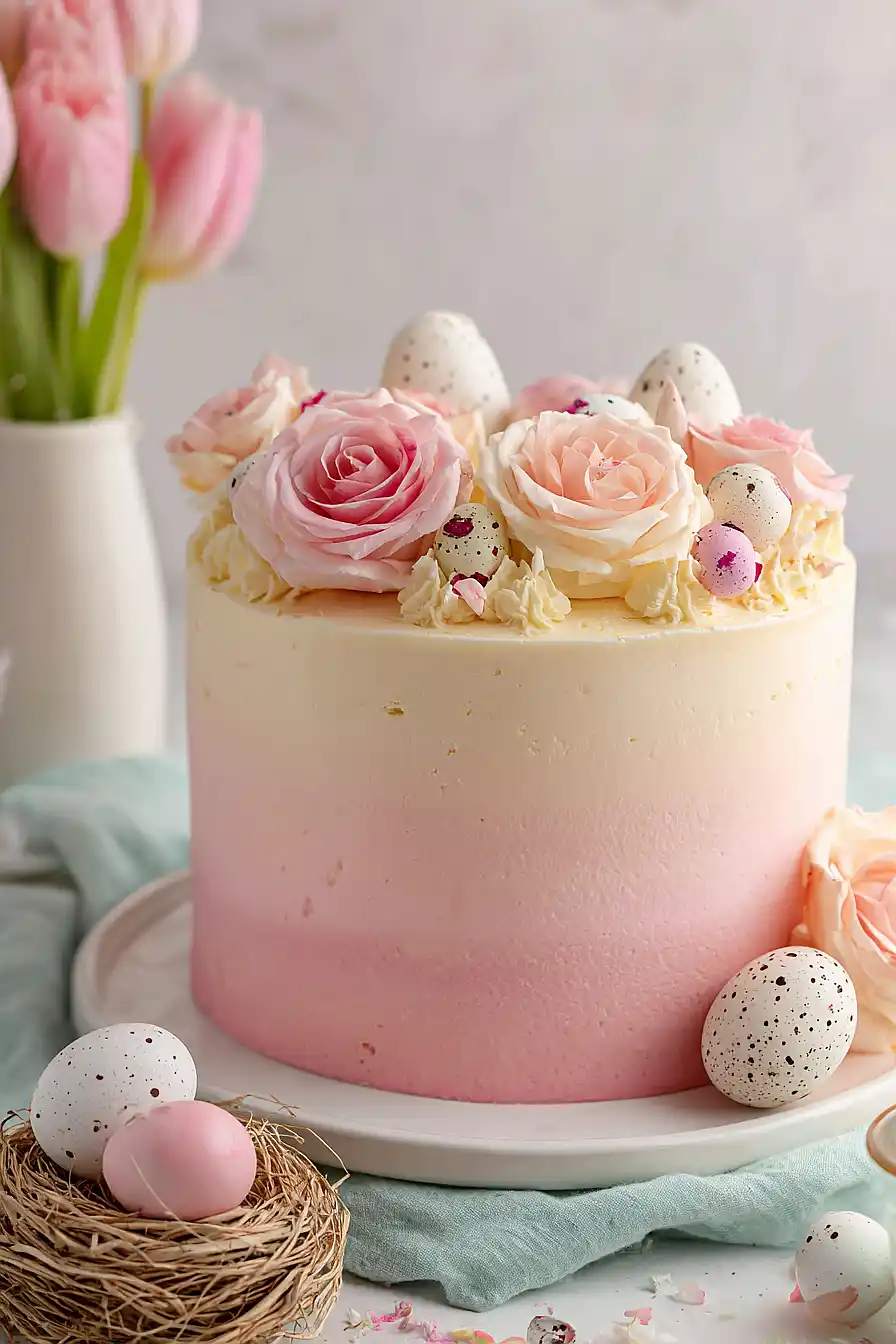
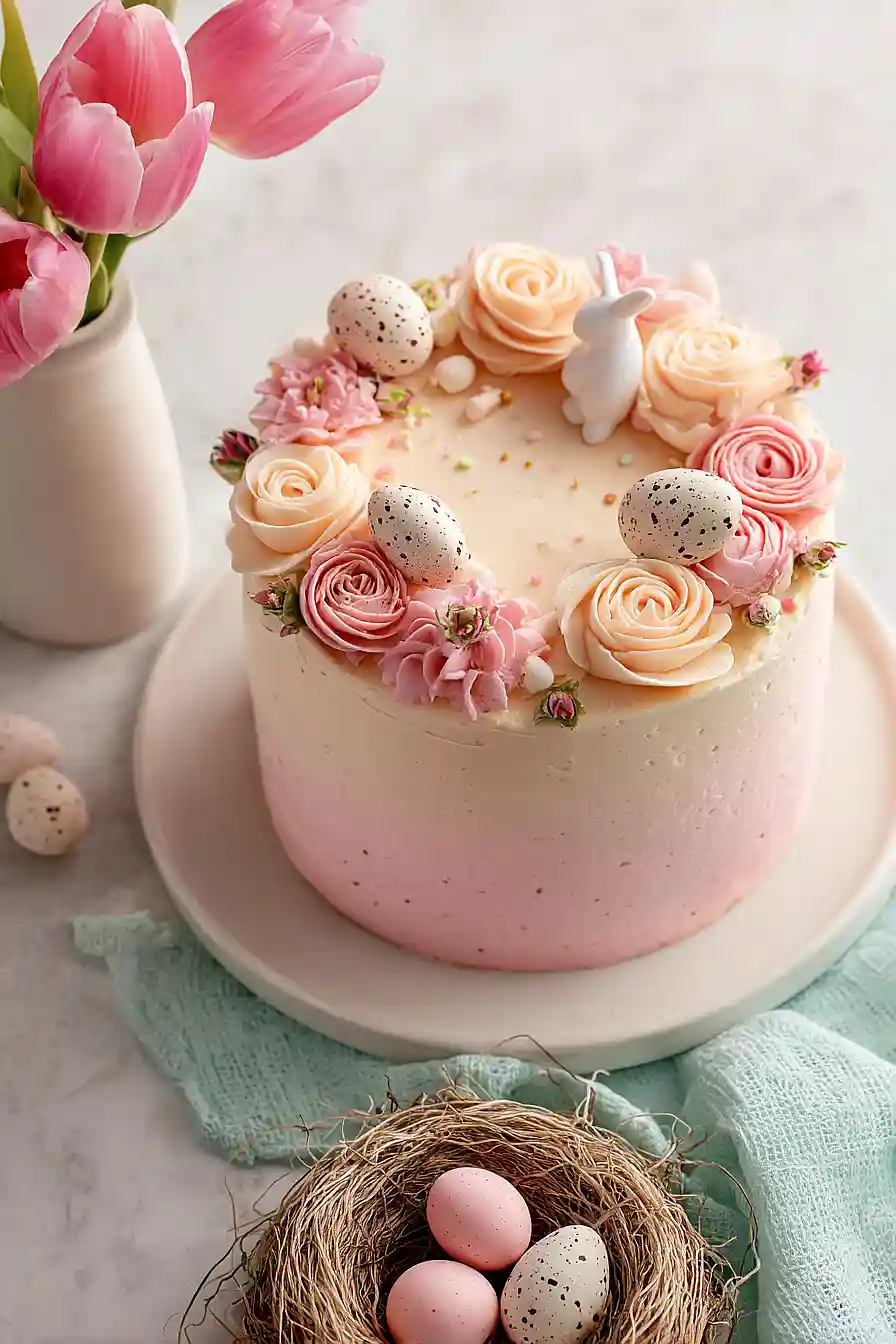
- Perfect for Easter celebrations – This festive cake with its pastel colors, chocolate bunny, and candy eggs makes a beautiful centerpiece for your holiday table that everyone will be excited to see.
- Real strawberry flavor – The strawberry preserves baked right into the cake and frosting give you authentic fruit flavor, not just artificial taste.
- Fun to decorate – You can get creative with the pink and yellow food coloring, and kids will love helping you place the chocolate bunny and eggs on top.
- Impressive but doable – While it looks like something from a bakery, this recipe breaks down into simple steps that home bakers can follow to create something special.
What Kind of Strawberry Preserves Should I Use?
For this Easter cake, you can use either strawberry preserves or strawberry jam – they’ll both give you that fruity flavor you’re looking for. The main difference is that preserves have larger chunks of fruit while jam is smoother, so it really comes down to personal preference. If you want a more uniform texture throughout your cake and frosting, go with jam, but if you like little bits of strawberry, stick with preserves. Whatever you choose, try to pick a brand that’s not overly sweet since you’re already using plenty of sugar in the cake and frosting, and you want that fresh strawberry taste to shine through.
Options for Substitutions
This festive cake is pretty forgiving when it comes to swaps, so here are some options if you need them:
- Strawberry preserves: If you don’t have strawberry preserves, raspberry or cherry preserves work nicely. You could also use fresh strawberries – just puree about ½ cup and reduce it in a pan until thick and jammy.
- Sour cream: Greek yogurt makes a great substitute for sour cream in the same amount. You can also use buttermilk, though you might want to reduce the milk slightly to keep the batter from getting too thin.
- Egg whites: This recipe calls for quite a few egg whites. If you’re making it all at once, you’ll need 7 total. Save those yolks for custard or scrambled eggs! In a pinch, you can use 2 tablespoons of aquafaba (chickpea liquid) per egg white for the cake portion.
- Butter: With all the butter in this recipe, it’s best not to substitute it in the frosting as it really needs that richness. However, in the cake itself, you could use vegetable oil (use ¾ of the amount called for).
- Cream of tartar: If you don’t have cream of tartar, use an equal amount of lemon juice or white vinegar when whipping the egg whites.
- Food coloring: The pink and yellow coloring is optional and just for Easter fun. You can skip it entirely or use natural alternatives like beet juice for pink and turmeric for yellow.
Watch Out for These Mistakes While Baking
The biggest challenge with this layered cake is overbaking, which can lead to dry, crumbly layers that are hard to frost – start checking for doneness at 30 minutes by inserting a toothpick into the center, and remove the cakes as soon as it comes out clean.
When making the meringue-based frosting, adding the hot sugar syrup too quickly can scramble the egg whites, so pour it in a slow, steady stream while the mixer runs on medium speed to create a smooth, glossy texture.
Make sure your butter is at room temperature (not melted or too cold) before adding it to the meringue, as this prevents the frosting from separating or becoming greasy.
For the gradient effect to work properly, let your crumb coat chill completely before piping on the colored frosting – skipping this step will cause the colors to mix into a muddy mess instead of creating clean, pretty stripes.
What to Serve With Strawberry Easter Cake?
This festive cake is pretty much a showstopper on its own, so I like to keep the sides simple and let it shine. A scoop of vanilla ice cream or some fresh whipped cream on the side is always a good call, especially since the strawberry flavor pairs so nicely with dairy. If you’re serving this at an Easter brunch, it goes great alongside some fresh berries or a fruit salad to balance out the sweetness. For drinks, I’d go with coffee, milk for the kids, or even some sparkling lemonade to make the celebration feel extra special.
Storage Instructions
Store: This cake keeps really well in the fridge for up to 5 days. Just cover it loosely with plastic wrap or keep it in a cake carrier to protect the frosting. The buttercream actually helps keep the cake moist, so it tastes great even a few days later.
Freeze: You can freeze unfrosted cake layers wrapped tightly in plastic wrap and foil for up to 3 months. I don’t recommend freezing the decorated cake though, since the chocolate bunny and eggs might not hold up well in the freezer.
Serve: Take the cake out of the fridge about 30 minutes before serving so the buttercream can soften up a bit. It tastes so much better at room temperature, and the texture of the cake is way more tender when it’s not cold.
| Preparation Time | 90-120 minutes |
| Cooking Time | 35-40 minutes |
| Total Time | 125-160 minutes |
| Level of Difficulty | Hard |
| Servings | 12 slices |
Estimated Nutrition
Estimated nutrition for the whole recipe (without optional ingredients):
- Calories: 6500-7300
- Protein: 55-70 g
- Fat: 270-310 g
- Carbohydrates: 1000-1150 g
Ingredients
For the cake:
- 1 3/4 cups flour (I always use King Arthur all-purpose flour)
- 1 cup sugar
- 1 tsp baking powder
- 1/4 tsp baking soda
- 3/4 cup butter (softened to room temperature, about 70°F)
- 1/4 cup milk
- 1/4 cup strawberry preserves (I use Bonne Maman for better fruit flavor)
- 1/2 cup sour cream
- 3 1/2 tsp vanilla
- 3 egg whites
- pink food coloring
- 1/8 tsp salt
For the meringue buttercream:
- 4 egg whites
- 1 1/2 cups sugar
- 1/8 tsp salt
- 2 1/4 cups butter (I like Kerrygold unsalted butter for this)
- 1 1/2 tsp vanilla
- 1/3 cup water
- 1/8 tsp cream of tartar
- pink food coloring
- yellow food coloring
For the strawberry buttercream:
- 1 lb confectioners sugar (sifted to remove lumps)
- 1 1/4 cups butter
- 1 tbsp strawberry preserve
- 2 1/2 tbsp lemon juice (freshly squeezed for the best acidity)
For the assembly:
- 1 chocolate bunny (approx 3.5 oz size)
- 1 bag chocolate eggs (I prefer Cadbury Mini Eggs for the matte finish)
Step 1: Prepare Mise en Place and Preheat Oven
- 1 3/4 cups flour
- 1 tsp baking powder
- 1/4 tsp baking soda
- 1/8 tsp salt
- 1/4 cup milk
- 1/2 cup sour cream
- 3 1/2 tsp vanilla
- pink food coloring
- 1/4 cup strawberry preserves
Heat your oven to 340°F and grease three 6-inch round cake pans.
While the oven preheats, sift together the flour, baking powder, baking soda, and salt in a small bowl—this aerates the flour and prevents lumps.
In a separate bowl, whisk together the sour cream, milk, 3½ teaspoons vanilla, and pink food coloring until well combined.
Strain the strawberry preserves through a fine mesh sieve to remove seeds and pulp, which will give you a smoother preserve to work with.
Having everything prepared before mixing ensures a smooth, efficient baking process.
Step 2: Mix and Bake the Cake Layers
- 3/4 cup butter
- 1 cup sugar
- dry ingredient mixture from Step 1
- wet ingredient mixture from Step 1
In a large mixer bowl, cream together the softened butter and 1 cup sugar until light and fluffy, about 2-3 minutes.
Gradually add the dry ingredient mixture from Step 1, alternating with the wet mixture (starting and ending with dry), mixing on low speed just until combined—overmixing creates a dense cake.
Divide the batter evenly among the three prepared pans and bake at 340°F for 35 minutes, until a toothpick inserted in the center comes out clean.
Remove from oven and let cool in the pans for 10 minutes before turning out onto wire racks to cool completely.
I like to let these layers cool to room temperature before frosting, which prevents the frosting from melting.
Step 3: Make the Swiss Meringue Buttercream Base
- 4 egg whites
- 1 1/2 cups sugar
- 1/8 tsp salt
- 1/8 tsp cream of tartar
- 2 1/4 cups butter
- 1 1/2 tsp vanilla
Combine 4 egg whites, 1½ cups sugar, 1/8 teaspoon salt, and 1/8 teaspoon cream of tartar in a heatproof mixer bowl.
Place the bowl over a pot of simmering water (double boiler method) and whisk constantly until the mixture reaches 160°F and feels warm to the touch, about 4-5 minutes—this safely pasteurizes the egg whites.
Transfer the bowl to your mixer and beat on medium-high speed for about 15 minutes until the meringue cools completely and reaches stiff, glossy peaks.
Gradually add 2¼ cups softened butter in small pieces while the mixer is running, then add 1½ teaspoons vanilla and beat until smooth and creamy.
The result should be a silky, stable frosting that’s perfect for piping and layering.
Step 4: Create Strawberry Buttercream and Colored Frosting Variations
- Swiss meringue buttercream from Step 3
- 1 1/4 cups butter
- 1 lb confectioners sugar
- 1 tbsp strawberry preserve
- 2 1/2 tbsp lemon juice
- pink food coloring
- yellow food coloring
Divide the buttercream from Step 3 into portions: reserve about 1 cup for the strawberry version and keep the rest for your gradient colors.
For the strawberry frosting, beat together 1¼ cups butter and 1 lb confectioners sugar (sifted) until smooth, then add 1 tablespoon strained strawberry preserve and 2½ tablespoons fresh lemon juice, beating until fully incorporated.
For the gradient frosting, take your remaining buttercream and divide it into separate bowls, adding pink and yellow food coloring to create an ombre effect from pale pink to peachy tones.
Transfer each frosting variety into piping bags fitted with appropriate tips—I use a grass tip for the strawberry roses and smaller round tips for piping the gradient stripes.
Step 5: Assemble and Frost the Cake
- cooled cake layers from Step 2
- strawberry buttercream from Step 4
Place the first cooled cake layer on a serving plate or cake board and spread a thin layer of strawberry buttercream from Step 4 on top.
Add the second layer and repeat with another layer of strawberry frosting, then top with the final cake layer.
Apply a thin crumb coat of strawberry frosting all over the outside of the cake and refrigerate for 10 minutes to set—this prevents crumbs from showing in your final frosting layer.
Once chilled, apply a final, thicker layer of strawberry frosting as your base coat, smoothing it as evenly as possible with an offset spatula.
Step 6: Pipe Gradient Frosting and Add Decorative Elements
- frosted cake from Step 5
- colored gradient frosting from Step 4
- strawberry frosting from Step 4
- 1 chocolate bunny
- 1 bag chocolate eggs
Using the piping bags with colored gradient frosting from Step 4, pipe vertical or horizontal stripes in your chosen pattern across the sides and top of the cake, starting with the palest shade and working toward deeper pink.
Smooth the frosting gently with an offset spatula or bench scraper to create an ombré effect, blending the colors slightly where they meet.
Chill the cake for 10-15 minutes to set the frosting.
While chilled, prepare your decorations: pipe strawberry frosting roses directly onto parchment paper and let them set, then carefully peel away the paper.
Top the finished cake with the chocolate bunny, strawberry roses, and chocolate eggs, arranging them artfully on top.
Decorated Strawberry Easter Cake
Ingredients
For the cake
- 1 3/4 cups flour (I always use King Arthur all-purpose flour)
- 1 cup sugar
- 1 tsp baking powder
- 1/4 tsp baking soda
- 3/4 cup butter (softened to room temperature, about 70°F)
- 1/4 cup milk
- 1/4 cup strawberry preserves (I use Bonne Maman for better fruit flavor)
- 1/2 cup sour cream
- 3 1/2 tsp vanilla
- 3 egg whites
- pink food coloring
- 1/8 tsp salt
For the meringue buttercream
- 4 egg whites
- 1 1/2 cups sugar
- 1/8 tsp salt
- 2 1/4 cups butter (I like Kerrygold unsalted butter for this)
- 1 1/2 tsp vanilla
- 1/3 cup water
- 1/8 tsp cream of tartar
- pink food coloring
- yellow food coloring
For the strawberry buttercream
- 1 lb confectioners sugar (sifted to remove lumps)
- 1 1/4 cups butter
- 1 tbsp strawberry preserve
- 2 1/2 tbsp lemon juice (freshly squeezed for the best acidity)
For the assembly
- 1 chocolate bunny (approx 3.5 oz size)
- 1 bag chocolate eggs (I prefer Cadbury Mini Eggs for the matte finish)
Instructions
- Heat your oven to 340°F and grease three 6-inch round cake pans. While the oven preheats, sift together the flour, baking powder, baking soda, and salt in a small bowl—this aerates the flour and prevents lumps. In a separate bowl, whisk together the sour cream, milk, 3½ teaspoons vanilla, and pink food coloring until well combined. Strain the strawberry preserves through a fine mesh sieve to remove seeds and pulp, which will give you a smoother preserve to work with. Having everything prepared before mixing ensures a smooth, efficient baking process.
- In a large mixer bowl, cream together the softened butter and 1 cup sugar until light and fluffy, about 2-3 minutes. Gradually add the dry ingredient mixture from Step 1, alternating with the wet mixture (starting and ending with dry), mixing on low speed just until combined—overmixing creates a dense cake. Divide the batter evenly among the three prepared pans and bake at 340°F for 35 minutes, until a toothpick inserted in the center comes out clean. Remove from oven and let cool in the pans for 10 minutes before turning out onto wire racks to cool completely. I like to let these layers cool to room temperature before frosting, which prevents the frosting from melting.
- Combine 4 egg whites, 1½ cups sugar, 1/8 teaspoon salt, and 1/8 teaspoon cream of tartar in a heatproof mixer bowl. Place the bowl over a pot of simmering water (double boiler method) and whisk constantly until the mixture reaches 160°F and feels warm to the touch, about 4-5 minutes—this safely pasteurizes the egg whites. Transfer the bowl to your mixer and beat on medium-high speed for about 15 minutes until the meringue cools completely and reaches stiff, glossy peaks. Gradually add 2¼ cups softened butter in small pieces while the mixer is running, then add 1½ teaspoons vanilla and beat until smooth and creamy. The result should be a silky, stable frosting that's perfect for piping and layering.
- Divide the buttercream from Step 3 into portions: reserve about 1 cup for the strawberry version and keep the rest for your gradient colors. For the strawberry frosting, beat together 1¼ cups butter and 1 lb confectioners sugar (sifted) until smooth, then add 1 tablespoon strained strawberry preserve and 2½ tablespoons fresh lemon juice, beating until fully incorporated. For the gradient frosting, take your remaining buttercream and divide it into separate bowls, adding pink and yellow food coloring to create an ombre effect from pale pink to peachy tones. Transfer each frosting variety into piping bags fitted with appropriate tips—I use a grass tip for the strawberry roses and smaller round tips for piping the gradient stripes.
- Place the first cooled cake layer on a serving plate or cake board and spread a thin layer of strawberry buttercream from Step 4 on top. Add the second layer and repeat with another layer of strawberry frosting, then top with the final cake layer. Apply a thin crumb coat of strawberry frosting all over the outside of the cake and refrigerate for 10 minutes to set—this prevents crumbs from showing in your final frosting layer. Once chilled, apply a final, thicker layer of strawberry frosting as your base coat, smoothing it as evenly as possible with an offset spatula.
- Using the piping bags with colored gradient frosting from Step 4, pipe vertical or horizontal stripes in your chosen pattern across the sides and top of the cake, starting with the palest shade and working toward deeper pink. Smooth the frosting gently with an offset spatula or bench scraper to create an ombré effect, blending the colors slightly where they meet. Chill the cake for 10-15 minutes to set the frosting. While chilled, prepare your decorations: pipe strawberry frosting roses directly onto parchment paper and let them set, then carefully peel away the paper. Top the finished cake with the chocolate bunny, strawberry roses, and chocolate eggs, arranging them artfully on top.


