Finding the perfect fall dessert that brings together two beloved treats can feel like an impossible task. After all, when you’re craving both the comfort of classic apple pie and the rich sweetness of caramel apples, it’s hard to choose just one, and things get even trickier when you’re trying to impress guests or satisfy a family with different preferences.
Luckily, this apple pie caramel apple recipe gives you the best of both worlds: it combines the warm spices and flaky crust of traditional apple pie with the gooey caramel coating we all love, and it’s surprisingly simple to make with ingredients you probably already have in your kitchen.
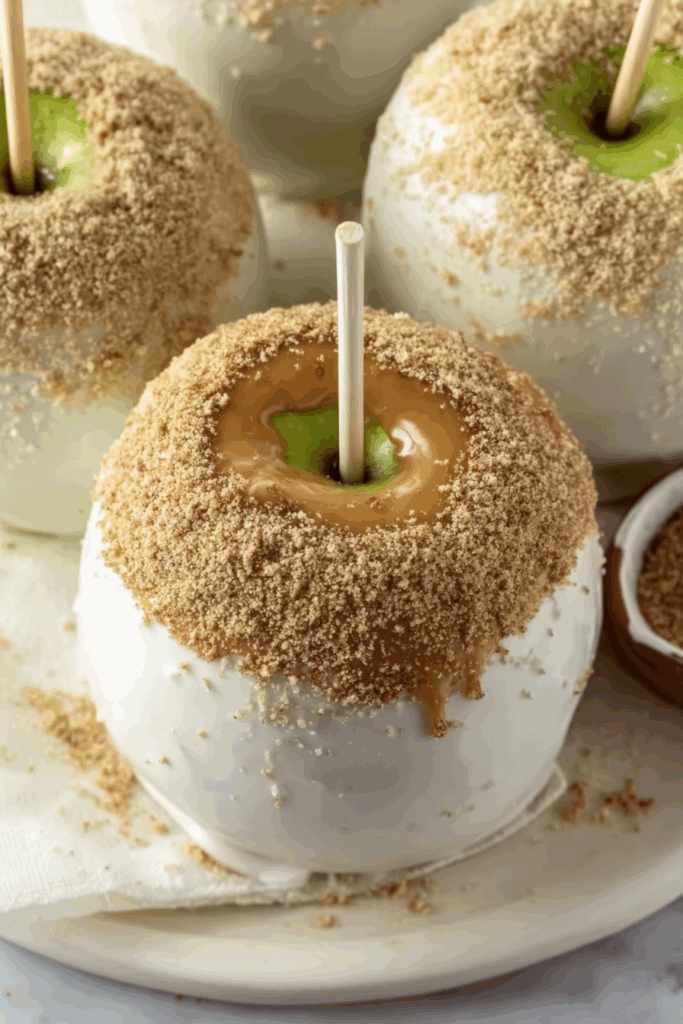
Why You’ll Love This Caramel Apple
- Quick and easy treat – Ready in just 25-35 minutes, these caramel apples are perfect when you need a fun dessert without spending hours in the kitchen.
- Kid-friendly activity – This recipe is great for making with children – they’ll love dipping the apples and watching the magic happen as you create these sweet treats together.
- Perfect fall dessert – Using fresh Granny Smith apples and warm cinnamon sugar, these caramel apples capture all the cozy flavors of autumn in one delicious bite.
- Simple ingredients – Made with basic items you can easily find at any grocery store, no special equipment or hard-to-find ingredients required.
- Great for parties – These make impressive treats for Halloween parties, fall gatherings, or any time you want to surprise guests with something homemade and delicious.
What Kind of Apples Should I Use?
Granny Smith apples are the perfect choice for caramel apples because they’re firm and tart, which balances out all that sweet caramel coating. Their crisp texture holds up well when you dip them, and they won’t get mushy or fall apart on the stick. If you can’t find Granny Smith, other tart varieties like Honeycrisp or Braeburn will work too, just make sure they’re firm and not overly ripe. When picking your apples, look for ones that are free of bruises and have a good shape – you want them to look as good as they taste when they’re all dressed up with caramel and toppings.
Options for Substitutions
This fun apple pie caramel apple recipe has some room for swaps if you need them:
- Granny Smith apples: While Granny Smith apples are perfect because they’re tart and crisp, you can use Honeycrisp or Fuji apples if that’s what you have. Just make sure they’re firm and not too sweet since the caramel adds plenty of sweetness.
- Brach’s Milk Maid caramels: Any soft caramel candies will work here – Kraft caramels, Werther’s soft caramels, or even homemade caramel sauce. If using caramel sauce, you might need to cook it a bit longer to get the right consistency for dipping.
- White chocolate melting wafers: Regular white chocolate chips work too, but you’ll need to add 1 tablespoon of coconut oil or shortening to help it melt smoothly. Vanilla candy coating or almond bark are also great options.
- Graham crackers: Crushed vanilla wafers, digestive biscuits, or even crushed cinnamon graham crackers can replace regular graham crackers for a different flavor twist.
- Marshmallows: Mini marshmallows work fine – just use about 1/2 cup instead of the large ones. You can also skip them entirely if you want a simpler apple pie look.
Watch Out for These Mistakes While Cooking
The biggest mistake when making caramel apples is not properly drying the apples after washing them – any moisture left on the surface will prevent the caramel from sticking, so make sure to pat them completely dry and let them sit at room temperature for about 30 minutes.
Another common error is overheating the caramel, which can cause it to become too thick and hard to work with – melt it slowly over low heat or in 30-second intervals in the microwave, stirring frequently until smooth.
To prevent your white chocolate from seizing up, avoid getting any water in it and melt it gently using the same low-heat method as the caramel.
For the cleanest finish, crush your graham crackers into fine, even pieces rather than large chunks, and work quickly once you start dipping since the caramel and chocolate will begin to set within minutes.
What to Serve With Caramel Apples?
These caramel apples are pretty much a dessert all on their own, but they’re perfect for sharing at fall parties or Halloween gatherings. I love setting them out on a big platter alongside other autumn treats like pumpkin cookies, cinnamon donuts, or even some warm apple cider for dipping breaks. If you’re doing a dessert table, mini cupcakes and candy corn make great companions that won’t compete with the apples’ sweet, crunchy goodness. For a cozy night in, just grab some napkins and enjoy them with a mug of hot chocolate or spiced tea.
Storage Instructions
Keep Fresh: These caramel apples are best enjoyed within 2-3 days of making them. Store them in the refrigerator in an airtight container or wrap each one individually in plastic wrap. The cold helps keep the caramel and chocolate coating firm and prevents the apples from getting too soft.
Freeze: You can freeze these treats for up to 1 month if you want to make them ahead for a party. Wrap each apple individually in plastic wrap, then place them in a freezer-safe container. Just remember they’ll need about 30 minutes to thaw before serving.
Serve: Let frozen caramel apples sit at room temperature for about 30 minutes before eating so they’re not rock-hard. If you’re serving them from the fridge, just 10-15 minutes at room temperature will make them perfect for biting into without breaking your teeth on the chocolate coating!
| Preparation Time | 15-20 minutes |
| Cooking Time | 10-15 minutes |
| Total Time | 25-35 minutes |
| Level of Difficulty | Medium |
Estimated Nutrition
Estimated nutrition for the whole recipe (without optional ingredients):
- Calories: 2600-2900
- Protein: 15-20 g
- Fat: 75-90 g
- Carbohydrates: 500-550 g
Ingredients
For preparing the apples:
- 4 to 5 wooden sticks (popsicle or cake pop sticks)
- 4 to 5 large Granny Smith apples (washed and dried thoroughly)
For the caramel coating:
- 2 tbsp water
- 1 bag (11 oz) soft caramels (I use Brach’s Milk Maid)
For the crust and chocolate layer:
- 12 oz white chocolate melting wafers (or vanilla candy coating, melted and cooled slightly)
- 6 graham crackers (crushed into fine crumbs)
For topping and optional decoration:
- 2 tbsp sugar mixed with 1/2 tsp ground cinnamon
- 8 large marshmallows (finely chopped, about 1/4-inch pieces)
Step 1: Prepare the Apples and Mise en Place
- 4 to 5 large Granny Smith apples
- 4 to 5 wooden sticks
- 6 graham crackers
- 8 large marshmallows
- 2 tbsp sugar mixed with 1/2 tsp ground cinnamon
Wash and thoroughly dry the Granny Smith apples—any moisture will prevent the caramel from adhering properly.
Insert a wooden stick firmly into the stem end of each apple, pushing it about halfway through.
Line a baking sheet with wax paper and set it nearby.
Crush the graham crackers into fine crumbs (you want a texture similar to sand, not chunky pieces) and set aside in a shallow bowl.
Chop the marshmallows into small ¼-inch pieces and place in another shallow bowl.
Mix the sugar with cinnamon in a small bowl.
Having everything prepped and ready will make the dipping and coating process smooth and efficient.
Step 2: Coat Apples with Caramel
- 1 bag soft caramels
- 2 tbsp water
In a medium saucepan, combine the caramels and water over medium heat.
Stir frequently until completely melted and smooth, about 3 minutes.
Remove from heat and let cool for about 1 minute so it’s still warm but not too hot to handle.
Working with one apple at a time, dip it into the caramel, rotating to coat evenly, then quickly scrape off any excess caramel using a butter knife or spoon (this prevents thick, uneven coating).
Place the caramel-coated apple on the prepared baking sheet.
Repeat with remaining apples, then refrigerate the sheet for 1 hour to allow the caramel to set completely before moving to the next coating.
Step 3: Apply White Chocolate and Graham Cracker Coating
- 12 oz white chocolate melting wafers
- graham cracker crumbs from Step 1
Melt the white chocolate wafers according to package directions (microwave in 30-second intervals, stirring between each, or use a double boiler), then let cool for 1 minute so it’s warm but not hot.
Working quickly, dip each caramel-coated apple into the white chocolate, rotating to coat evenly, then immediately roll the bottom half of the apple in the graham cracker crumbs for a textured finish.
Place the apple back on the baking sheet.
I find it helpful to work with a few apples at a time rather than all at once, so the chocolate stays at the right temperature.
Let the coated apples set at room temperature for 20-30 minutes.
Step 4: Add Marshmallow Ears and Final Touches
- chopped marshmallows from Step 1
- white chocolate
- cinnamon-sugar mixture from Step 1
Once the chocolate coating has set, prepare the marshmallow ears.
Dip each chopped marshmallow piece into the remaining melted white chocolate (reheat gently if needed) and press two pieces onto the top of each apple to create “ears.” Work gently so the marshmallows stay attached.
Once positioned, immediately sprinkle the cinnamon-sugar mixture over the marshmallows and the top of each apple for a finishing touch.
The apples will continue to set at room temperature and are ready to serve or display.







