I’ll admit—when I first saw chocolate covered strawberry ladybugs on Pinterest, I thought they’d be way too fussy to actually make. Like something you’d need an art degree and steady hands for. But then my daughter asked if we could try them for her class party, and I figured, why not?
Turns out, these little guys are pretty forgiving. If your blueberries don’t stick on perfectly or your chocolate dots are a bit wobbly, they still look cute. And honestly, kids don’t care if your ladybugs look like they belong in a magazine—they just want to eat chocolate-covered fruit. The whole thing takes maybe twenty minutes, and most of that is just waiting for the chocolate to set.
Why You’ll Love These Chocolate Covered Strawberry Ladybugs
- Kid-friendly and fun – These adorable ladybug treats are perfect for getting kids excited about eating fruit, and they’ll love helping you make them too.
- Only 3 ingredients – You just need strawberries, chocolate chips, and blueberries to create these cute little treats.
- Quick to make – Ready in under an hour, these are perfect for last-minute party snacks or when you need a fun dessert in a pinch.
- Great for parties – Whether it’s a birthday party, baby shower, or spring gathering, these charming ladybugs always steal the show and make for great conversation starters.
- Healthier dessert option – Since they’re mostly fresh fruit with just a touch of chocolate, you can feel good about serving these as a lighter sweet treat.
What Kind of Strawberries Should I Use?
Fresh strawberries work best for this recipe, and you’ll want to pick ones that are firm and bright red without any soft spots or bruising. Medium to large strawberries are ideal since they’re easier to work with when decorating them as ladybugs, plus they give you more surface area for the chocolate. Make sure your strawberries are completely dry before dipping them in chocolate – any moisture will cause the chocolate to seize up and get clumpy. If you’re shopping at the farmers market or grocery store, give them a gentle squeeze to make sure they’re not mushy, and try to use them within a day or two of purchasing for the best results.
Options for Substitutions
This fun recipe is pretty straightforward, but here are a few swaps you can make:
- Chocolate chips: Semi-sweet chocolate chips work great, but you can use milk chocolate for a sweeter taste or dark chocolate if you prefer something less sweet. Chocolate melting wafers are another option and tend to melt more smoothly.
- Blueberries: Fresh blueberries are best for this recipe since they’ll be used as the ladybug heads, but if they’re out of season, you can use small blackberries or even chocolate chips as a substitute for the heads.
- Strawberries: Fresh strawberries are essential for this recipe – they’re the base of your ladybugs, so there’s really no good substitute here. Just make sure to pick firm, ripe berries that aren’t too soft.
Watch Out for These Mistakes While Making
The biggest mistake when making chocolate covered strawberry ladybugs is using wet strawberries, which will cause the chocolate to seize up and become grainy – make sure to wash your berries ahead of time and pat them completely dry with paper towels before decorating.
Another common issue is overheating the chocolate, so melt it in 20-30 second intervals in the microwave, stirring between each round, until it’s smooth and just melted.
If your piped chocolate dots are sliding off the strawberries, the chocolate is too warm – let it cool for a minute or two until it thickens slightly, which will give you much better control.
Finally, don’t skip letting the chocolate fully set before moving your ladybugs, or you’ll end up with smudged decorations and blueberry heads rolling away.
What to Serve With Chocolate Covered Strawberry Ladybugs?
These little ladybugs are perfect for serving at birthday parties, baby showers, or any spring gathering where you want something cute and sweet. They work great as part of a dessert platter alongside other finger foods like mini cupcakes, fruit skewers, or sugar cookies. Since they’re pretty light and fruity, you could also pair them with a cheese and cracker board for a nice sweet and savory balance. I like setting them out with some sparkling lemonade or iced tea for a fun afternoon snack that kids and adults both enjoy.
Storage Instructions
Refrigerate: These adorable ladybugs are best enjoyed within 24 hours of making them. Store them in a single layer in an airtight container in the fridge, and they’ll stay fresh for up to 2 days. Just know that the chocolate might sweat a bit when you take them out, so let them sit at room temperature for a few minutes before serving.
Make Ahead: You can prep the chocolate-dipped strawberries a few hours before your party or event. Just keep them chilled until you’re ready to add the blueberry spots and serve. I wouldn’t recommend making these more than a day ahead since fresh strawberries release moisture over time and can make the chocolate soggy.
| Preparation Time | 30-40 minutes |
| Cooking Time | 15-30 minutes |
| Total Time | 45-70 minutes |
| Level of Difficulty | Easy |
| Servings | 20 pieces |
Estimated Nutrition
Estimated nutrition for the whole recipe (without optional ingredients):
- Calories: 750-850
- Protein: 6-8 g
- Fat: 28-34 g
- Carbohydrates: 120-135 g
Ingredients
- 1 lb strawberries (I use Driscoll’s for uniform size and shape)
- 3/4 cup blueberries
- 3/4 cup chocolate chips (I prefer Ghirardelli semi-sweet for a smooth melt)
- Pinch of flaky sea salt
Step 1: Prepare the Strawberries
- 1 lb strawberries
Rinse and thoroughly dry the strawberries—moisture will prevent chocolate from adhering properly.
Using a sharp paring knife, carefully cut a small V-shaped notch into the top of each strawberry to create the ladybug’s head.
Then slice each strawberry in half lengthwise, creating two halves that will serve as the body.
Pat the cut sides dry with a paper towel to ensure the chocolate coating sets smoothly.
Step 2: Melt the Chocolate
- 3/4 cup chocolate chips
Place the chocolate chips in a microwave-safe bowl and heat in 30-second intervals, stirring between each interval, until completely melted and smooth.
This gradual approach prevents scorching and ensures a glossy finish.
Once melted, let the chocolate cool for 1-2 minutes—it should still be warm enough to flow smoothly but not so hot it breaks down the delicate berries.
Step 3: Transfer Chocolate and Pipe Details
- melted chocolate from Step 2
Pour the melted chocolate from Step 2 into a piping bag fitted with a small round tip (or simply cut a small opening if using a basic piping bag).
On each strawberry half, pipe evenly-spaced dots across the body to resemble ladybug spots—typically 5-7 dots depending on the berry’s size.
I like to pipe the dots first before handling the berries, as it keeps your workspace organized and prevents fingerprints from melting the chocolate.
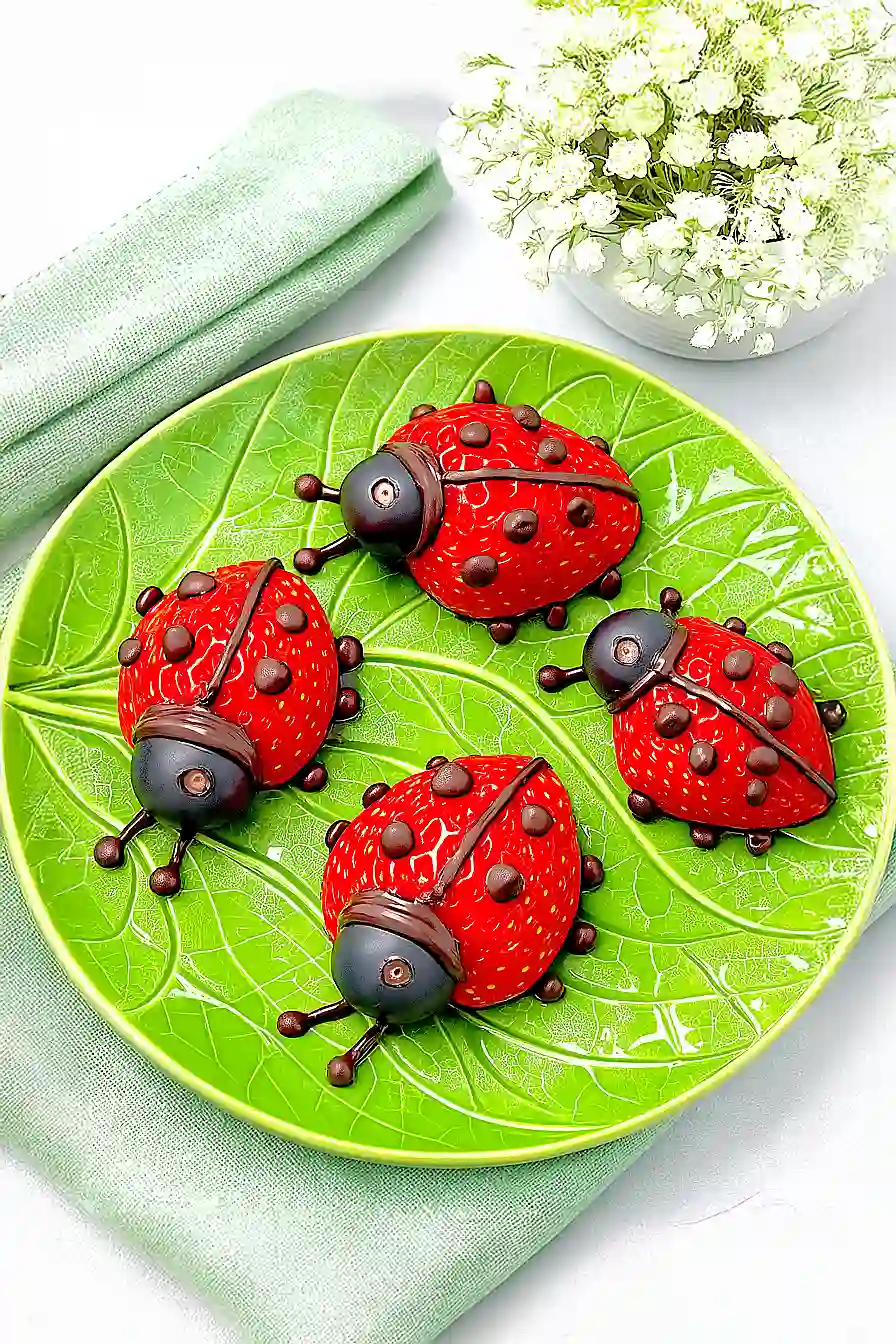
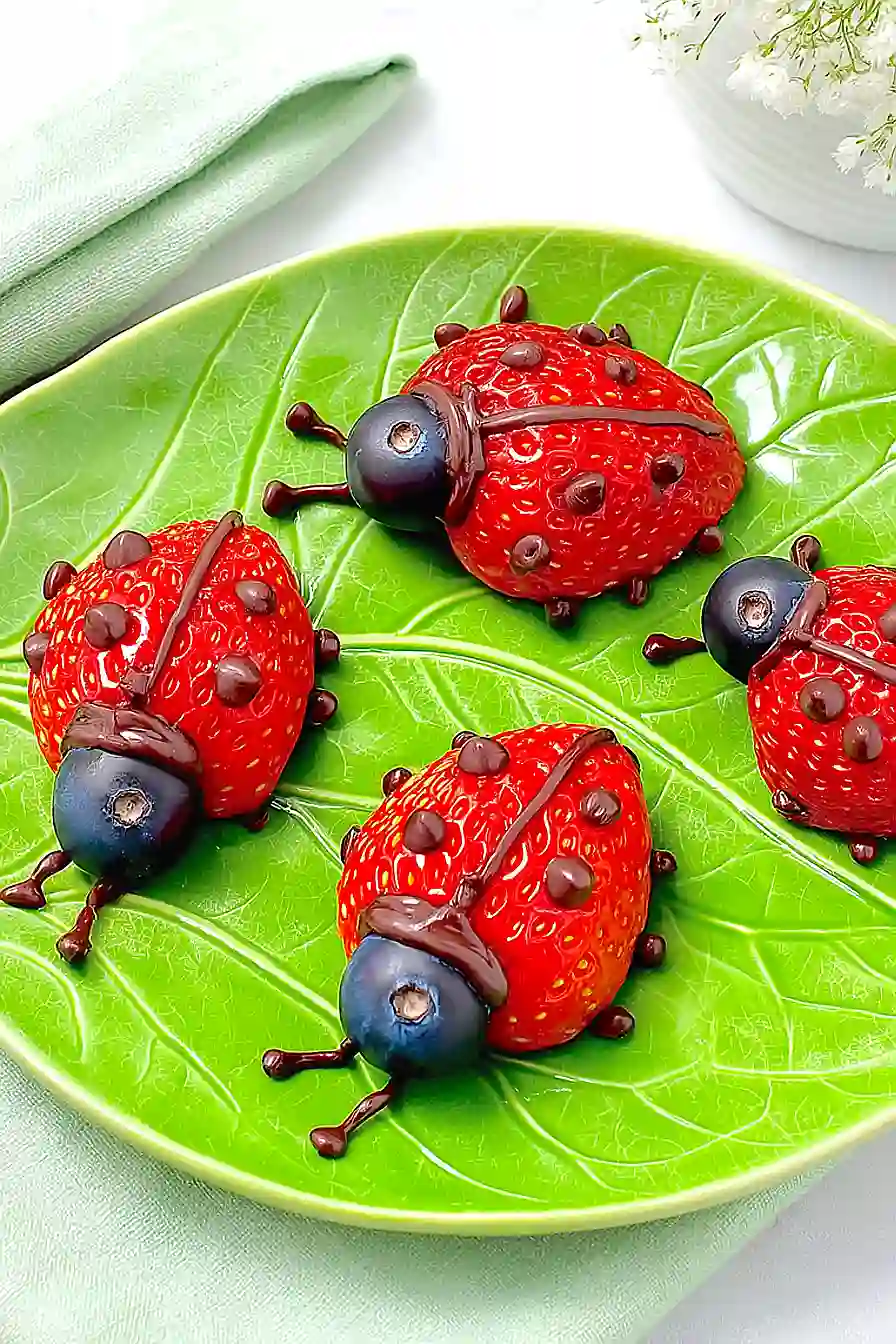
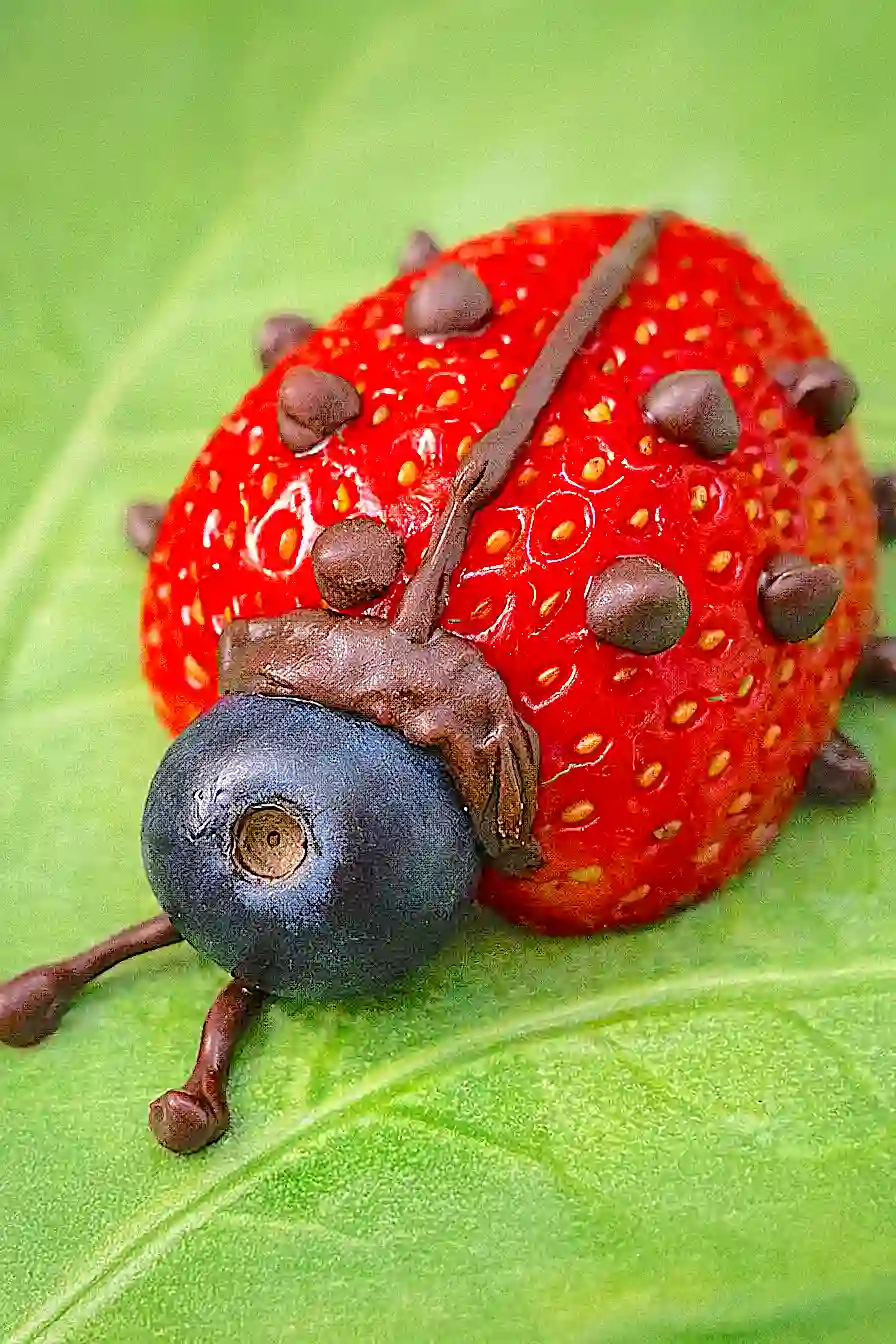
Step 4: Attach Blueberry Heads and Add Final Details
- 3/4 cup blueberries
- melted chocolate from Step 2
Using the remaining melted chocolate in the piping bag, pipe a small dot of chocolate into the V-shaped notch at the top of each strawberry half.
Press a single blueberry firmly into this chocolate to create the ladybug’s head.
Next, pipe two thin lines extending from the top of the blueberry head to create antennae, and pipe four small legs underneath the strawberry body.
Work quickly as the chocolate begins to set.
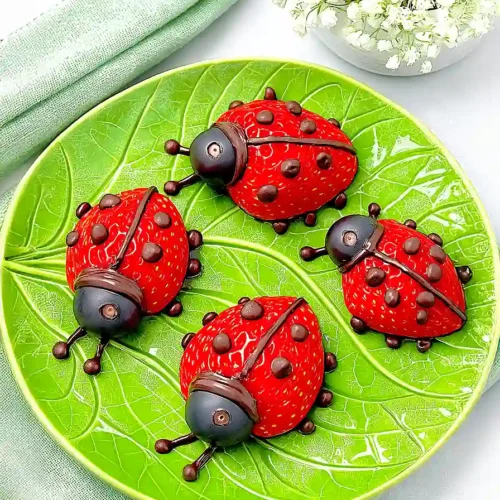
Step 5: Set and Finish
- Pinch of flaky sea salt
Arrange the chocolate-decorated strawberries on a clean plate or serving platter and allow the chocolate to set at room temperature for 10-15 minutes, or speed up the process by refrigerating for 3-5 minutes.
I like to add a tiny pinch of flaky sea salt to the plate around the ladybugs just before serving—it adds a subtle sophistication that balances the sweetness of the chocolate and berries beautifully.
Serve chilled or at room temperature.
Delicious Chocolate Covered Strawberry Ladybugs
Ingredients
- 1 lb strawberries (I use Driscoll's for uniform size and shape)
- 3/4 cup blueberries
- 3/4 cup chocolate chips (I prefer Ghirardelli semi-sweet for a smooth melt)
- Pinch of flaky sea salt
Instructions
- Rinse and thoroughly dry the strawberries—moisture will prevent chocolate from adhering properly. Using a sharp paring knife, carefully cut a small V-shaped notch into the top of each strawberry to create the ladybug's head. Then slice each strawberry in half lengthwise, creating two halves that will serve as the body. Pat the cut sides dry with a paper towel to ensure the chocolate coating sets smoothly.
- Place the chocolate chips in a microwave-safe bowl and heat in 30-second intervals, stirring between each interval, until completely melted and smooth. This gradual approach prevents scorching and ensures a glossy finish. Once melted, let the chocolate cool for 1-2 minutes—it should still be warm enough to flow smoothly but not so hot it breaks down the delicate berries.
- Pour the melted chocolate from Step 2 into a piping bag fitted with a small round tip (or simply cut a small opening if using a basic piping bag). On each strawberry half, pipe evenly-spaced dots across the body to resemble ladybug spots—typically 5-7 dots depending on the berry's size. I like to pipe the dots first before handling the berries, as it keeps your workspace organized and prevents fingerprints from melting the chocolate.
- Using the remaining melted chocolate in the piping bag, pipe a small dot of chocolate into the V-shaped notch at the top of each strawberry half. Press a single blueberry firmly into this chocolate to create the ladybug's head. Next, pipe two thin lines extending from the top of the blueberry head to create antennae, and pipe four small legs underneath the strawberry body. Work quickly as the chocolate begins to set.
- Arrange the chocolate-decorated strawberries on a clean plate or serving platter and allow the chocolate to set at room temperature for 10-15 minutes, or speed up the process by refrigerating for 3-5 minutes. I like to add a tiny pinch of flaky sea salt to the plate around the ladybugs just before serving—it adds a subtle sophistication that balances the sweetness of the chocolate and berries beautifully. Serve chilled or at room temperature.


