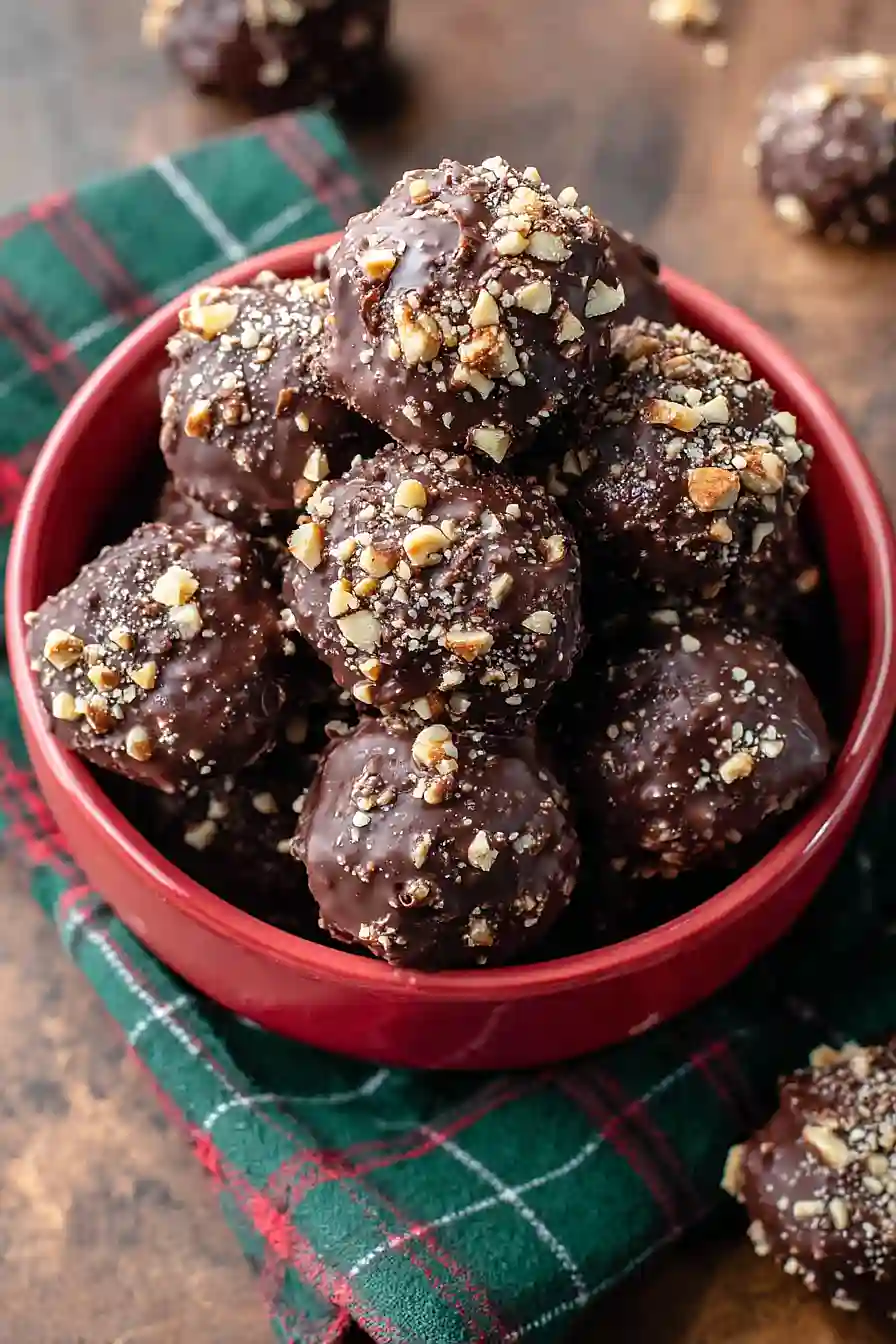
I’ve always had a thing for chocolate and hazelnut together. There’s something about that combo that just works, you know? But store-bought truffles can be pricey, and half the time they’re too sweet or have weird fillings. Making them at home sounds fancy, but honestly, it’s easier than you’d think.
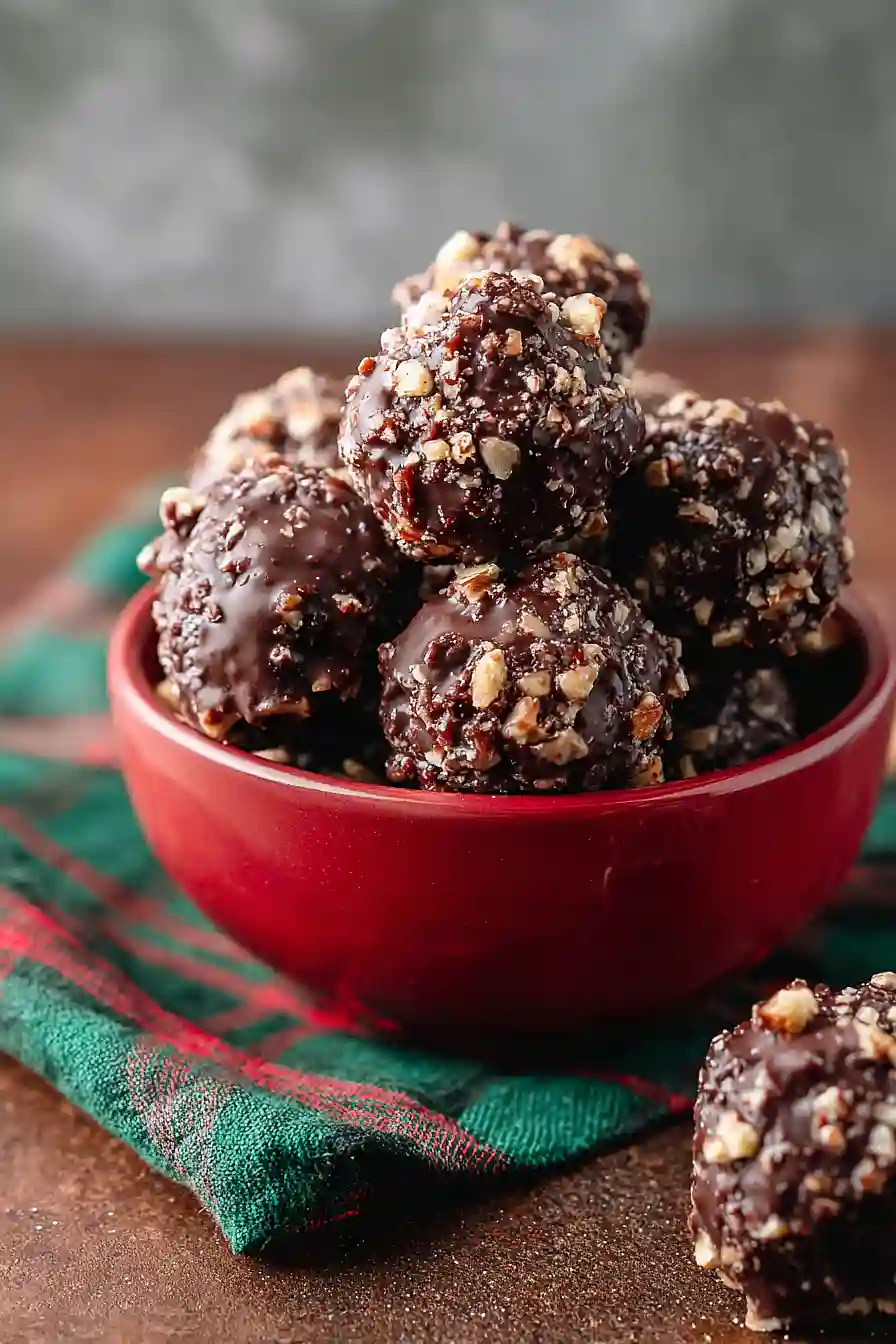
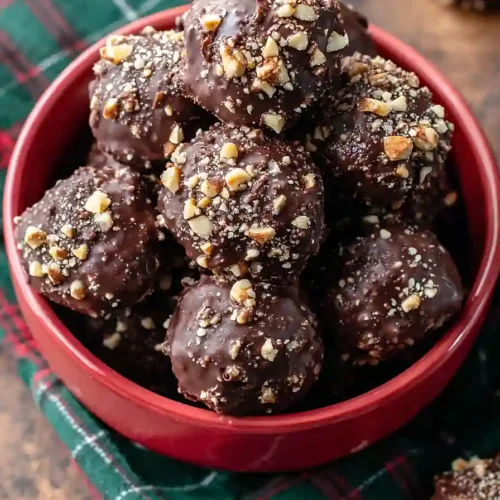
These chocolate hazelnut truffles are perfect for when you want to impress someone without spending hours in the kitchen. I make them for gift-giving during the holidays, or sometimes just because I want something nice with my afternoon coffee. The waffle cone crumbs add a little crunch that sets them apart from regular truffles.
The best part? You can make a whole batch in under an hour, and they’ll keep in the fridge for weeks. Though in my house, they never last that long.
Why You’ll Love These Chocolate Hazelnut Truffles
- Quick and impressive – These truffles come together in under an hour, making them perfect for last-minute gifts or when you need a fancy dessert without spending all day in the kitchen.
- Simple ingredients – You only need chocolate, hazelnut butter, and a few basic pantry items to create something that looks and tastes like it came from a fancy chocolate shop.
- Customizable – You can easily swap almond butter for hazelnut butter or skip the waffle cone bits if you don’t have them on hand.
- Perfect for gifting – These homemade truffles make thoughtful presents for holidays, birthdays, or just because, and they’re way more special than store-bought candy.
- Rich and indulgent – The combination of creamy chocolate, nutty hazelnut butter, and crunchy topping creates a treat that feels like a special occasion with every bite.
What Kind of Chocolate Should I Use?
For the truffle centers, you’ll want to use good quality baking chocolate – either dark chocolate bars or baking chocolate discs work great. The percentage of cacao is really up to your personal taste, but something in the 60-70% range gives you a nice balance of richness without being too bitter. For the coating, regular milk chocolate is perfect and creates that classic truffle look and taste. Just avoid using chocolate chips since they contain stabilizers that don’t melt as smoothly, and you want that silky coating for dipping your truffles.
Options for Substitutions
These truffles are pretty forgiving when it comes to swaps, so here are some options if you need to make changes:
- Baking chocolate: You can use dark chocolate chips or a chocolate bar instead. Just make sure it’s at least 60% cocoa for the best texture and flavor.
- Hazelnut or almond butter: These two are interchangeable in this recipe. If you’re out of both, try cashew butter or even peanut butter, though it will change the flavor profile a bit.
- Waffle cone or Gavottes: Since this is optional anyway, you can skip it entirely. Or try crushed graham crackers or vanilla wafer cookies for a similar crunchy texture.
- Milk chocolate: Feel free to use dark chocolate for the coating if you prefer less sweetness. Semi-sweet chocolate works well too.
- Grape seed or sunflower oil: Any neutral oil works here – try vegetable oil or even melted coconut oil. The oil helps thin the chocolate for easier coating.
- Hazelnuts: While hazelnuts are traditional, you can substitute with almonds, pecans, or walnuts throughout the recipe. Just keep the roasting and crushing instructions the same.
Watch Out for These Mistakes While Cooking
The biggest mistake when making chocolate truffles is working with mixture that’s too warm, which makes rolling the balls nearly impossible – if your ganache feels soft or sticky, pop it back in the fridge for another 10-15 minutes until it’s firm enough to handle.
When dipping your truffles in the melted milk chocolate coating, make sure the chocolate isn’t too hot (let it cool for a few minutes after melting) or it will melt your ganache centers and create a mess.
To get a smooth, professional-looking coating, use a fork to dip each truffle and gently tap off the excess chocolate before placing it on the cooling rack.
Finally, resist the urge to refrigerate your finished truffles immediately – let them set at room temperature so the chocolate coating develops a nice shine instead of getting dull and streaky.
What to Serve With Chocolate Hazelnut Truffles?
These truffles are perfect as an after-dinner treat alongside a cup of strong espresso or coffee, since the bitterness balances out the rich chocolate and hazelnut flavors. I love setting them out on a dessert platter with fresh berries like raspberries or strawberries, which add a nice pop of freshness to cut through the richness. A glass of dessert wine like port or even a sweet moscato pairs beautifully if you’re entertaining guests. You can also serve them with a cheese board featuring mild cheeses like brie or mascarpone for an elegant finish to any meal.
Storage Instructions
Store: Keep your truffles in an airtight container in the fridge for up to 2 weeks. I like to place parchment paper between layers so they don’t stick together. They taste amazing cold straight from the fridge, almost like little bites of fudge!
Freeze: These truffles freeze really well for up to 3 months. Just arrange them in a single layer on a baking sheet to freeze solid first, then transfer to a freezer bag or container. This way they won’t clump together and you can grab just one or two whenever a chocolate craving hits.
Serve: Let frozen truffles sit at room temperature for about 10 minutes before eating, or enjoy them straight from the fridge. They’re actually delicious at different temperatures – cold and firm or slightly softened – so experiment to find what you like best!
| Preparation Time | 45-60 minutes |
| Cooking Time | 0 minutes |
| Total Time | 45-60 minutes |
| Level of Difficulty | Medium |
| Servings | 24 truffles |
Estimated Nutrition
Estimated nutrition for the whole recipe (without optional ingredients):
- Calories: 1700-1900
- Protein: 22-26 g
- Fat: 130-145 g
- Carbohydrates: 125-140 g
Ingredients
For the ganache filling:
- 12 whole hazelnuts (roasted for best flavor)
- pinch sea salt (enhances chocolate flavor)
- 5.3 oz hazelnut butter (smooth variety preferred)
- 10g waffle cone (crushed into fine crumbs)
- 5.3 oz baking chocolate (chopped into small pieces for even melting)
For the chocolate coating:
- 2 tbsp grapeseed oil (or any neutral oil for glossy finish)
- 5.3 oz milk chocolate (chopped into small pieces)
- 1.8 oz crushed hazelnuts (toasted for deeper flavor)
Step 1: Prepare Your Workspace and Mise en Place
- parchment paper
- 5.3 oz baking chocolate, chopped
- 5.3 oz milk chocolate, chopped
- 5.3 oz hazelnut butter
- 10g waffle cone, crushed into fine crumbs
- 1.8 oz crushed hazelnuts
- 2 tbsp grapeseed oil
- 12 whole hazelnuts
- pinch sea salt
Line a baking tray with parchment paper and set aside.
Chop the 5.3 oz of baking chocolate into small, uniform pieces to ensure even melting, then do the same with the 5.3 oz of milk chocolate.
Measure out the hazelnut butter, crushed waffle cone crumbs, crushed hazelnuts, grapeseed oil, sea salt, and whole hazelnuts—having everything ready before you start melting will keep the process smooth and prevent the chocolate from cooling while you’re searching for ingredients.
Step 2: Create the Truffle Filling Base
- 5.3 oz baking chocolate, chopped
- 5.3 oz hazelnut butter
- 10g waffle cone, crushed into fine crumbs
- pinch sea salt
Melt the chopped baking chocolate using a gentle heat method (double boiler or microwave in 20-second intervals, stirring between pulses) until smooth and no lumps remain.
Remove from heat and immediately stir in the hazelnut butter, crushed waffle cone crumbs, and sea salt until fully combined and glossy.
The warm chocolate will melt and incorporate the hazelnut butter smoothly, creating a rich, cohesive filling.
Pour or scrape this mixture onto your prepared parchment-lined tray and refrigerate for 30 minutes until firm enough to scoop and handle.
Step 3: Shape and Assemble the Truffle Centers
- chilled hazelnut-chocolate filling from Step 2
- 12 whole hazelnuts
Remove the chilled filling from the refrigerator.
Using a small cookie scoop or rounded teaspoon, scoop out a portion of the filling and place it in the palm of your hand.
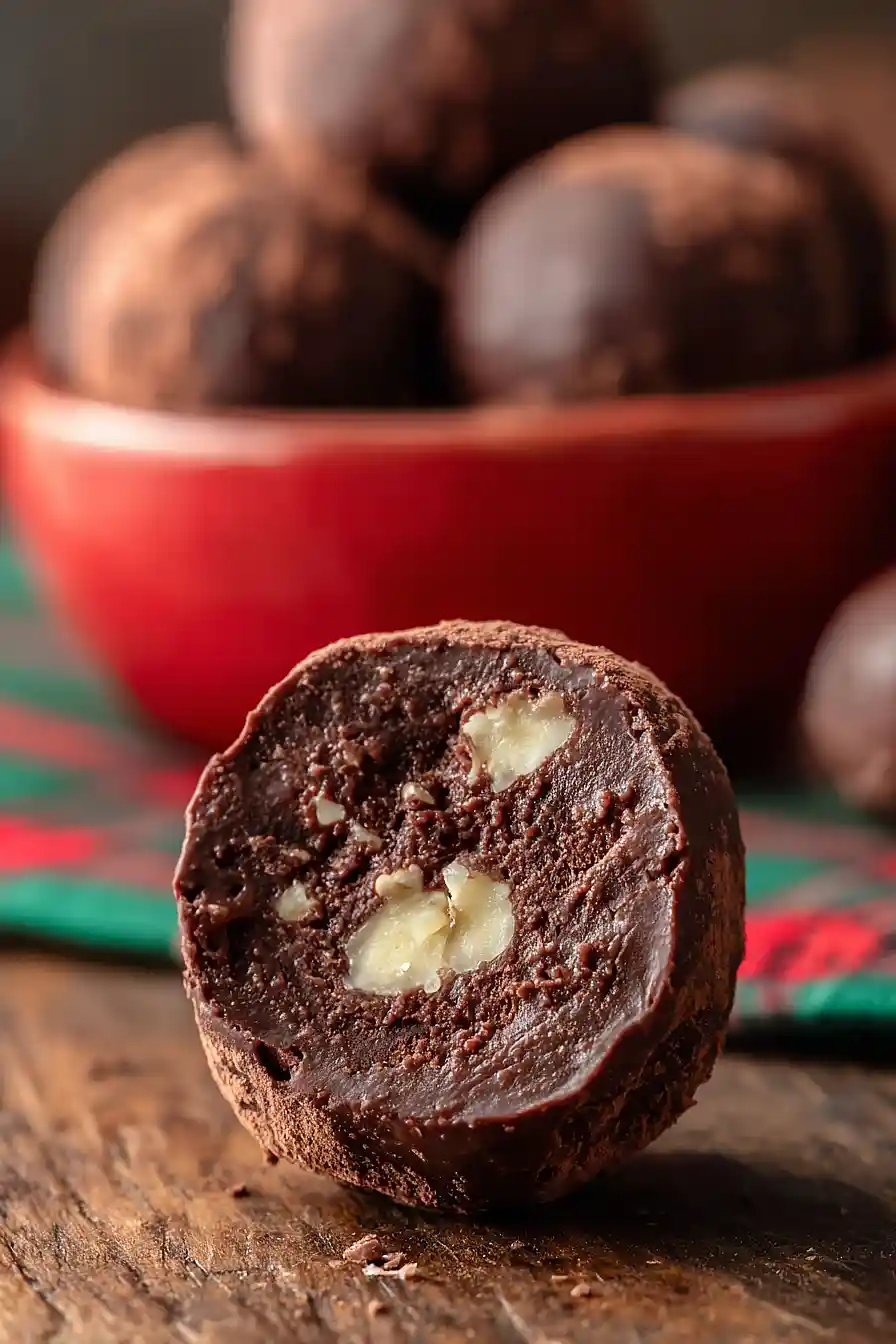
Gently press one whole roasted hazelnut into the center, then carefully roll the filling around it to completely encapsulate the hazelnut, creating a smooth ball.
I find that slightly warming your hands under warm water before rolling helps the filling adhere and creates a smoother surface.
Place each assembled truffle ball on a clean section of the parchment-lined tray as you work.
Step 4: Prepare the Milk Chocolate Coating
- 5.3 oz milk chocolate, chopped
- 2 tbsp grapeseed oil
- 1.8 oz crushed hazelnuts
Melt the chopped milk chocolate using the same gentle heat method as before, stirring until completely smooth.
Once melted, stir in the grapeseed oil until well combined—this creates a thinner, glossier coating that will adhere beautifully to the truffles and give them a professional finish.
Stir in the toasted crushed hazelnuts for a textured, flavorful coating.
Keep this mixture at a warm but not hot temperature so it remains pourable and doesn’t harden too quickly when you dip the truffles.
Step 5: Coat the Truffles and Set Up for Cooling
- truffle centers from Step 3
- milk chocolate coating from Step 4
Working with one truffle at a time, use a fork or small dipping spoon to submerge each ball into the warm milk chocolate mixture, coating it completely on all sides.
Lift the truffle out, allowing excess chocolate to drip back into the bowl, then place it on a cooling rack set over a baking sheet to catch any drips.
I like to tap the fork gently on the edge of the bowl to remove excess coating—this prevents thick, uneven layers.
Work quickly but carefully to maintain an even coating on each truffle.
Step 6: Final Set and Serve
Allow the coated truffles to cool and set completely at room temperature for about 15-20 minutes, or refrigerate for 5-10 minutes if you’re in a warm environment.
The chocolate coating should become firm and matte, and the crushed hazelnut pieces should be set into the surface.
Once fully set, your truffles are ready to serve or store in an airtight container in a cool place for up to two weeks.
Easy Chocolate Hazelnut Truffles
Ingredients
For the ganache filling:
- 12 whole hazelnuts (roasted for best flavor)
- pinch sea salt (enhances chocolate flavor)
- 5.3 oz hazelnut butter (smooth variety preferred)
- 10g waffle cone (crushed into fine crumbs)
- 5.3 oz baking chocolate (chopped into small pieces for even melting)
For the chocolate coating:
- 2 tbsp grapeseed oil (or any neutral oil for glossy finish)
- 5.3 oz milk chocolate (chopped into small pieces)
- 1.8 oz crushed hazelnuts (toasted for deeper flavor)
Instructions
- Line a baking tray with parchment paper and set aside. Chop the 5.3 oz of baking chocolate into small, uniform pieces to ensure even melting, then do the same with the 5.3 oz of milk chocolate. Measure out the hazelnut butter, crushed waffle cone crumbs, crushed hazelnuts, grapeseed oil, sea salt, and whole hazelnuts—having everything ready before you start melting will keep the process smooth and prevent the chocolate from cooling while you're searching for ingredients.
- Melt the chopped baking chocolate using a gentle heat method (double boiler or microwave in 20-second intervals, stirring between pulses) until smooth and no lumps remain. Remove from heat and immediately stir in the hazelnut butter, crushed waffle cone crumbs, and sea salt until fully combined and glossy. The warm chocolate will melt and incorporate the hazelnut butter smoothly, creating a rich, cohesive filling. Pour or scrape this mixture onto your prepared parchment-lined tray and refrigerate for 30 minutes until firm enough to scoop and handle.
- Remove the chilled filling from the refrigerator. Using a small cookie scoop or rounded teaspoon, scoop out a portion of the filling and place it in the palm of your hand. Gently press one whole roasted hazelnut into the center, then carefully roll the filling around it to completely encapsulate the hazelnut, creating a smooth ball. I find that slightly warming your hands under warm water before rolling helps the filling adhere and creates a smoother surface. Place each assembled truffle ball on a clean section of the parchment-lined tray as you work.
- Melt the chopped milk chocolate using the same gentle heat method as before, stirring until completely smooth. Once melted, stir in the grapeseed oil until well combined—this creates a thinner, glossier coating that will adhere beautifully to the truffles and give them a professional finish. Stir in the toasted crushed hazelnuts for a textured, flavorful coating. Keep this mixture at a warm but not hot temperature so it remains pourable and doesn't harden too quickly when you dip the truffles.
- Working with one truffle at a time, use a fork or small dipping spoon to submerge each ball into the warm milk chocolate mixture, coating it completely on all sides. Lift the truffle out, allowing excess chocolate to drip back into the bowl, then place it on a cooling rack set over a baking sheet to catch any drips. I like to tap the fork gently on the edge of the bowl to remove excess coating—this prevents thick, uneven layers. Work quickly but carefully to maintain an even coating on each truffle.
- Allow the coated truffles to cool and set completely at room temperature for about 15-20 minutes, or refrigerate for 5-10 minutes if you're in a warm environment. The chocolate coating should become firm and matte, and the crushed hazelnut pieces should be set into the surface. Once fully set, your truffles are ready to serve or store in an airtight container in a cool place for up to two weeks.


