Fall desserts hold a special place in my heart. There’s something about the smell of cinnamon and baked apples that makes the whole house feel cozy. But I don’t always have time to roll out pie crust or deal with fancy techniques when I want something sweet.
That’s why apple cobbler is my go-to dessert when apples are in season. It gives you all the flavors of apple pie without the fuss. I can have it in the oven in about fifteen minutes, and it always comes out looking like I spent way more time on it than I actually did. Plus, any apples work – even the ones that are getting a little soft in the fruit bowl.
Want something warm and comforting? This cobbler delivers. Need a dessert that feeds a crowd? Same recipe works perfectly. Honestly, I make this so often that my family starts asking for it the minute the weather turns cool.

Why You’ll Love This Apple Cobbler
- Simple ingredients – You probably have most of these pantry staples on hand already, making this an easy dessert to whip up anytime.
- Quick and easy – Ready in just about an hour, this cobbler comes together much faster than traditional apple pie but delivers all the same cozy flavors.
- Perfect fall comfort dessert – The warm spices and tender apples topped with a golden, biscuit-like topping make this the ideal treat for chilly evenings.
- Great for beginners – No fancy techniques or rolling out dough required – just mix, pour, and bake for foolproof results every time.
- Crowd-pleasing dessert – Whether you’re hosting dinner guests or bringing something to a potluck, this cobbler always gets rave reviews and empty pans.
What Kind of Apples Should I Use?
For apple cobbler, you’ll want to stick with apples that hold their shape well during baking and won’t turn to mush. Granny Smith apples are a classic choice because they’re tart and firm, which balances nicely with the sweet cobbler topping. Golden Delicious apples are another great option since they’re naturally sweet and bake beautifully without falling apart. You can also try Honeycrisp, Braeburn, or Jonathan apples if that’s what you have on hand. Feel free to mix different varieties together for a more complex flavor – just make sure they’re all good baking apples that won’t get too soft in the oven.

Options for Substitutions
This apple cobbler is pretty forgiving when it comes to swaps, so here are some easy substitutions you can make:
- Apples: While Granny Smith and Golden Delicious are perfect for baking, you can use Honeycrisp, Braeburn, or even a mix of whatever apples you have on hand. Just avoid super soft varieties like Red Delicious that might turn mushy.
- Brown sugar: You can swap this with granulated sugar if that’s what you have, though you’ll lose some of that rich molasses flavor. Coconut sugar works great too for a slightly different taste.
- All-purpose flour: A 1:1 gluten-free flour blend works well here if you need to avoid gluten. The texture will be slightly different but still delicious.
- Milk: Any milk works – whole, 2%, or even non-dairy options like almond or oat milk. Just stick with unsweetened varieties to keep the sugar balance right.
- Butter: You can use vegetable oil or melted coconut oil instead, though butter gives the best flavor. If using coconut oil, make sure it’s completely melted and not solidified.
- Cornstarch: If you’re out of cornstarch, use 2 tablespoons of all-purpose flour instead to thicken the apple mixture.
Watch Out for These Mistakes While Baking
The biggest mistake when making apple cobbler is cutting your apples too thick, which can leave you with crunchy, undercooked fruit even after the topping is golden brown – stick to that ¼ inch thickness for even cooking.
Another common error is skipping the cornstarch in your apple mixture, which results in a watery cobbler that lacks the thick, syrupy consistency you want.
Don’t forget to let your melted butter cool slightly before mixing it into your batter, as hot butter can cause the milk to curdle and create lumps in your topping.
For the best texture, make sure your oven is fully preheated before baking, and resist the urge to open the oven door too often – this can cause the topping to sink instead of staying light and fluffy.
What to Serve With Apple Cobbler?
Apple cobbler is absolutely perfect on its own, but a scoop of vanilla ice cream on top takes it to the next level – the cold, creamy ice cream melting into the warm, cinnamon-spiced apples is pure magic. You can also try it with a dollop of freshly whipped cream or even a drizzle of caramel sauce if you’re feeling fancy. For a cozy fall dinner, I love serving apple cobbler after a hearty meal like roast chicken or pork chops, since the sweet, spiced dessert is the perfect way to end things. A hot cup of coffee or black tea alongside makes it even more comforting, especially on chilly evenings.
Storage Instructions
Keep Fresh: Apple cobbler tastes amazing for days after you make it! Just cover it with foil or plastic wrap and keep it in the fridge for up to 5 days. The flavors actually get better as they meld together, so don’t worry if you have leftovers.
Freeze: You can freeze apple cobbler for up to 3 months, either before or after baking. If freezing unbaked, wrap it tightly in plastic wrap and foil. For baked cobbler, let it cool completely first, then wrap well and freeze in individual portions if you want.
Warm Up: To enjoy your cobbler again, just pop it in a 350°F oven for about 15-20 minutes until it’s heated through and the top gets crispy again. You can also microwave individual portions for about 30-60 seconds, though the oven method keeps that nice crispy topping.
| Preparation Time | 15-20 minutes |
| Cooking Time | 40-45 minutes |
| Total Time | 55-65 minutes |
| Level of Difficulty | Easy |
Estimated Nutrition
Estimated nutrition for the whole recipe (without optional ingredients):
- Calories: 1900-2100
- Protein: 15-20 g
- Fat: 35-40 g
- Carbohydrates: 410-440 g
Ingredients
For the apple mixture:
- 1 cup water or apple juice
- 1 tbsp cornstarch (helps thicken the juices)
- 1/3 cup brown sugar
- 1 tsp ground cinnamon (freshly ground preferred)
- 1 tbsp lemon juice (freshly squeezed for best flavor)
- 1/8 tsp salt
- 1/2 tsp vanilla extract
- 1/2 tsp ground nutmeg
- 6 medium apples (peeled and sliced 1/4 inch thick, such as Granny Smith or Golden Delicious)
For the batter:
- 2 tsp baking powder
- 1 cup sugar
- 1 cup all-purpose flour (I use King Arthur all-purpose flour)
- 5 tbsp melted butter (cooled slightly)
- 1/4 tsp salt
- 3/4 cup milk (room temperature for better mixing)
For the topping:
- Ground cinnamon (for sprinkling, about 1/4 tsp)
Step 1: Prepare the Mise en Place and Preheat
- 6 medium apples
- Baking pan
Peel and slice your apples to 1/4 inch thickness—I prefer using a mix of Granny Smith and Golden Delicious for the perfect balance of tartness and sweetness.
Grease your baking pan and preheat the oven to 350°F.
Having everything prepped and ready will make the cooking process smooth and ensure your apples don’t oxidize before cooking.
Step 2: Build the Apple Filling
- 1/3 cup brown sugar
- 1 cup water or apple juice
- 1 tbsp cornstarch
- 1 tbsp lemon juice
- 1/2 tsp vanilla extract
- 1 tsp ground cinnamon
- 1/2 tsp ground nutmeg
- 1/8 tsp salt
- 6 medium apples
In a pot, combine the brown sugar, water or apple juice, cornstarch, lemon juice, vanilla extract, cinnamon, nutmeg, and salt.
Whisk until the cornstarch is fully dissolved and there are no lumps.
The cornstarch is essential here—it will thicken the apple juices as they release during cooking, creating that signature cobbler texture.
Bring the mixture to a simmer over medium heat, then add the sliced apples and cook for 3-5 minutes, stirring gently, until the apples begin to soften and the liquid thickens slightly.
Don’t overcook at this stage; the apples will continue cooking in the oven.
Step 3: Prepare the Cobbler Topping Batter
- 1 cup all-purpose flour
- 1 cup sugar
- 2 tsp baking powder
- 1/4 tsp salt
- 3/4 cup milk
- 5 tbsp melted butter
While the apples are cooking, whisk together the flour, sugar, baking powder, and salt in a separate bowl.
This dry mixture is the foundation of your topping.
In another small bowl or measuring cup, combine the room-temperature milk and melted butter (cooled slightly)—using room temperature milk helps the batter mix more evenly and creates a better texture.
I find that room temperature ingredients blend more smoothly than cold ones, giving you a more tender topping.
Step 4: Combine and Assemble the Cobbler
- Apple filling from Step 2
- Dry ingredient mixture from Step 3
- Wet ingredient mixture from Step 3
- 1/4 tsp ground cinnamon
Pour the cooked apple filling from Step 2 into your greased baking pan, spreading it evenly.
Pour the milk and butter mixture into the dry ingredients from Step 3 and stir gently with a spatula just until combined—don’t overmix, as a few lumps in the batter will actually give you a more tender, rustic cobbler topping.
Pour this batter evenly over the apples.
The batter will seem thin, but it will rise and set beautifully as it bakes.
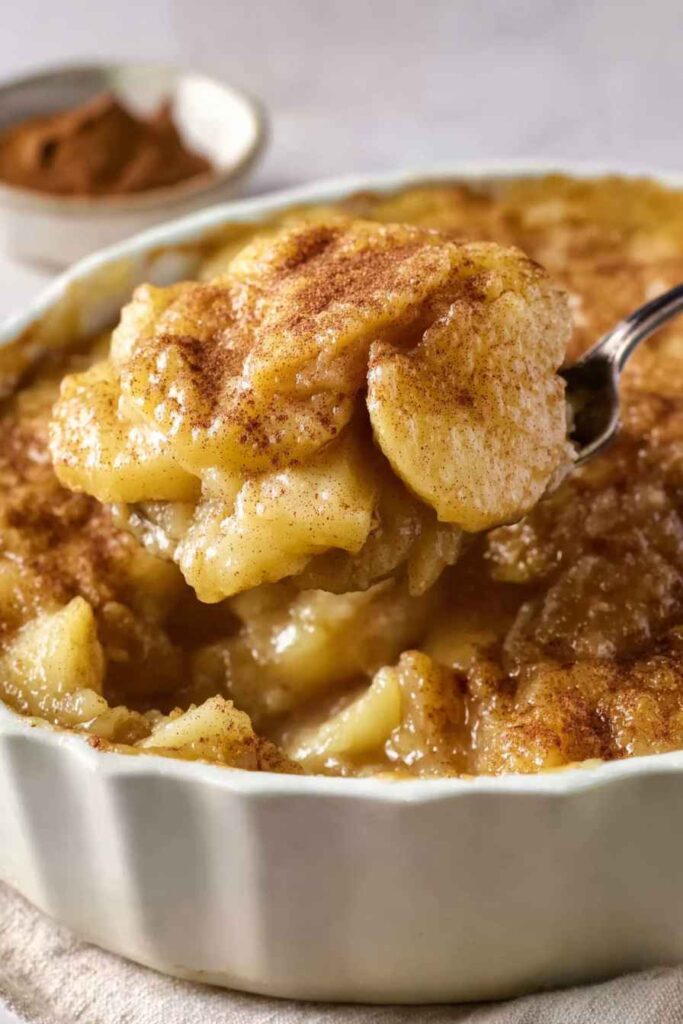
Sprinkle the additional cinnamon across the top for a warm, aromatic finish.
Step 5: Bake Until Golden and Cool
Place the cobbler in your preheated 350°F oven and bake for 38-40 minutes, until the topping is golden brown and a toothpick inserted into the topping comes out clean.
The apples underneath will bubble slightly at the edges—this is exactly what you want.
Remove from the oven and let cool for 15 minutes before serving.
This resting time allows the filling to set slightly so it won’t run all over your plate, while still remaining warm and juicy.


