I never understood why people bought pickles at the store until I realized most folks don’t know how easy it is to pickle things at home. My kids used to turn their noses up at radishes—too peppery, too boring—but throw those same radishes in some vinegar brine and suddenly they’re fighting over the last jar.
The best part? You don’t need any special equipment or canning knowledge. If you can boil water and slice a radish, you can make these. They’re ready to eat in just a few hours, and they last in the fridge for weeks. I started making them to use up extra radishes from our farmers market haul, but now I buy radishes just so I can pickle them.
Why You’ll Love This Pickled Radish
- Quick and easy – These pickled radishes are ready in under 30 minutes, making them perfect when you need a tangy side dish or topping in a pinch.
- Simple ingredients – You probably already have most of these pantry staples on hand, and radishes are affordable and easy to find year-round.
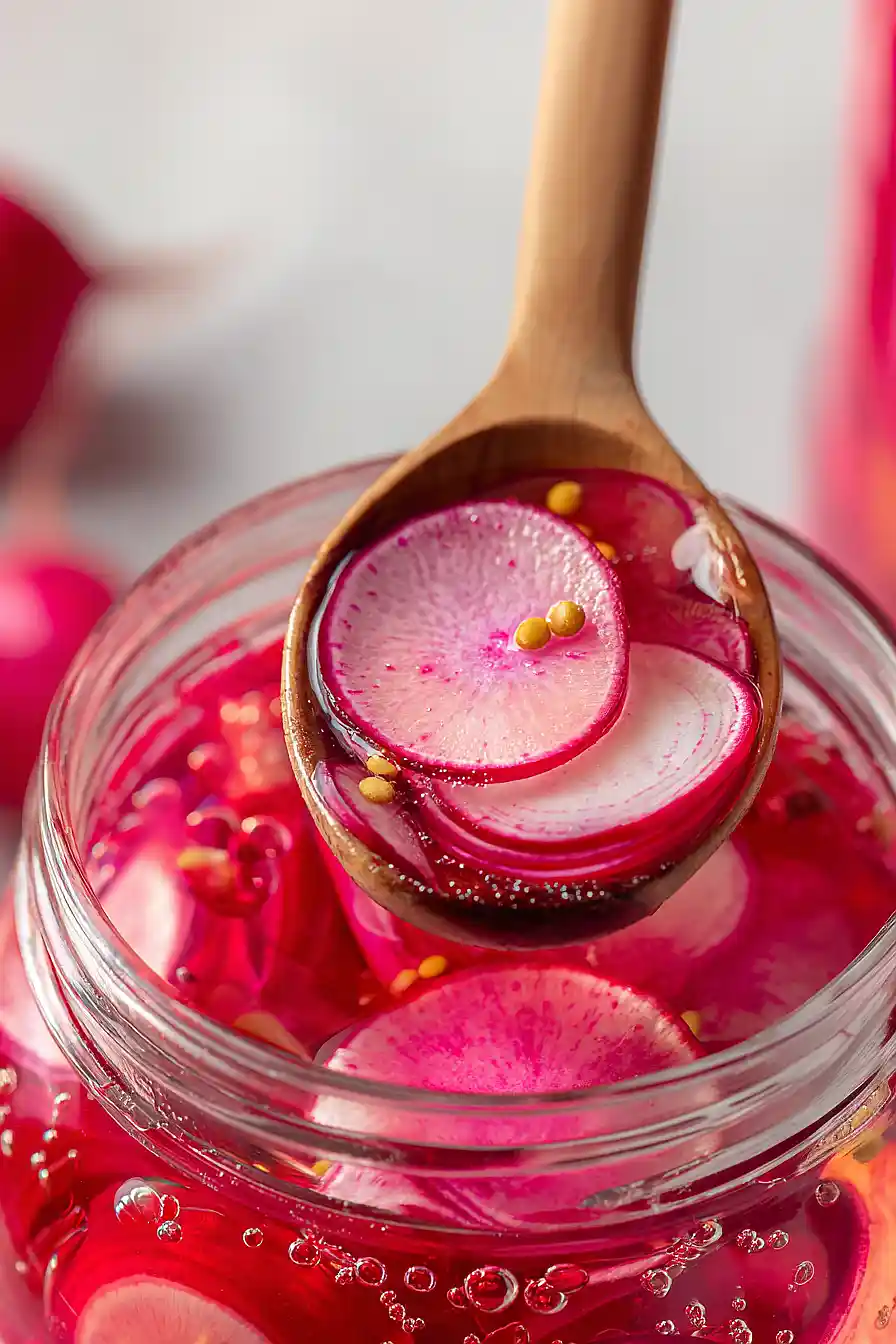
- Adds a tangy crunch to everything – These pickles are great on tacos, sandwiches, salads, or straight from the jar as a snack. They bring a bright, acidic pop to any meal.
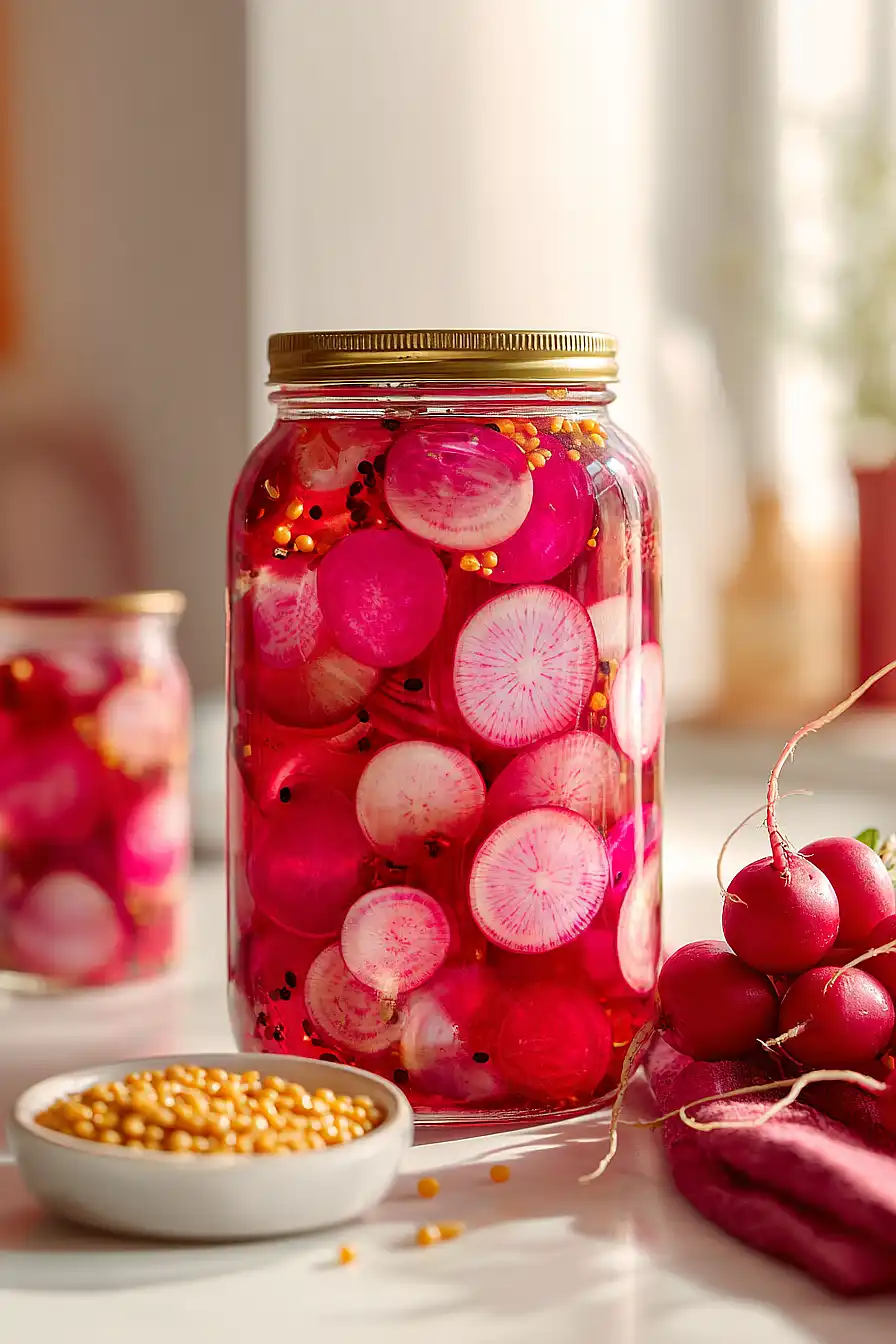
- Lasts for weeks – Store them in your fridge and enjoy crispy, flavorful pickled radishes for up to a month, so you can make a batch and have them ready whenever you need them.
What Kind of Radishes Should I Use?
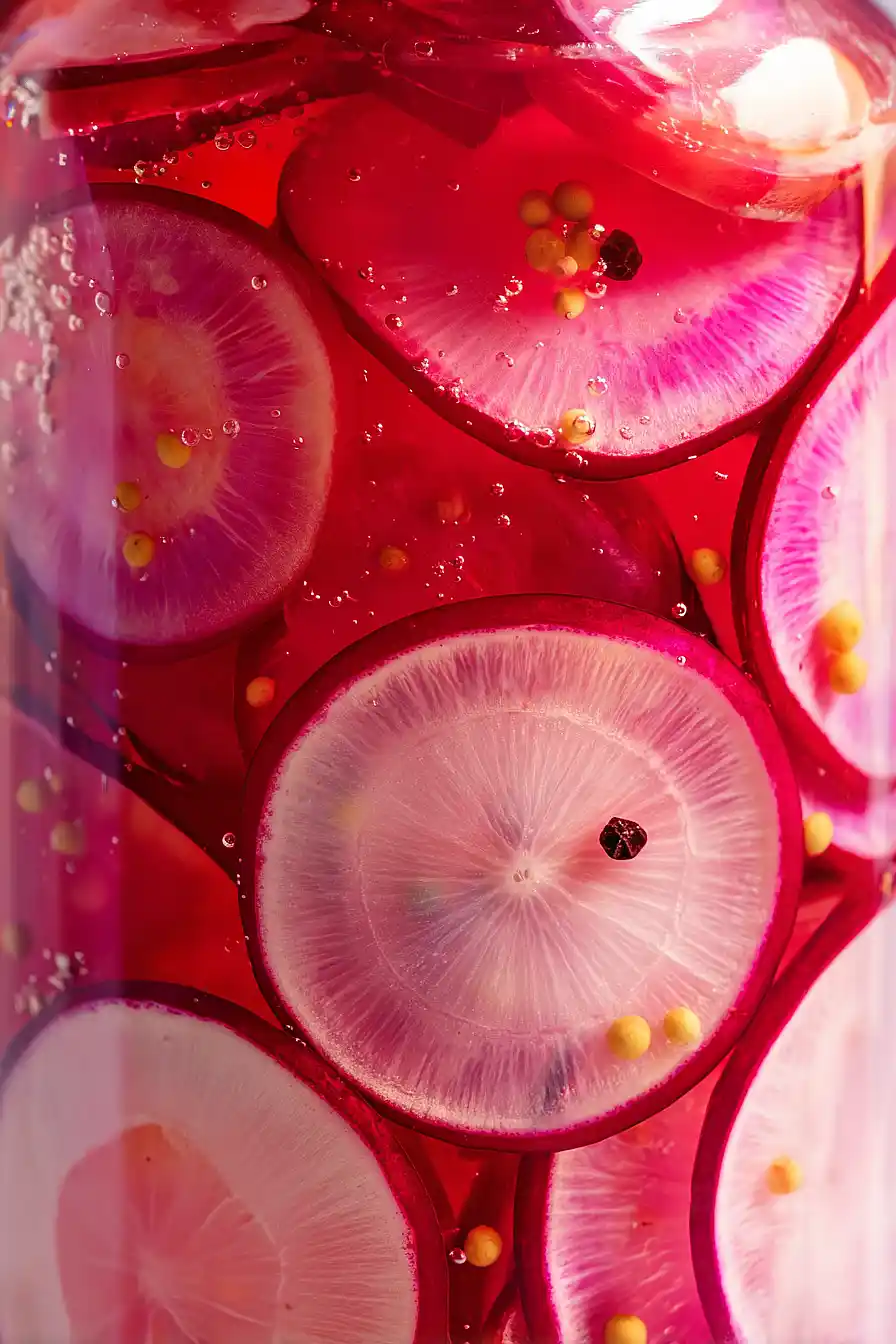
Red radishes are the classic choice for pickling and they’re what you’ll find most easily at the grocery store. You can use regular round radishes or the slightly longer French breakfast radishes – both work great and have that nice peppery bite that mellows out during pickling. If you can find them at a farmers market, try to grab radishes with their greens still attached, as this usually means they’re fresher (just remove the tops before pickling). Make sure to pick radishes that are firm to the touch without any soft spots, and give them a good scrub before slicing since they can hold onto dirt.
Options for Substitutions
This pickled radish recipe is pretty straightforward, but here are some swaps you can make:
- Red radishes: You can use watermelon radishes, daikon radishes, or even turnips instead. Just keep in mind that daikon and turnips are larger, so you’ll want to slice them thinner for even pickling.
- White vinegar: Apple cider vinegar or rice vinegar work great as substitutes. Rice vinegar will give you a slightly milder, sweeter flavor that’s really nice with radishes.
- Cane sugar: Regular white sugar, honey, or maple syrup can replace cane sugar. If using honey or maple syrup, you might want to start with 2 tablespoons and taste, as they’re a bit sweeter.
- Sea salt: Any salt works here – kosher salt, table salt, or pickling salt are all fine. Just note that table salt is finer, so you may want to use slightly less.
- Mixed peppercorns: If you don’t have mixed peppercorns, just use black peppercorns on their own. You can also add a pinch of red pepper flakes for some heat.
- Mustard seeds: Yellow or brown mustard seeds both work. In a pinch, you can leave them out, though they do add a nice tangy bite to the pickles.
Watch Out for These Mistakes While Cooking
The biggest mistake people make with pickled radishes is not slicing them evenly, which means some pieces will be perfectly pickled while others stay too crunchy or become too soft – aim for consistent ¼-inch slices or uniform halves for the best results.
Another common error is pouring boiling-hot brine directly over the radishes without letting it cool slightly first, which can make them mushy and dull in color instead of crisp and bright pink.
Don’t skip dissolving the sugar and salt completely in the brine, as undissolved crystals will settle at the bottom and leave you with unevenly seasoned pickles.
For extra flavor, try adding a smashed garlic clove or a few fresh dill sprigs to the jar before pouring in the brine, and make sure your radishes are fully submerged by weighing them down with a small plate if needed.
What to Serve With Pickled Radish?
Pickled radishes are one of those condiments that make just about everything taste better. I love piling them on tacos, especially fish tacos or carnitas, where their tangy crunch cuts through all that richness. They’re also perfect for topping rice bowls, grain salads, or even a simple avocado toast when you want to add some zing. If you’re making sandwiches or burgers, swap out your usual pickles for these radishes – they bring a peppery kick that regular pickles just can’t match.
Storage Instructions
Store: Keep your pickled radishes in the jar with the brine in the fridge, and they’ll stay crisp and tangy for up to 3 weeks. Make sure the radishes are fully submerged in the liquid to keep them fresh and prevent any spoilage.
Serve: These pickled radishes are ready to eat after just a few hours in the fridge, but they taste even better after sitting for a day or two. The longer they sit, the more flavor they’ll soak up from the brine and spices.
| Preparation Time | 15-20 minutes |
| Cooking Time | 10-15 minutes |
| Total Time | 25-35 minutes |
| Level of Difficulty | Easy |
| Servings | 6 cups of pickled product |
Estimated Nutrition
Estimated nutrition for the whole recipe (without optional ingredients):
- Calories: 110-130
- Protein: 3-5 g
- Fat: 0-1 g
- Carbohydrates: 25-30 g
Ingredients
For the base:
- 4 bunches radishes (thinly sliced into 1/8-inch rounds)
For the brine:
- 1 cup white vinegar
- 1 cup water
- 3 tablespoons sugar
- 1.5 tablespoons coarse kosher salt
- 3/4 teaspoon peppercorns
- 3/4 teaspoon mustard seeds
- 2 cloves garlic (smashed)
- 1/4 teaspoon red pepper flakes
Step 1: Prepare the Radishes and Sterilize the Jars
- 4 bunches radishes
Wash the radishes thoroughly and trim off the stems and roots.
Using a mandoline slicer or sharp knife, slice the radishes into thin 1/8-inch rounds—this consistency is crucial for even pickling and quick flavor absorption.
While you’re preparing the radishes, sterilize your jars by rinsing them with hot water or running them through the dishwasher.
Once sliced, pack the radishes tightly into your clean jars, filling them about three-quarters full.
Step 2: Create the Pickling Liquid
- 1 cup white vinegar
- 1 cup water
- 3 tablespoons sugar
- 1.5 tablespoons coarse kosher salt
- 2 cloves garlic
- 3/4 teaspoon peppercorns
- 3/4 teaspoon mustard seeds
- 1/4 teaspoon red pepper flakes
In a medium saucepan, combine the white vinegar, water, sugar, and coarse kosher salt.
Bring the mixture to a boil over medium-high heat, then reduce to medium and stir constantly for about 1 minute until all the sugar and salt are completely dissolved.
I like to taste the brine at this point—if it feels too sharp, I know the radishes will soften that acidity as they pickle.
Add the smashed garlic cloves, peppercorns, mustard seeds, and red pepper flakes to the hot brine, stirring gently to distribute the spices evenly.
Step 3: Pour and Cool the Pickled Radishes
- radishes from Step 1
- pickling liquid from Step 2
Carefully pour the hot pickling liquid from Step 2 over the radishes in the jars, ensuring all the radish slices are fully submerged and the spices are distributed throughout the jars.
Let the jars sit at room temperature for about 20-30 minutes to begin cooling.
I find that letting them cool slightly before refrigerating helps the radishes maintain a bit more crunch rather than becoming too soft.
Step 4: Refrigerate and Finish Pickling
Once the jars have cooled to room temperature, transfer them to the refrigerator.
The radishes will be ready to eat after just 1 hour, though they’ll develop deeper, more complex flavors if left overnight.
The longer they sit, the more tender they become while still retaining a pleasant snap.
They’ll keep refrigerated for up to 2 weeks.
Mouthwatering Pickled Radish
Ingredients
For the base
- 4 bunches radishes (thinly sliced into 1/8-inch rounds)
For the brine
- 1 cup white vinegar
- 1 cup water
- 3 tablespoons sugar
- 1.5 tablespoons coarse kosher salt
- 3/4 teaspoon peppercorns
- 3/4 teaspoon mustard seeds
- 2 cloves garlic (smashed)
- 1/4 teaspoon red pepper flakes
Instructions
- Wash the radishes thoroughly and trim off the stems and roots. Using a mandoline slicer or sharp knife, slice the radishes into thin 1/8-inch rounds—this consistency is crucial for even pickling and quick flavor absorption. While you're preparing the radishes, sterilize your jars by rinsing them with hot water or running them through the dishwasher. Once sliced, pack the radishes tightly into your clean jars, filling them about three-quarters full.
- In a medium saucepan, combine the white vinegar, water, sugar, and coarse kosher salt. Bring the mixture to a boil over medium-high heat, then reduce to medium and stir constantly for about 1 minute until all the sugar and salt are completely dissolved. I like to taste the brine at this point—if it feels too sharp, I know the radishes will soften that acidity as they pickle. Add the smashed garlic cloves, peppercorns, mustard seeds, and red pepper flakes to the hot brine, stirring gently to distribute the spices evenly.
- Carefully pour the hot pickling liquid from Step 2 over the radishes in the jars, ensuring all the radish slices are fully submerged and the spices are distributed throughout the jars. Let the jars sit at room temperature for about 20-30 minutes to begin cooling. I find that letting them cool slightly before refrigerating helps the radishes maintain a bit more crunch rather than becoming too soft.
- Once the jars have cooled to room temperature, transfer them to the refrigerator. The radishes will be ready to eat after just 1 hour, though they'll develop deeper, more complex flavors if left overnight. The longer they sit, the more tender they become while still retaining a pleasant snap. They'll keep refrigerated for up to 2 weeks.


