Corn casserole is one of those dishes that always makes me smile. It reminds me of every family gathering where someone brings a big dish of this creamy, slightly sweet comfort food. The best part? It’s so easy to make that even my kids could handle it.
I love how corn casserole walks the line between a side dish and almost dessert. It’s got that hint of sweetness from the corn, but it’s hearty enough to fill you up. Plus, it goes with just about everything – barbecue, roast chicken, or even just a simple salad.
This recipe comes together in about five minutes of actual work. You dump everything in a bowl, mix it up, and let the oven do the rest. It’s perfect for potlucks because it travels well and always disappears fast. Trust me, you’ll want to make a double batch.
Why You’ll Love This Corn Casserole
- Simple ingredients – You probably already have most of these pantry staples at home, and the Jiffy mix makes it foolproof.
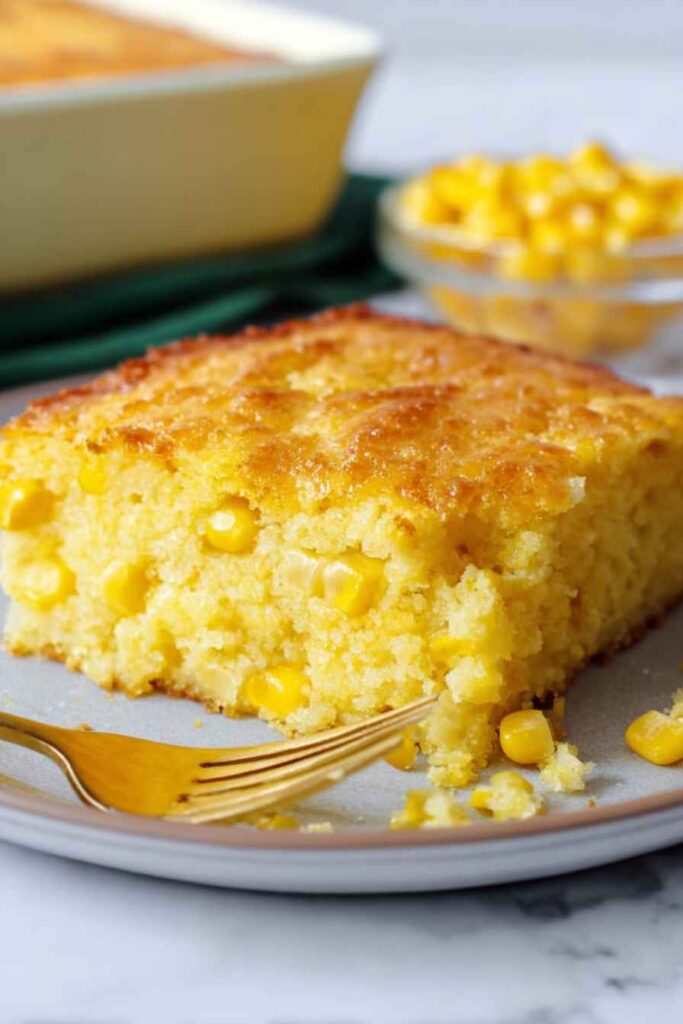
- Perfect side dish – This creamy, slightly sweet casserole pairs beautifully with everything from holiday turkey to weeknight grilled chicken.
- Easy preparation – Just mix everything together in one bowl, pour it in a baking dish, and let the oven do the work.
- Crowd-pleasing comfort food – The combination of sweet corn and cornbread creates a dish that both kids and adults will ask for seconds of.
- Make-ahead friendly – You can assemble this casserole earlier in the day and pop it in the oven when you’re ready to serve.
What Kind of Corn Should I Use?
For this corn casserole, you’ll need both regular corn kernels and cream style corn, and either canned or frozen will work perfectly fine. When choosing your regular corn, look for kernels that are plump and golden – if using canned, make sure to drain them well so your casserole doesn’t get watery. For the cream style corn, any brand will do the trick, though some people prefer the slightly thicker consistency of name brands over store brands. If you want to get fancy, you can absolutely use fresh corn cut off the cob during peak season, but honestly, the canned versions work just as well and save you time.

Options for Substitutions
This corn casserole is pretty forgiving when it comes to swaps, so here are some options if you need them:
- Jiffy Cornbread Mix: This is really the heart of the recipe, so I’d recommend sticking with Jiffy if possible. In a pinch, you could use another brand of cornbread mix, but the texture might be slightly different.
- Sour cream: Greek yogurt works great as a substitute – use the same amount. You could also try cream cheese (softened) or even regular plain yogurt, though it might make the casserole a bit less rich.
- Butter: Vegetable oil or melted margarine can replace the butter if needed. Use about 6 tablespoons of oil instead of the full stick of butter.
- White sugar: Brown sugar adds a nice caramel note, or you can reduce it to 1/3 cup if you prefer less sweetness. Honey works too – just use about 1/3 cup.
- Canned corn: Fresh corn kernels from about 2-3 ears work perfectly. Frozen corn is fine too – just thaw and drain it first.
- Eggs: For each egg, you can substitute 1/4 cup applesauce or 1 tablespoon ground flaxseed mixed with 3 tablespoons water (let it sit for 5 minutes first).
Watch Out for These Mistakes While Baking
The biggest mistake people make with corn casserole is overmixing the batter, which can lead to a tough, dense texture instead of the light and fluffy result you want – just stir until the ingredients are barely combined and you still see a few lumps.
Another common error is not draining the regular corn completely, as excess liquid will make your casserole watery and prevent it from setting properly in the oven.
To avoid a raw center, make sure to bake until the top is golden brown and a toothpick inserted in the middle comes out with just a few moist crumbs, not wet batter.
For the best texture, let the casserole cool for about 10 minutes before serving, which allows it to firm up and makes it much easier to cut clean squares.
What to Serve With Corn Casserole?
Corn casserole is the perfect side dish for just about any barbecue or comfort food meal you can think of! It pairs beautifully with grilled chicken, pulled pork, or beef brisket since the sweet, creamy corn balances out smoky and savory flavors really well. This casserole is also a natural fit for holiday dinners alongside turkey, ham, or roast beef, and it goes great with other classic sides like mashed potatoes and green beans. For a complete Southern-style spread, serve it with cornbread (yes, more corn!), coleslaw, and some tangy pickles to cut through all that rich, buttery goodness.
Storage Instructions
Keep Fresh: This corn casserole keeps really well in the fridge for up to 4 days. Just cover it tightly with foil or plastic wrap, or transfer leftovers to an airtight container. It’s one of those dishes that actually tastes even better the next day after all the flavors have had time to meld together.
Freeze: You can definitely freeze this casserole for up to 3 months! I like to cut it into individual portions and wrap them separately, or freeze the whole thing in a freezer-safe dish. Just make sure it’s completely cooled before freezing to maintain the best texture.
Warm Up: To enjoy your leftover corn casserole, just pop it in a 350°F oven for about 15-20 minutes until heated through. If it’s frozen, thaw it overnight in the fridge first, then reheat. You can also microwave individual portions for about 1-2 minutes, stirring halfway through.
| Preparation Time | 10-15 minutes |
| Cooking Time | 40-45 minutes |
| Total Time | 50-60 minutes |
| Level of Difficulty | Easy |
Estimated Nutrition
Estimated nutrition for the whole recipe (without optional ingredients):
- Calories: 1850-2000
- Protein: 22-28 g
- Fat: 68-78 g
- Carbohydrates: 285-310 g
Ingredients
- 1/2 cup sour cream (room temperature for best mixing)
- 1 can cream-style corn (about 15 oz)
- 2 large eggs
- 1/2 cup unsalted butter, melted (I use Kerrygold for richness)
- 1/2 cup sugar
- 1 can whole kernel corn, drained (about 15 oz)
- 1 box corn muffin mix (Jiffy brand works great)
Step 1: Prepare Your Pan and Preheat the Oven
Preheat your oven to 350°F and generously grease a 9×13-inch baking dish (or similar casserole pan) with butter or cooking spray.
This ensures your casserole won’t stick and gives you even browning on the edges.
Having your pan ready before mixing means you can move directly from mixing to baking without delay.
Step 2: Combine the Corn Base
- 1/2 cup unsalted butter, melted
- 1 box corn muffin mix
- 1 can whole kernel corn, drained
- 1 can cream-style corn
In a large mixing bowl, combine the melted butter, corn muffin mix, drained whole kernel corn, and cream-style corn.
Stir until the muffin mix is fully incorporated and there are no dry pockets.
I find that using a quality butter like Kerrygold really elevates the richness of this casserole, so it’s worth the investment.
The combination of textures from both corn types creates a nice balance between chunky and creamy.
Step 3: Fold in the Wet Ingredients and Sugar
- corn mixture from Step 2
- 1/2 cup sour cream
- 2 large eggs
- 1/2 cup sugar
Add the room-temperature sour cream, eggs, and sugar to the corn mixture from Step 2.
Stir until everything is smooth and well-combined, making sure there are no lumps of muffin mix remaining.
Using sour cream at room temperature helps it blend smoothly rather than creating cold pockets in your batter.
The sugar and sour cream work together to create a tender crumb structure while adding subtle sweetness that complements the corn.
Step 4: Bake Until Golden
- batter from Step 3
Pour the batter into your prepared pan from Step 1, spreading it into an even layer.
Bake for 40-45 minutes, until the edges are golden brown and a toothpick inserted in the center comes out clean or with just a few moist crumbs.
I like to check at 40 minutes first—ovens vary, and you want to catch it while it’s still moist in the center but fully set around the edges.
The casserole will continue to firm up slightly as it cools.
Step 5: Cool and Serve
Remove the casserole from the oven and let it cool for 5-10 minutes before serving.
This allows the structure to set slightly, making it easier to scoop and serving portions will hold together better.
Serve warm directly from the pan for the best texture and flavor.


