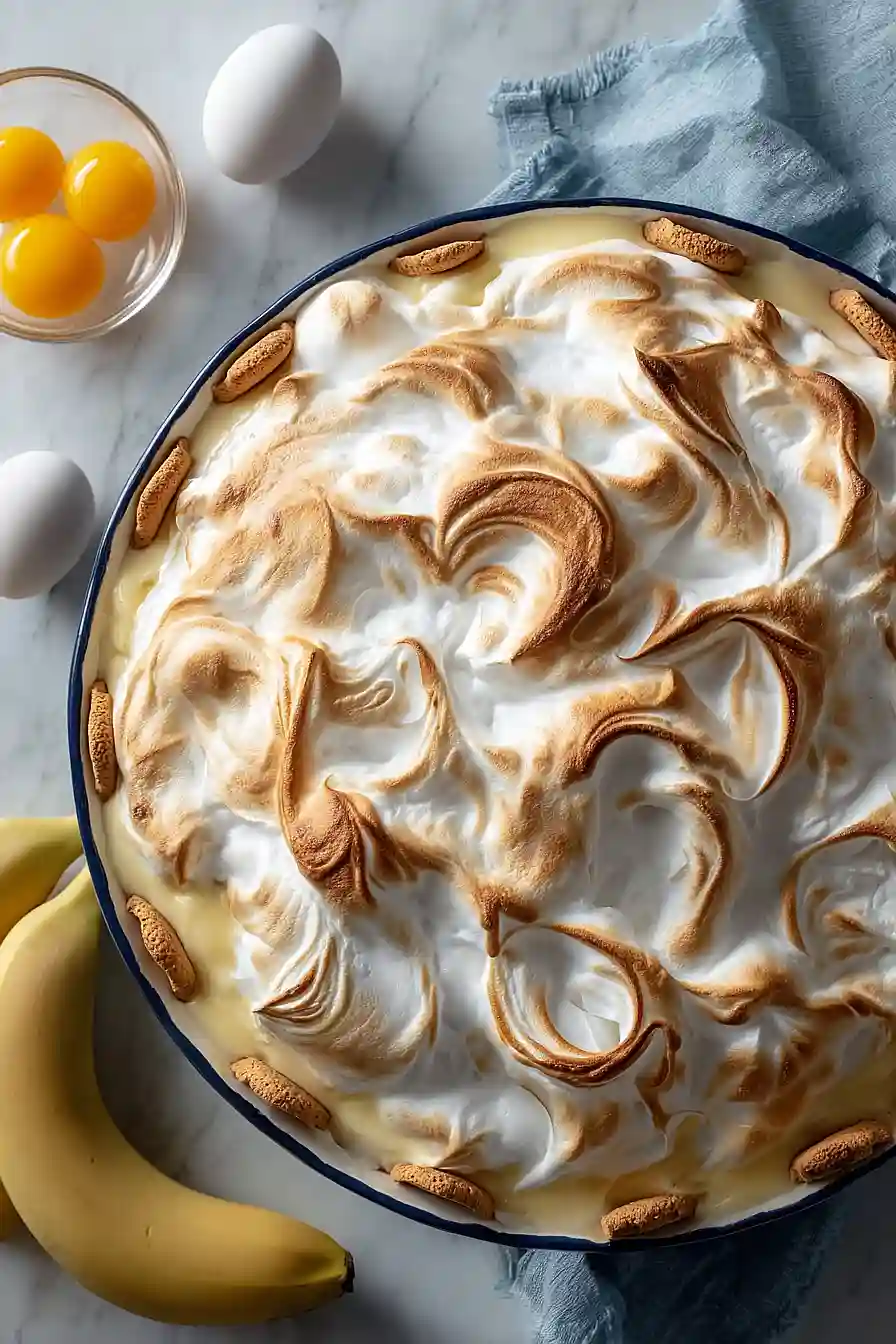
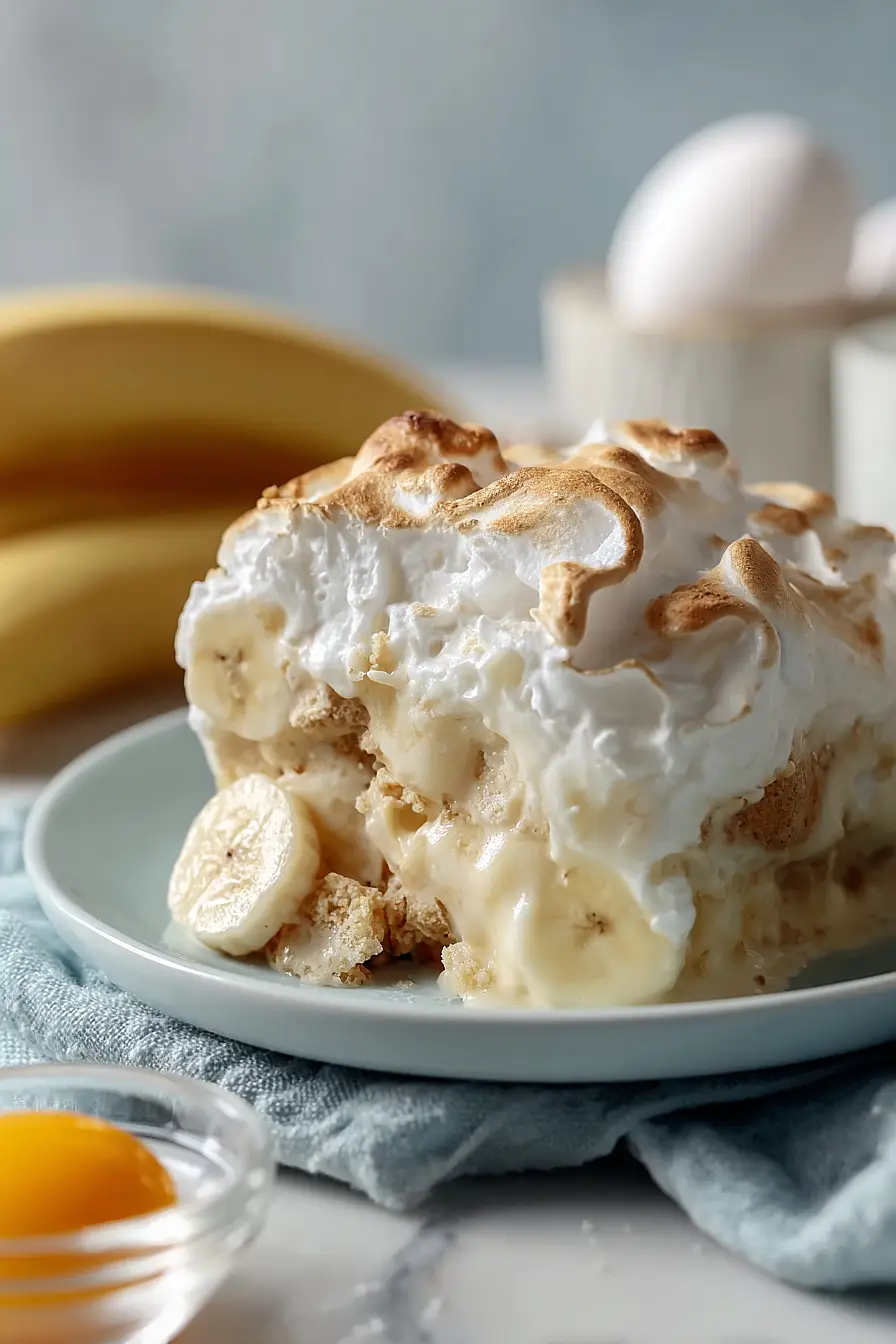
There’s something about old fashioned banana pudding that just brings people together. Maybe it’s the creamy custard that you make from scratch on the stovetop, or those layers of vanilla wafers that get perfectly soft as they soak up all that goodness, but this dessert never fails to disappear at family gatherings and potlucks.
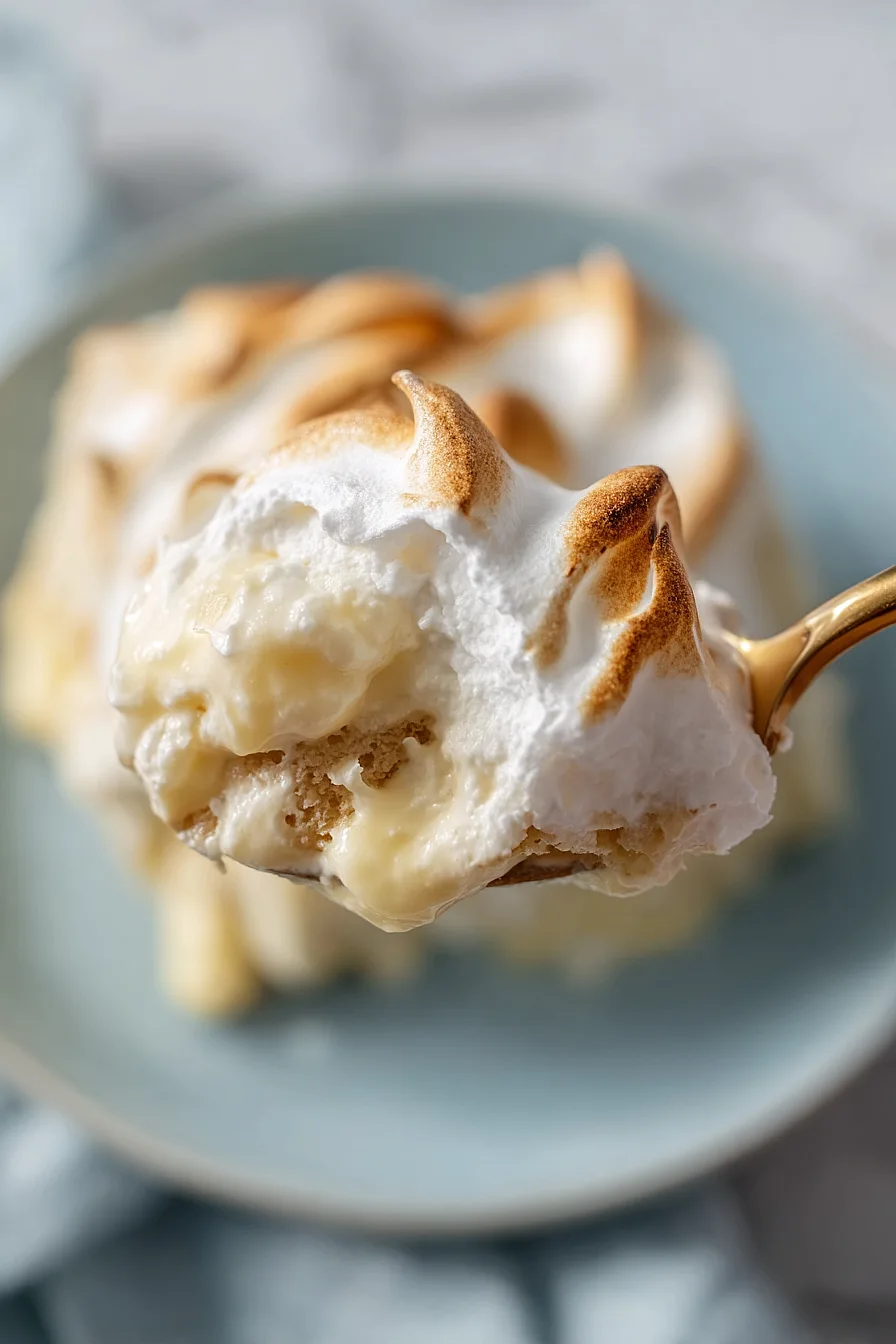
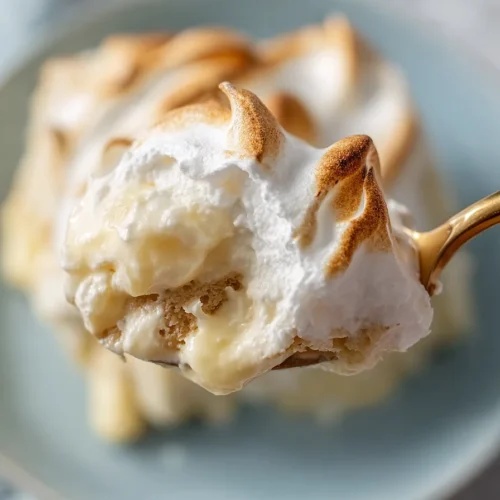
The best part? This recipe uses real custard made with evaporated milk and egg yolks, then topped with a fluffy meringue that bakes up golden. Sure, it takes a bit more effort than the instant pudding version, but the difference in taste is absolutely worth it. Once you try homemade banana pudding, you’ll understand why grandmas have been making it this way for generations.
Why You’ll Love This Banana Pudding
- Classic homemade taste – This old-fashioned recipe brings back memories of grandma’s kitchen with its creamy custard and layers of vanilla wafers that taste so much better than store-bought versions.
- Perfect for gatherings – Whether it’s a potluck, family dinner, or holiday meal, this banana pudding always disappears fast and has everyone asking for the recipe.
- Simple ingredients – You probably have most of these pantry staples on hand already, making it easy to whip up whenever a craving hits.
- Ready in under an hour – From start to finish, you can have this comforting dessert on the table in 40-60 minutes, making it doable even on busy weeknights.
- Impressive presentation – The beautiful layers of custard, bananas, and wafers topped with fluffy meringue look like you spent hours in the kitchen, but it’s actually pretty straightforward to make.
What Kind of Bananas Should I Use?
The ripeness of your bananas really matters for banana pudding. You’ll want to use bananas that are ripe but still firm – look for ones that are yellow with just a few brown spots. If your bananas are too green, they won’t have enough sweetness and flavor, and if they’re too brown and mushy, they’ll break down too much in the pudding. I like to buy my bananas a few days ahead and let them ripen on the counter until they’re just right. And here’s a tip: slice your bananas right before assembling the pudding to prevent them from browning too much.
Options for Substitutions
This classic dessert is pretty forgiving when it comes to swaps:
- Vanilla wafers: If you can’t find vanilla wafers, graham crackers or shortbread cookies work well. Just break them into similar-sized pieces for layering.
- Evaporated milk: You can use all regular milk instead – just replace the evaporated milk with an equal amount of whole milk. The pudding will be slightly less rich but still tasty.
- Egg whites for meringue: Not a fan of meringue? Top your pudding with whipped cream instead. Use 1 cup of heavy cream whipped with 2 tablespoons of sugar.
- Bananas: This one’s non-negotiable – bananas are the star of banana pudding! Make sure they’re ripe but still firm, not overly soft or brown.
- Flour: Cornstarch can replace flour as a thickener. Use 3 tablespoons of cornstarch instead of the 1/4 cup flour for a smoother pudding.
- Vanilla essence: Vanilla extract works the same way, or you can scrape the seeds from half a vanilla bean for a more intense flavor.
Watch Out for These Mistakes While Baking
The biggest mistake people make with banana pudding is not cooking the custard long enough, which leaves you with a runny pudding that won’t set properly – keep stirring constantly and don’t pull it off the heat until it coats the back of a spoon and holds a line when you run your finger through it.
Another common error is skipping the lemon juice on the bananas, which causes them to turn brown and look unappetizing within hours, so take that extra minute to toss your sliced bananas with a little lemon juice before layering.
When making the meringue, make sure your bowl and beaters are completely clean and grease-free (even a tiny bit of fat will prevent the egg whites from whipping up properly), and add the sugar gradually once soft peaks form rather than all at once.
Finally, don’t overbake the meringue – pull it out as soon as the peaks turn golden brown, usually around 10-12 minutes, because leaving it in too long will cause it to weep and create a watery layer between the meringue and pudding.
What to Serve With Banana Pudding?
Banana pudding is pretty much a dessert that stands on its own, but I love serving it after a big Southern-style meal with fried chicken, collard greens, and cornbread. It’s also perfect alongside other potluck favorites like barbecue ribs or pulled pork since the cool, creamy sweetness balances out all those smoky flavors. If you’re hosting a casual get-together, set out the banana pudding with some sweet tea or coffee, and maybe put out some extra vanilla wafers on the side for people who want to add more crunch. For a fun summer twist, serve it with fresh berries on top or a dollop of whipped cream for anyone who wants to make it extra special.
Storage Instructions
Refrigerate: Banana pudding is best enjoyed within 2-3 days of making it. Keep it covered tightly with plastic wrap or in an airtight container in the fridge. The wafers will continue to soften as it sits, which some people actually prefer!
Prevent Browning: To keep your bananas from turning brown too quickly, make sure they’re completely covered by the pudding layers. You can also brush them lightly with a bit of lemon juice before assembling if you’re planning to store it for a couple days.
Meringue Tips: The meringue topping is best the day you make it, as it can start to weep or get a bit watery after sitting in the fridge. If you’re making this ahead, consider adding the meringue topping right before serving for the prettiest presentation.
| Preparation Time | 20-30 minutes |
| Cooking Time | 20-30 minutes |
| Total Time | 40-60 minutes |
| Level of Difficulty | Medium |
| Servings | 8 servings |
Estimated Nutrition
Estimated nutrition for the whole recipe (without optional ingredients):
- Calories: 2300-2500
- Protein: 40-50 g
- Fat: 35-45 g
- Carbohydrates: 470-500 g
Ingredients
For the base:
- 5 bananas (sliced into 1/2-inch rounds)
- 55 vanilla wafers (I always use Nilla Wafers for the classic crunch)
For the custard:
- 2/3 cup sugar
- 1/4 tsp salt
- 1/4 cup flour (I prefer King Arthur all-purpose for a smooth set)
- 1 cup milk
- 1.5 cups evaporated milk (makes the custard extra creamy and rich)
- 4 egg yolks (room temperature, about 70°F)
- 1 tsp vanilla
- Pinch of ground nutmeg
For the meringue topping:
- 4 egg whites (beaten until stiff peaks form)
- 1/2 cup sugar
- 1.25 tsp vanilla
Step 1: Prepare the Mise en Place and Layer the Base
- 5 bananas, sliced into 1/2-inch rounds
- 55 vanilla wafers
Slice the bananas into 1/2-inch rounds and set aside in a bowl.
Arrange the vanilla wafers and banana slices in alternating layers in a 9×13-inch baking dish, starting with a layer of wafers on the bottom.
This creates a sturdy foundation that will absorb the custard beautifully.
You’ll typically get about 2-3 layers depending on your layering technique.
Step 2: Build the Custard Base
- 2/3 cup sugar
- 1/4 tsp salt
- 1/4 cup flour
- 4 egg yolks, room temperature
- 1 cup milk
- 1.5 cups evaporated milk
In a medium saucepan, whisk together the sugar, salt, and flour until well combined with no lumps.
Add the egg yolks one at a time, whisking thoroughly after each addition to prevent scrambling.
Gradually whisk in the milk and evaporated milk, stirring until smooth.
This slow incorporation prevents lumps and ensures a silky custard texture.
I prefer King Arthur all-purpose flour because it creates a smoother, more refined set than other brands.
Step 3: Cook and Finish the Custard
- custard mixture from Step 2
- 1 tsp vanilla
- pinch of ground nutmeg
Place the saucepan over medium heat and stir constantly for 7-8 minutes until the mixture thickens and coats the back of a spoon.
You’ll notice it transforms from thin and pourable to creamy and luscious.
Remove from heat and stir in the vanilla and nutmeg.
The evaporated milk is key here—it creates that extra-creamy richness that defines a proper banana pudding.
Step 4: Assemble the Pudding Base
- layered wafers and bananas from Step 1
- cooked custard from Step 3
Pour the warm custard sauce from Step 3 evenly over the wafer and banana layers from Step 1, allowing it to soak into and around the wafers.
Let it sit for a few minutes to fully absorb before moving to the meringue topping.
Step 5: Prepare the Meringue Topping
- 4 egg whites
- 1/2 cup sugar
- 1.25 tsp vanilla
In a clean, dry bowl, beat the egg whites with an electric mixer on high speed until stiff peaks form (they should stand straight up when you lift the beaters).
In a separate small bowl, combine the 1/2 cup sugar and 1.25 tsp vanilla.
Gently fold this mixture into the beaten egg whites using a spatula, being careful not to deflate them—you want to maintain as much volume and stability as possible.
Step 6: Top and Bake Until Golden
- meringue topping from Step 5
- assembled pudding from Step 4
Spread the meringue topping evenly over the pudding, making sure it reaches all the edges and seals the entire surface (this prevents shrinking during baking).
Bake in a preheated 350°F oven for 10-12 minutes until the meringue is lightly browned with golden peaks.
Watch carefully—meringue can brown quickly.
I always let the pudding cool for at least 15-20 minutes before serving so the layers set properly and it’s easier to portion.
Sweet Old Fashioned Banana Pudding
Ingredients
For the base::
- 5 bananas (sliced into 1/2-inch rounds)
- 55 vanilla wafers (I always use Nilla Wafers for the classic crunch)
For the custard::
- 2/3 cup sugar
- 1/4 tsp salt
- 1/4 cup flour (I prefer King Arthur all-purpose for a smooth set)
- 1 cup milk
- 1.5 cups evaporated milk (makes the custard extra creamy and rich)
- 4 egg yolks (room temperature, about 70°F)
- 1 tsp vanilla
- Pinch of ground nutmeg
For the meringue topping::
- 4 egg whites (beaten until stiff peaks form)
- 1/2 cup sugar
- 1.25 tsp vanilla
Instructions
- Slice the bananas into 1/2-inch rounds and set aside in a bowl. Arrange the vanilla wafers and banana slices in alternating layers in a 9x13-inch baking dish, starting with a layer of wafers on the bottom. This creates a sturdy foundation that will absorb the custard beautifully. You'll typically get about 2-3 layers depending on your layering technique.
- In a medium saucepan, whisk together the sugar, salt, and flour until well combined with no lumps. Add the egg yolks one at a time, whisking thoroughly after each addition to prevent scrambling. Gradually whisk in the milk and evaporated milk, stirring until smooth. This slow incorporation prevents lumps and ensures a silky custard texture. I prefer King Arthur all-purpose flour because it creates a smoother, more refined set than other brands.
- Place the saucepan over medium heat and stir constantly for 7-8 minutes until the mixture thickens and coats the back of a spoon. You'll notice it transforms from thin and pourable to creamy and luscious. Remove from heat and stir in the vanilla and nutmeg. The evaporated milk is key here—it creates that extra-creamy richness that defines a proper banana pudding.
- Pour the warm custard sauce from Step 3 evenly over the wafer and banana layers from Step 1, allowing it to soak into and around the wafers. Let it sit for a few minutes to fully absorb before moving to the meringue topping.
- In a clean, dry bowl, beat the egg whites with an electric mixer on high speed until stiff peaks form (they should stand straight up when you lift the beaters). In a separate small bowl, combine the 1/2 cup sugar and 1.25 tsp vanilla. Gently fold this mixture into the beaten egg whites using a spatula, being careful not to deflate them—you want to maintain as much volume and stability as possible.
- Spread the meringue topping evenly over the pudding, making sure it reaches all the edges and seals the entire surface (this prevents shrinking during baking). Bake in a preheated 350°F oven for 10-12 minutes until the meringue is lightly browned with golden peaks. Watch carefully—meringue can brown quickly. I always let the pudding cool for at least 15-20 minutes before serving so the layers set properly and it's easier to portion.


