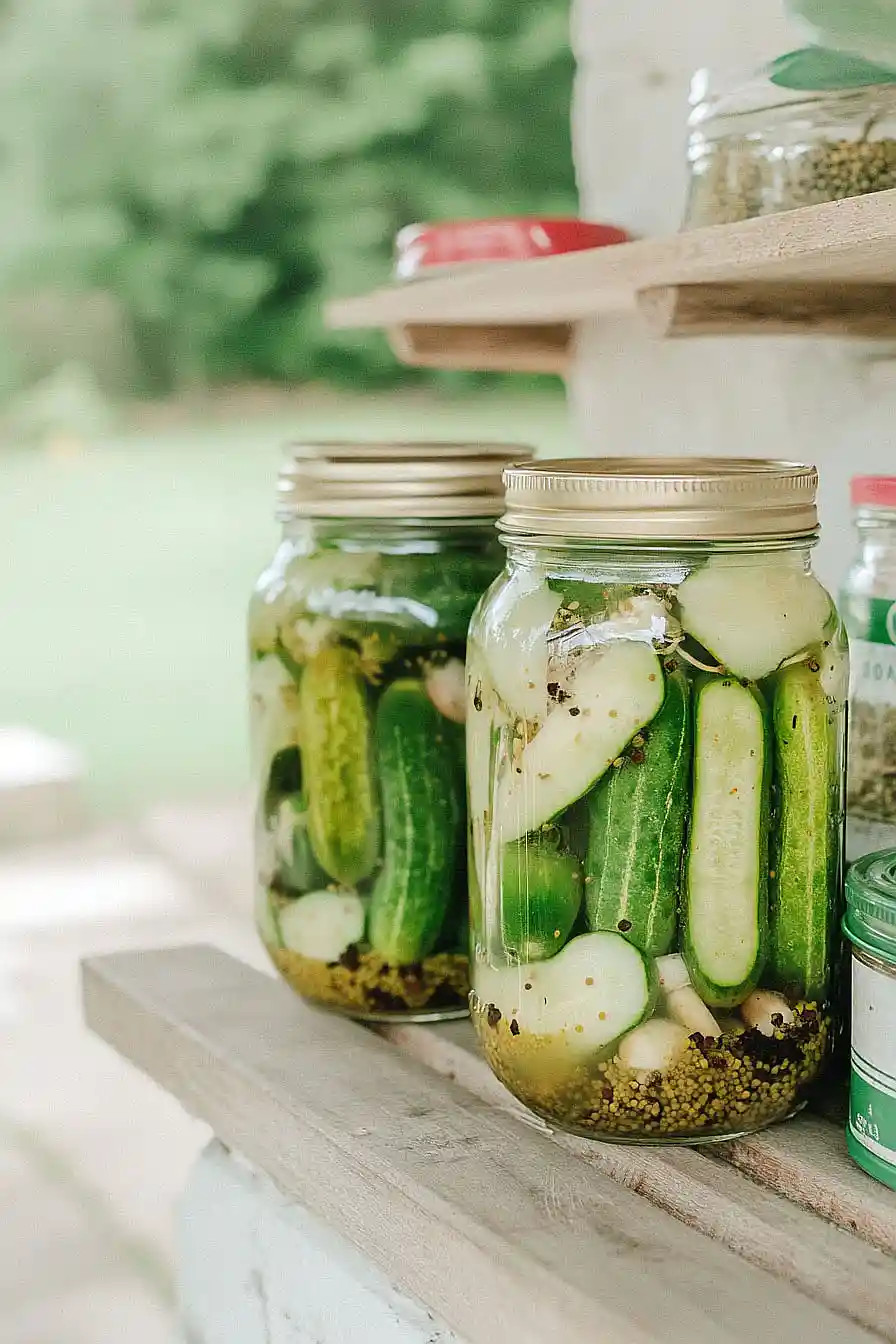
Tangy Garlic Dill Pickles are the perfect homemade snack! I love to make these crispy dill pickles and keep them in my fridge all year long.
They’re so easy, flavorful, and addictive– the perfect pickle recipe for sandwiches, burgers, or just munching straight from the jar!

Why You’ll Love These Garlic Dill Pickles
- Quick and easy homemade pickles – You can have fresh, crunchy pickles ready in just 30-40 minutes using simple ingredients you probably already have in your kitchen.
- Bold, tangy flavor – The combination of garlic, dill, and apple cider vinegar creates that perfect pickle taste with just the right amount of kick from the chili flakes.
- No special equipment needed – You don’t need any fancy canning equipment or water bath processing – just basic kitchen tools and mason jars.
- Control over ingredients – Making your own pickles means you know exactly what goes into them, with no preservatives or artificial additives like store-bought versions.
- Perfect crunch every time – Using fresh kirby cucumbers gives you that satisfying snap that makes homemade pickles so much better than the soggy ones from the jar.
Which Cucumbers to Pick
Kirby cucumbers are definitely your best bet for making crispy dill pickles since they’re specifically grown for pickling.
These small, bumpy cucumbers have thicker skins and fewer seeds than regular slicing cucumbers, which means they’ll stay crunchy even after sitting in the brine.
If you can’t find Kirbys at your grocery store, look for any cucumber labeled as “pickling cucumbers” – they’re usually shorter and more compact than the long English cucumbers.
Regular cucumbers can work in a pinch, but they tend to get softer and may not give you that satisfying crunch you’re looking for in a good pickle.

Smart Substitution Choices
While pickling has some must-haves, there’s still room for a few swaps in this recipe:
- Dill seed: Fresh dill heads work great if you can find them – use about 2-3 heads instead of the seeds. Dried dill weed can work in a pinch, but use only 2 teaspoons since it’s more concentrated.
- Apple cider vinegar: White vinegar works just as well and is actually more traditional for pickles. Just make sure whatever vinegar you use has at least 5% acidity for safe pickling.
- Pickling salt: You can use kosher salt instead – just make sure it doesn’t have any additives. Avoid table salt as the anti-caking agents can make your brine cloudy.
- Red chili flakes: Skip these if you don’t like heat, or try a whole dried chili pepper for a milder kick. You could also add a few slices of fresh jalapeño.
Common Preparation Mistakes to Dodge
The biggest mistake when making garlic dill pickles is using regular table salt instead of pickling salt, which contains anti-caking agents that can make your brine cloudy and affect the final texture of your pickles.
Another common error is not using filtered water – tap water with chlorine or other chemicals can interfere with the fermentation process and create off-flavors, so stick to filtered or distilled water for the clearest, crispest results.
Make sure your cucumbers are completely submerged under the brine at all times, as any exposed pieces will develop mold or become mushy, and always use clean, sterilized jars to prevent unwanted bacteria from ruining your batch.
For the best crunch, choose firm kirby cucumbers and avoid any that feel soft or have wrinkled skin, and remember that patience pays off – let your pickles cure for at least 24 hours before tasting, though they’ll be even better after a few days.
Storing Your Pickles Correctly
Refrigerate: Once your pickles are done fermenting, keep them in the fridge in their sealed jars. They’ll stay crisp and delicious for up to 6 months, though mine never last that long! The flavor actually gets better after a few weeks as everything melds together.
Pantry Storage: If you processed your pickles using proper canning methods with sterilized jars, you can store unopened jars in a cool, dark pantry for up to a year. Just make sure you followed safe canning practices and heard that satisfying ‘pop’ when the lids sealed.
Serve: Always use clean utensils when grabbing pickles from the jar to keep them fresh longer. Once you open a jar, it needs to stay in the fridge and should be eaten within a few months for the best crunch and flavor.
| Preparation Time | 20-30 minutes |
| Cooking Time | 10 minutes |
| Total Time | 30-40 minutes |
| Level of Difficulty | Easy |
Estimated Nutrition
Estimated nutrition for the whole recipe (without optional ingredients):
- Calories: 50-70
- Protein: 2-4 g
- Fat: 0-1 g
- Carbohydrates: 12-15 g
Ingredients
For packing the jars:
- 1 tsp crushed red pepper flakes (adjust to taste for heat level)
- 8 garlic cloves, peeled (freshly minced preferred for more flavor)
- 4 tsp dill seeds (or fresh dill if preferred)
- 2 qt kirby cucumbers (about 3 lb, small and firm for crispness)
- 2 tsp whole black peppercorns
For the brine:
- 1 1/2 cups filtered water
- 2 tbsp pickling salt (use non-iodized for best results)
- 1 1/2 cups apple cider vinegar (I use Bragg’s for tanginess)
Step 1: Prepare Equipment and Ingredients
- 2 qt kirby cucumbers
- 8 garlic cloves, peeled and minced
Wash your jars thoroughly with hot soapy water and set them aside to air dry or keep them warm.
While jars dry, wash the kirby cucumbers under cold running water, scrubbing gently to remove any dirt.
Trim off the blossom end (the non-stem end) from each cucumber, as this contains enzymes that can make pickles softer.
Peel your garlic cloves and mince them finely—I find freshly minced garlic gives a much more vibrant flavor than pre-minced, especially in pickles where it’s so prominent.
Step 2: Distribute Spices and Pack Cucumbers
- 4 tsp dill seeds
- 2 tsp whole black peppercorns
- 1 tsp crushed red pepper flakes
- minced garlic from Step 1
Divide the dill seeds, black peppercorns, and crushed red pepper flakes evenly among your jars, placing them on the bottom of each jar.
This ensures every pickle gets an even distribution of flavor throughout.
Pack the prepared cucumbers vertically into the jars, fitting them as tightly as you can without crushing them—they’ll shrink slightly during pickling, so firm packing helps them stay crisp.
Distribute the minced garlic among the jars as you pack, tucking pieces between the cucumbers.
Fill jars leaving about 1/2 inch of space at the top for the brine.
Step 3: Make and Pour the Brine
- 1 1/2 cups apple cider vinegar
- 1 1/2 cups filtered water
- 2 tbsp pickling salt
Combine the apple cider vinegar, filtered water, and pickling salt in a saucepan and bring to a rolling boil over medium-high heat, stirring occasionally until the salt completely dissolves.
This usually takes 3-5 minutes.
I use Bragg’s apple cider vinegar specifically because its tanginess really shines in pickles, but any quality apple cider vinegar works.
Once boiling, carefully pour the hot brine over the cucumbers in each jar, leaving exactly 1/4 inch of headspace from the rim—this space is crucial for proper sealing during processing.
Step 4: Seal and Process the Jars
Working quickly while the brine is still hot, use a clean plastic or wooden tool to slide around the inside of each jar to release any trapped air bubbles.
Wipe the jar rims clean with a damp cloth to remove any brine or food debris, as this prevents a proper seal.
Place the flat lids on each jar and screw the metal bands on finger-tight—snug enough to hold the lid, but not so tight that steam can’t escape during processing.
For shelf-stable pickles, lower the sealed jars into a boiling water canner on a rack, making sure they’re covered by at least 1 inch of boiling water.
Process for 10 minutes after the water returns to a rolling boil.
Step 5: Cool and Store
Using jar lifters, carefully remove the hot jars from the canner and place them on a clean kitchen towel, spacing them apart so air can circulate.
Let them cool completely at room temperature for 12-24 hours without moving them—you’ll hear the satisfying ‘pop’ as each lid seals as it cools.
Once cooled, check that each lid is concave (curved inward), which indicates a proper seal.
Any jars that didn’t seal should be refrigerated and used within a few weeks.
Sealed jars can be stored in a cool, dark place for up to a year.


I have read through several times and I cannot find where in the recipe it says how many jars you need and what size.
Says 2 quarts