Finding the perfect treat to celebrate Valentine’s Day with your loved ones can feel like a lot of pressure. After all, you want something special that shows you care, but you also don’t want to spend hours in the kitchen when you could be enjoying the day together, and store-bought cookies just don’t have that homemade touch.
Luckily, these Valentine’s Day chocolate cookies check all the boxes: they’re sweet and romantic with their chocolate-strawberry combination, easy enough to whip up in under an hour, and use simple ingredients you probably already have in your pantry.

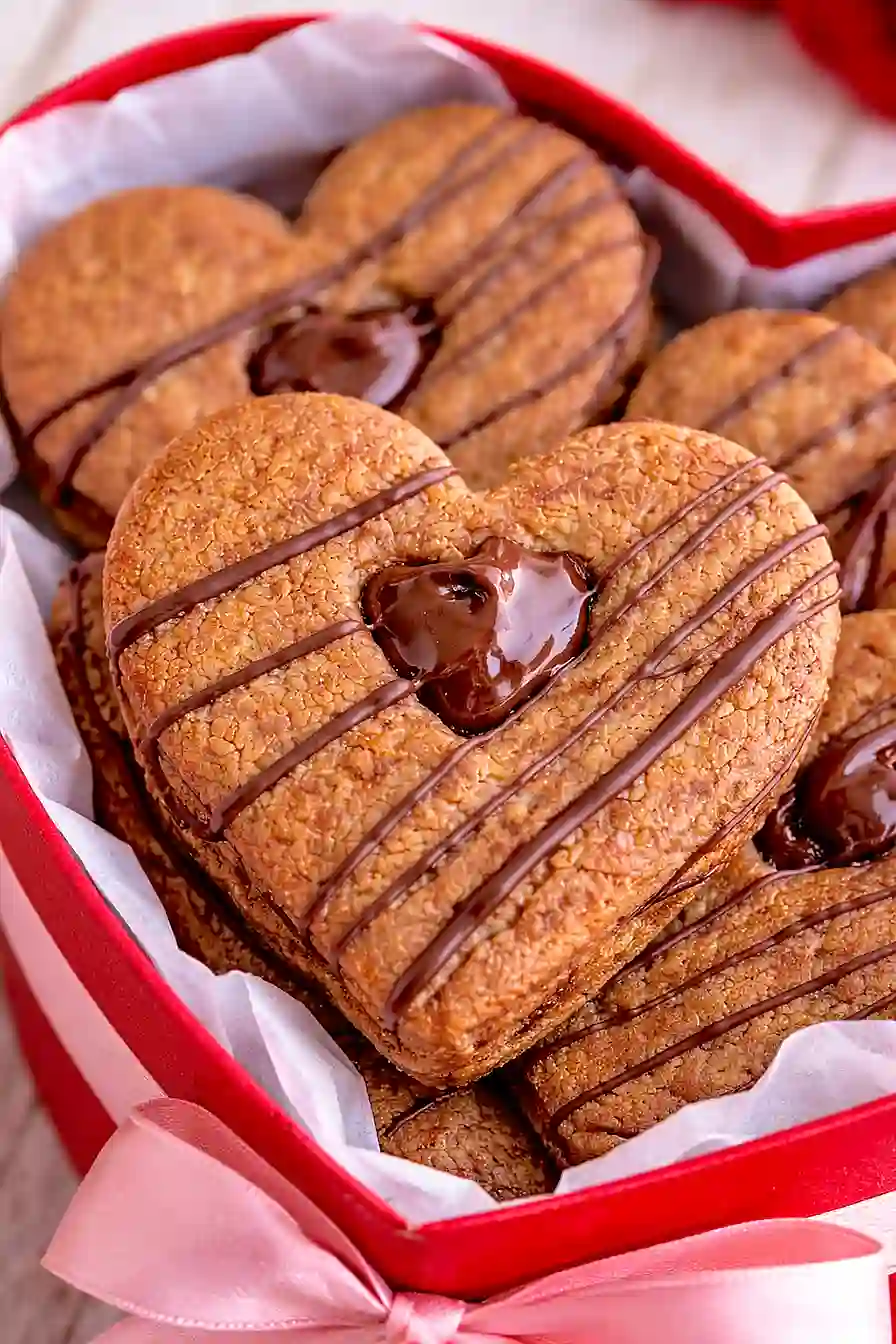
Why You’ll Love These Valentine’s Day Chocolate Cookies
- Perfect for gifting – These cookies make a thoughtful homemade gift for Valentine’s Day that shows you put in the effort, and they look just as good as they taste.
- Simple pantry ingredients – You probably already have most of these items in your kitchen, so no need for a special shopping trip.
- Fun flavor combinations – The dark chocolate, strawberry jam, and Nutella give you options to customize each cookie or make a variety that everyone will enjoy.
- Great for baking with kids – The straightforward steps make this a fun activity to do together, and kids love helping fill the cookies with their favorite flavors.
What Kind of Chocolate Should I Use?
For these Valentine’s Day cookies, you’ll want to use good quality dark chocolate since it’s one of the star flavors. The recipe calls for 2 squares of dark chocolate, which typically means baking chocolate bars that come pre-divided into 1-ounce squares. You can use anywhere from 60% to 70% cacao depending on how intense you want the chocolate flavor – the higher the percentage, the less sweet and more rich it’ll taste. If you don’t have baking chocolate squares on hand, you can also chop up a dark chocolate bar into small pieces, just measure out about 2 ounces total.

Options for Substitutions
These chocolate cookies are pretty forgiving when it comes to swaps, so here are some options if you need them:
- Butter: You can use margarine or coconut oil in place of butter. If using coconut oil, measure it in its solid state and expect a slightly different texture and a hint of coconut flavor.
- Dark chocolate: Milk chocolate or semi-sweet chocolate chips work just fine here. You can also use chocolate chips instead of chocolate squares – just use about ⅓ cup.
- Strawberry jam: Any jam or preserve you like will work – try raspberry, cherry, or even apricot for a different flavor. Just make sure it’s not too runny.
- Nutella: Other chocolate hazelnut spreads work great, or you can use peanut butter, almond butter, or even cookie butter for a fun twist.
- Milk: Any type of milk works here – whole, 2%, almond, oat, or soy milk will all do the job.
- Vanilla: If you’re out of vanilla extract, you can skip it or use almond extract instead, but use only ¼ teaspoon as it’s stronger.
Watch Out for These Mistakes While Baking
The biggest mistake people make with chocolate cookies is skipping the chilling step, which leads to cookies that spread too much and lose their shape in the oven – those 2-3 hours in the fridge are necessary for the dough to firm up and hold its form.
Another common error is rolling the dough too thin or too thick without adjusting baking time, so if you go with 1/8 inch thickness, stick to 10 minutes, and if you prefer thicker 1/4 inch cookies, give them the full 12 minutes to avoid underbaked centers or burnt edges.
When melting your dark chocolate, use low heat or short microwave bursts to prevent it from seizing up and becoming grainy, and make sure it cools slightly before adding it to your butter mixture so it doesn’t scramble the egg.
Finally, resist the urge to add your jam or Nutella filling while the cookies are still warm – wait until they’re completely cool on the rack, otherwise your toppings will melt and slide right off.
What to Serve With Chocolate Cookies?
These chocolate cookies are perfect on their own, but they really shine when paired with a cold glass of milk or a hot cup of coffee. If you’re putting together a Valentine’s Day dessert spread, set them out alongside fresh strawberries and whipped cream for dipping. You could also crumble them over vanilla ice cream for an easy dessert, or pack them up in a cute box with some chocolate truffles and candies for a sweet gift. For a cozy night in, serve them warm with hot chocolate topped with marshmallows.
Storage Instructions
Store: Keep your chocolate cookies in an airtight container at room temperature for up to 5 days. If you’ve filled them with jam and Nutella, I’d recommend storing them in the fridge instead, where they’ll stay fresh for about a week.
Freeze: These cookies freeze really well, especially if you freeze them unfilled. Just stack them with parchment paper between layers in a freezer bag and they’ll keep for up to 3 months. You can also freeze them already filled, though the texture might be slightly softer when thawed.
Serve: If you’re serving frozen cookies, let them thaw at room temperature for about 30 minutes. They taste great straight from the fridge too, especially on a warm day when you want a cool treat!
| Preparation Time | 20-30 minutes |
| Cooking Time | 10-15 minutes |
| Total Time | 200-240 minutes |
| Level of Difficulty | Medium |
| Servings | 24 cookies |
Estimated Nutrition
Estimated nutrition for the whole recipe (without optional ingredients):
- Calories: 2300-2500
- Protein: 25-30 g
- Fat: 90-100 g
- Carbohydrates: 340-360 g
Ingredients
For the dough:
- 2 cups flour (I always use King Arthur all-purpose flour)
- 1 tsp baking powder
- 1/4 tsp baking soda
- 1/4 tsp salt
- 1/2 cup butter (I like Kerrygold unsalted butter for this)
- 1 cup sugar
- 1 tsp vanilla
- 1 egg
- 2 oz dark chocolate (melted and cooled to room temperature)
- 4 tbsp milk
For the filling:
- 1/4 cup strawberry jam (I use Bonne Maman for the best fruit flavor)
- 1/4 cup Nutella
Step 1: Prepare Mise en Place and Dry Ingredients
- 2 oz dark chocolate
- 2 cups flour
- 1 tsp baking powder
- 1/4 tsp baking soda
- 1/4 tsp salt
Melt the dark chocolate and set it aside to cool to room temperature—this is crucial because adding warm chocolate to butter will cause it to separate and affect your cookie texture.
While the chocolate cools, whisk together the flour, baking powder, baking soda, and salt in a small bowl.
Having everything measured and ready before you start creaming butter will keep your workflow smooth and prevent overmixing.
Step 2: Cream Butter and Sugar
- 1/2 cup butter
- 1 cup sugar
In a large bowl, beat the softened butter and sugar together for about 3 minutes until the mixture is light, fluffy, and pale in color.
This creaming process incorporates air into the dough, which helps the cookies rise and creates a tender crumb.
Don’t skip this step—it makes a real difference in your final texture.
Step 3: Build the Wet Mixture
- 2 oz dark chocolate
- 1 egg
- 1 tsp vanilla
Add the cooled melted chocolate, egg, and vanilla to the creamed butter and sugar mixture from Step 2.
Stir until everything is well combined and the dough is smooth.
The chocolate should be completely cooled before adding to avoid any separation, and I find adding the egg after the chocolate helps create a more cohesive, silky dough.
Step 4: Combine Wet and Dry Ingredients
- dry ingredient mixture from Step 1
- wet mixture from Step 3
- 4 tbsp milk
Gently fold the dry ingredient mixture from Step 1 into the wet mixture from Step 3 in two additions, stirring just until combined after each addition.
Pour in the milk while mixing, incorporating it gradually to create a smooth, workable dough.
Be careful not to overmix once you add the flour, as this can lead to tough cookies.
Step 5: Chill the Dough
Cover the dough and refrigerate for 2-3 hours until it’s firm enough to roll out without sticking.
This chilling time allows the gluten to relax and the flavors to develop, which results in better-shaped cookies with less spreading during baking.
Step 6: Roll, Cut, and Bake
- dough from Step 5
Preheat your oven to 350°F.
On a lightly floured surface, roll the chilled dough to either 1/8 inch thickness for thinner, crispier cookies or 1/4 inch for softer, cake-like cookies.
Cut into heart shapes or your desired Valentine’s theme shapes and place on a parchment-lined baking sheet.
Bake for 10 minutes if rolled thin, or 12 minutes if rolled thicker, until the edges are just set but the centers still have a slight give.
Step 7: Cool and Add Toppings
- baked cookies from Step 6
- 1/4 cup strawberry jam
- 1/4 cup Nutella
Transfer the cookies to a wire rack to cool completely.
Once cooled, sandwich pairs together with strawberry jam and Nutella, or spread either topping on individual cookies.
For the best presentation, I like to use a small offset spatula to spread the jam and Nutella evenly, and the cooled cookies hold up beautifully without any crumbling.

Tasty Valentine's Day Chocolate Cookies
Ingredients
For the dough::
- 2 cups flour (I always use King Arthur all-purpose flour)
- 1 tsp baking powder
- 1/4 tsp baking soda
- 1/4 tsp salt
- 1/2 cup butter (I like Kerrygold unsalted butter for this)
- 1 cup sugar
- 1 tsp vanilla
- 1 egg
- 2 oz dark chocolate (melted and cooled to room temperature)
- 4 tbsp milk
For the filling::
- 1/4 cup strawberry jam (I use Bonne Maman for the best fruit flavor)
- 1/4 cup Nutella
Instructions
- Melt the dark chocolate and set it aside to cool to room temperature—this is crucial because adding warm chocolate to butter will cause it to separate and affect your cookie texture. While the chocolate cools, whisk together the flour, baking powder, baking soda, and salt in a small bowl. Having everything measured and ready before you start creaming butter will keep your workflow smooth and prevent overmixing.
- In a large bowl, beat the softened butter and sugar together for about 3 minutes until the mixture is light, fluffy, and pale in color. This creaming process incorporates air into the dough, which helps the cookies rise and creates a tender crumb. Don't skip this step—it makes a real difference in your final texture.
- Add the cooled melted chocolate, egg, and vanilla to the creamed butter and sugar mixture from Step 2. Stir until everything is well combined and the dough is smooth. The chocolate should be completely cooled before adding to avoid any separation, and I find adding the egg after the chocolate helps create a more cohesive, silky dough.
- Gently fold the dry ingredient mixture from Step 1 into the wet mixture from Step 3 in two additions, stirring just until combined after each addition. Pour in the milk while mixing, incorporating it gradually to create a smooth, workable dough. Be careful not to overmix once you add the flour, as this can lead to tough cookies.
- Cover the dough and refrigerate for 2-3 hours until it's firm enough to roll out without sticking. This chilling time allows the gluten to relax and the flavors to develop, which results in better-shaped cookies with less spreading during baking.
- Preheat your oven to 350°F. On a lightly floured surface, roll the chilled dough to either 1/8 inch thickness for thinner, crispier cookies or 1/4 inch for softer, cake-like cookies. Cut into heart shapes or your desired Valentine's theme shapes and place on a parchment-lined baking sheet. Bake for 10 minutes if rolled thin, or 12 minutes if rolled thicker, until the edges are just set but the centers still have a slight give.
- Transfer the cookies to a wire rack to cool completely. Once cooled, sandwich pairs together with strawberry jam and Nutella, or spread either topping on individual cookies. For the best presentation, I like to use a small offset spatula to spread the jam and Nutella evenly, and the cooled cookies hold up beautifully without any crumbling.


